It is amazing how many different mousetrap designs have been made over the centuries. Some designs are very fundamental while others utilize hi-tech designs to get the job done. This is my attempt at it.
All of my trap designs described below have caught mice.
I thought I should start to make my mouse trap designs using the least amount of materials possible and then expand on the use of low cost items found in the home, office and workshop.
Please check your catch and release traps twice a day or more often!
Any animal trapped in small containers will soon suffer or potentially die from asphyxiation, exhaustion, starvation, dehydration or hypothermia. I always try to incorporate air passage openings in my designs. You should too!
Countertop Balance Bottle Traps
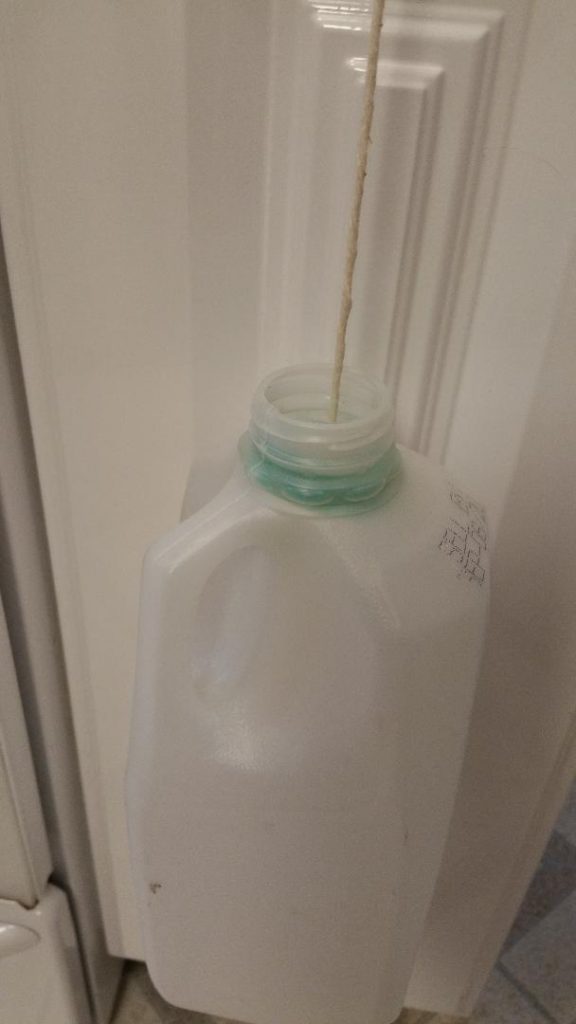
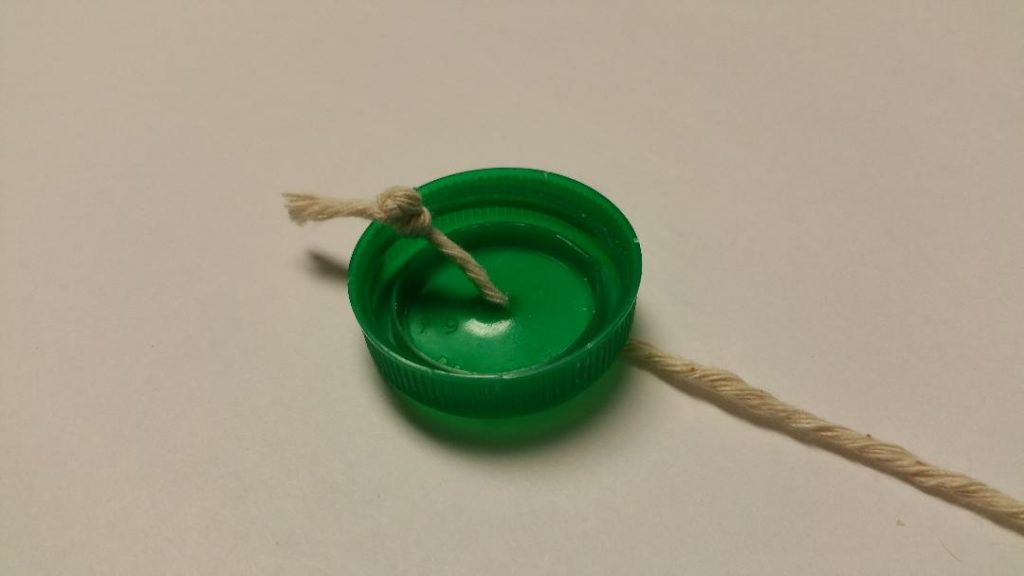
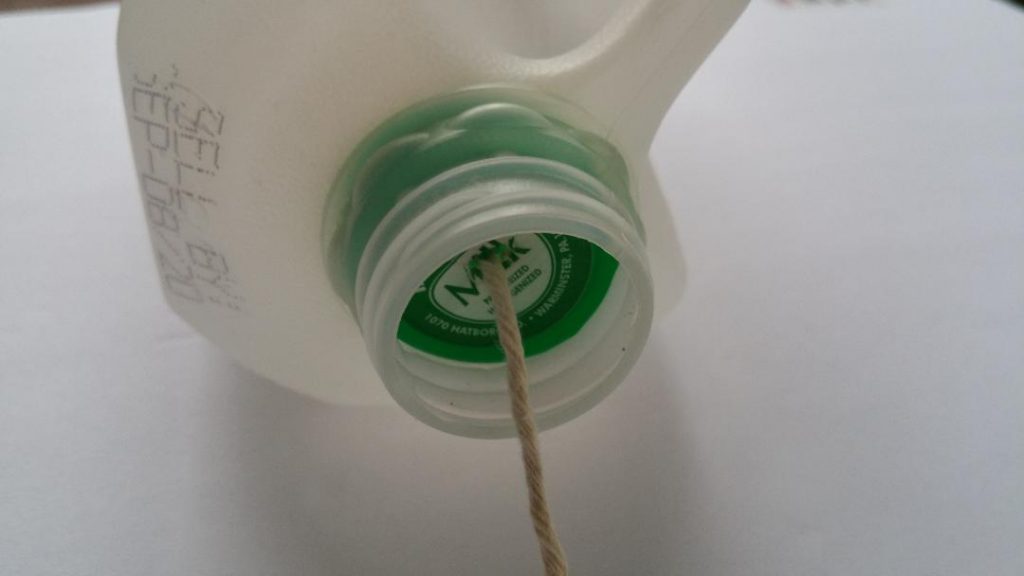
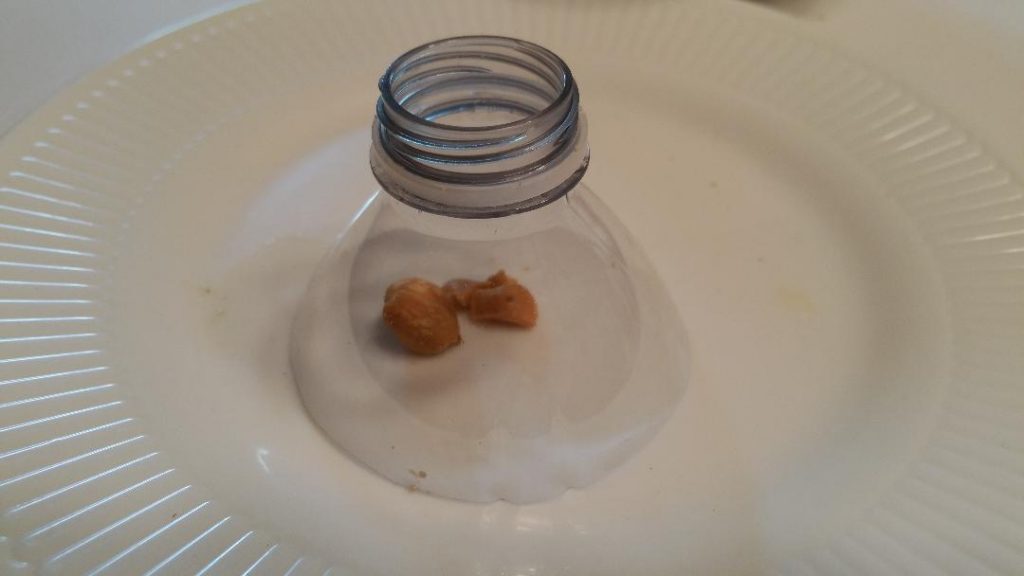
Here are some of my Countertop Balance Bottle Trap designs. The simplest and cheapest is made using a half gallon plastic milk container and a 2-3 foot piece of string. Make a small hole in the center of the container cap and place the string through the hole and tie a large knot at the end of the string. Now squeeze the bottle cap as if to fold it and push it through the container opening. The cap will return to its flat state and cannot be pulled back out of the container opening. The tapered neck of the bottle keeps the cap centered inside the opening. Tie the other end of the string to to a cabinet drawer handle or knob. Make sure the string length is short enough to suspend the container above the floor.
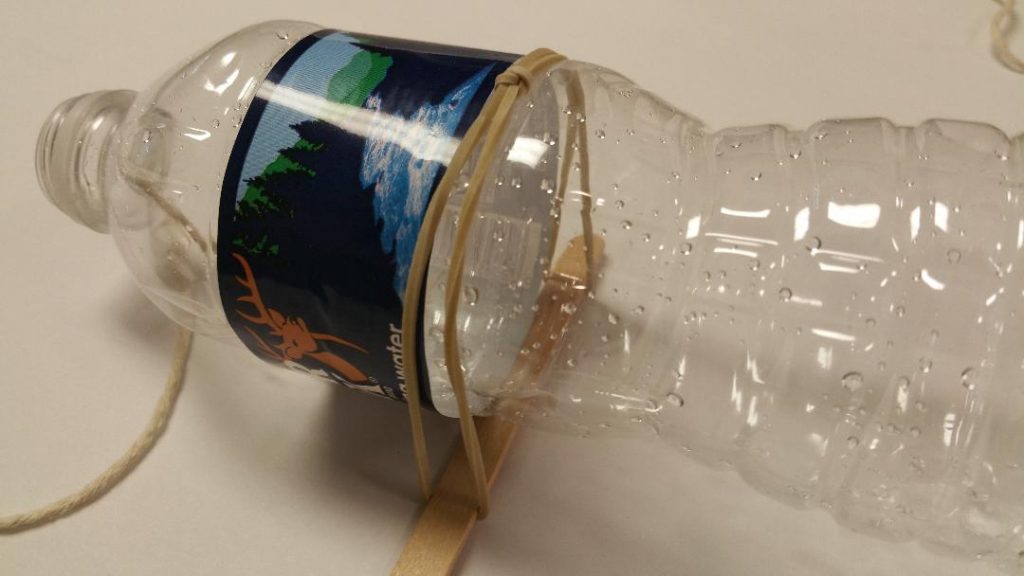
Place a small amount of bait (nuts, cereal, pasta, pretzels, cookies or peanut butter) toward the bottom end of the container and then balance the container at the edge of the counter or shelf. When the mouse enters the container to get the bait it upsets the container balance and then falls towards the floor in the container. The cap and string abruptly stop the container from falling to the floor while simultaneously closing off the container opening. When using cylindrical water bottles place one side next to an object to keep it from rolling side to side, or, stabilize it using a pop sickle stick, wooden skewer, or chopstick and rubber band(s) as shown.


Bowl Traps
Here are some of my bowl traps from the simplest to more advanced. My design objectives with bowl traps are getting the bait placed away from the trap entry points and having a stable trip method.
Note: Place bowl traps over a heavy weight disposable paper plate or other sturdy, portable flat surface to allow you transport the contained mouse.
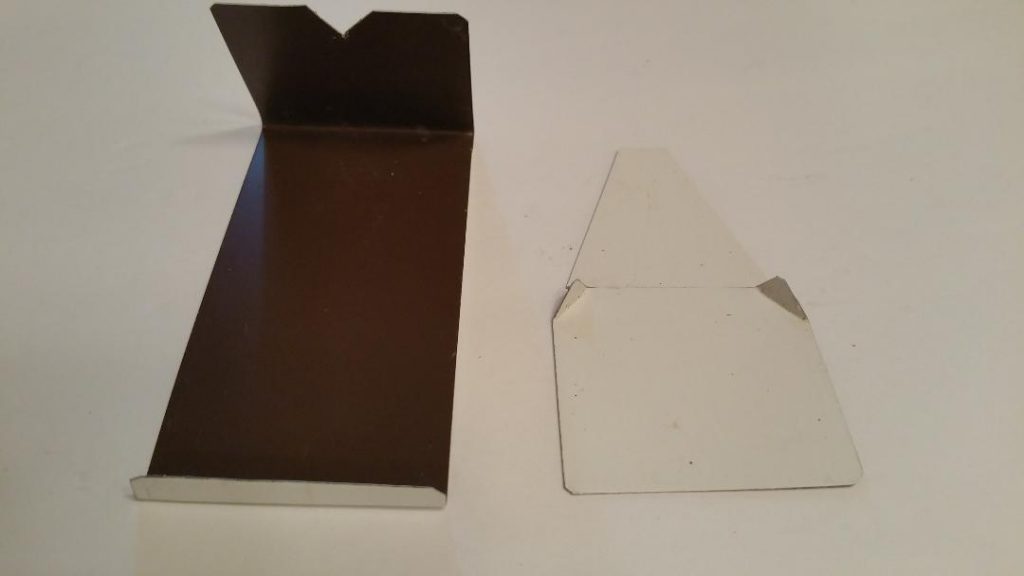
Bowl and business card trap
Fold a business card lengthwise and then fold both the end corners at 45 degrees inwards. The folds of one corner must be squeezed flat on the inside and the other end overlapping to close off the end. Tape the card around the center to maintain a triangular, tubular shape. Put peanut butter under the tightly folded corner ends. Balance the bowl edge over the opposite, closed corner end. The mouse will move the baited end upsetting the bowl’s balance and the bowl will fall over the mouse trapping it underneath.
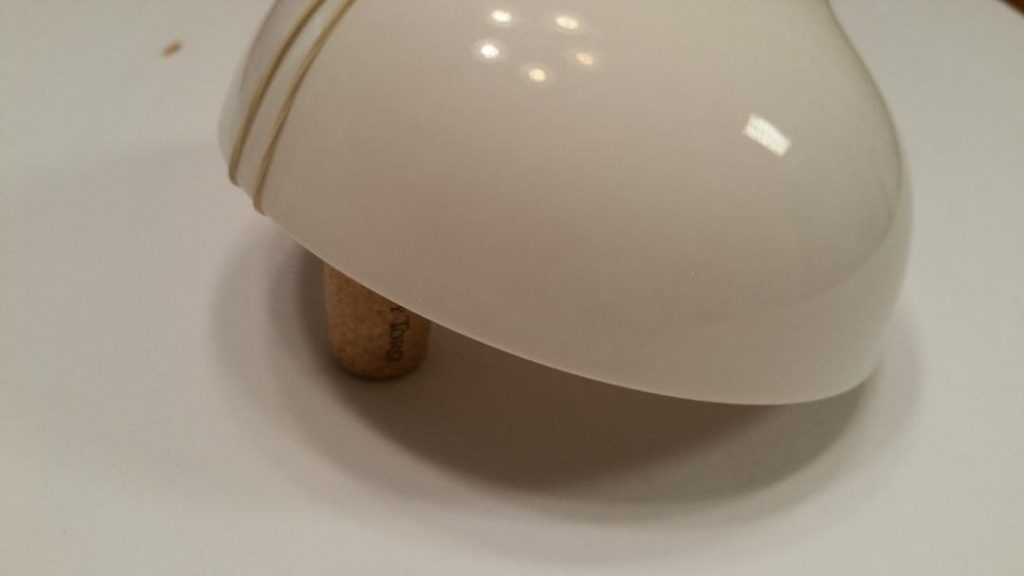
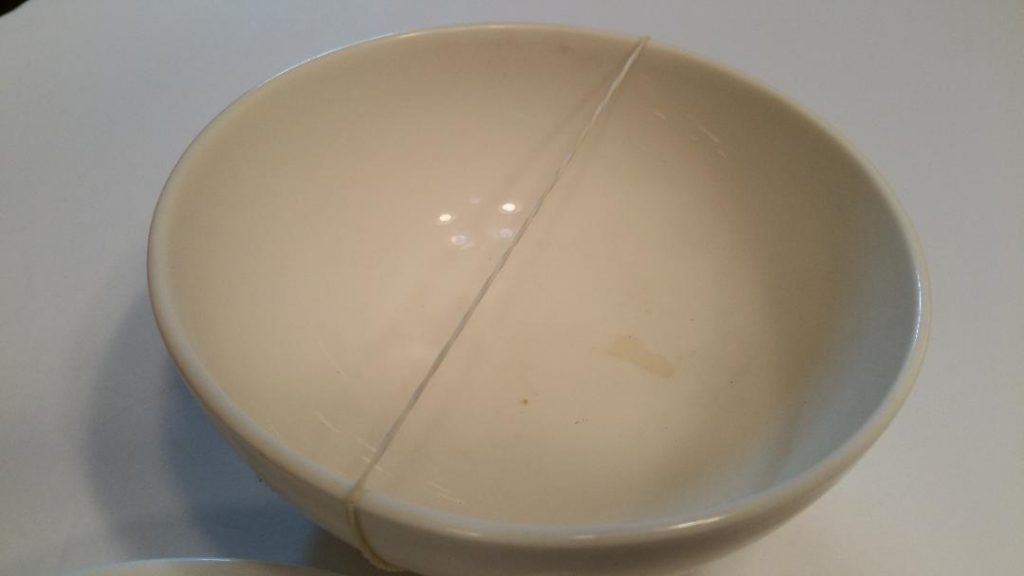
Bowl, rubber band and wine cork trap
Tie two rubber bands together by looping one into the other. Hold a rubber band end in each hand and position the hard bait like you doing a button loop to interlock the rubber bands and bait together. Now, while holding the interlocked bait in place maneuver the rubber bands over the bowl positioning the baited end toward the bowl’s inner edge. Center and spread the rubber bands a little where they come over the bowl edges. Position the bowl over the wine cork so the longer length of the rubber band rests on the top of the wine cork. This holds one end of the bowl up creating a gap for the mouse to enter. The mouse eats the bait in turn breaking the interlocked link of the two rubber bands and the bowl falls over the mouse trapping it underneath.
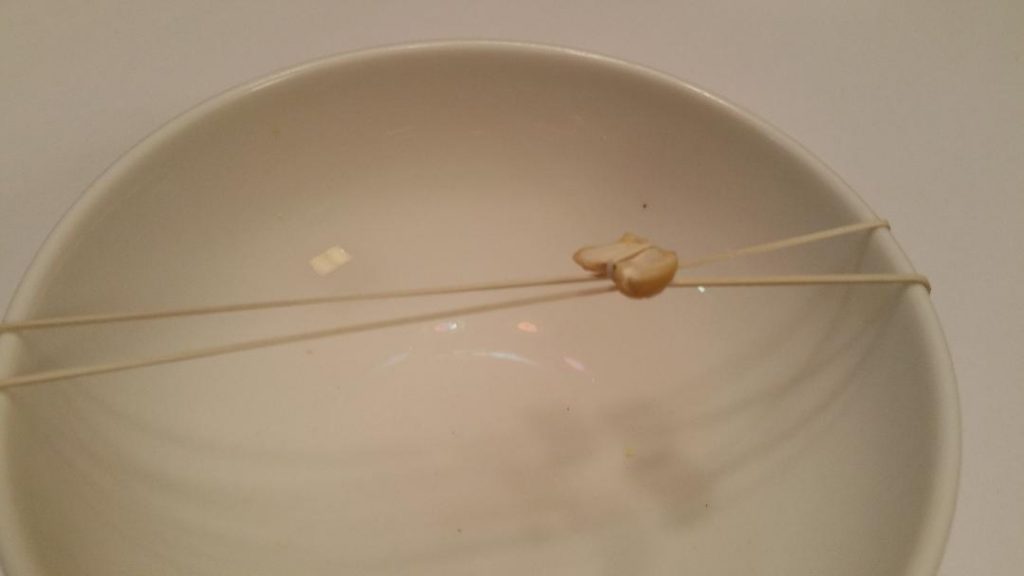
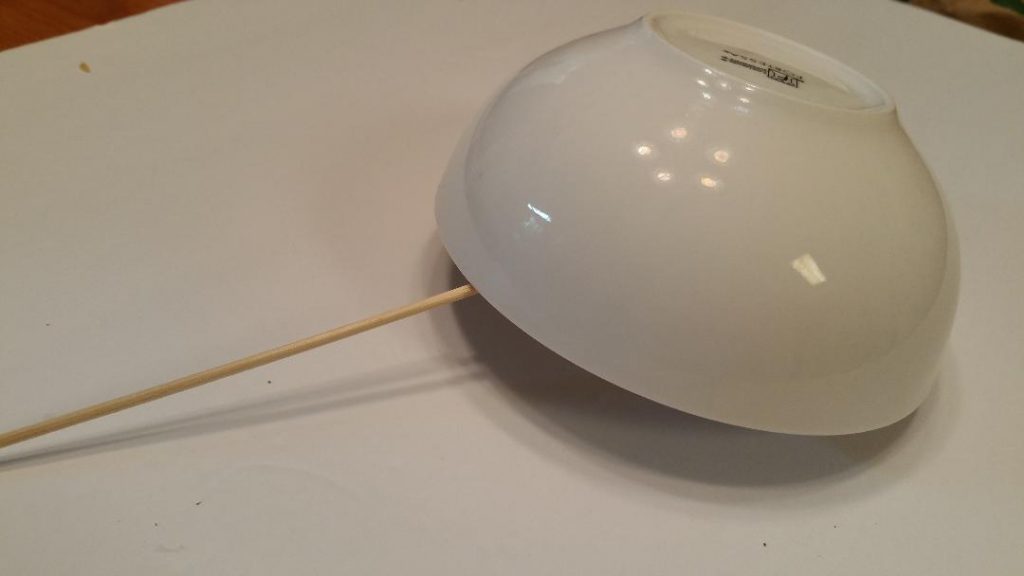
Bowl, skewer, toothpick and Cheerios trap
This design, although very simple, requires a bit of dexterity to set. Hold two toothpicks parallel together and then place both through the hole of a Cheerio (Honey Nut Cheerios make great bait). Center the Cheerio and spread the toothpicks into a crossed position that in turn holds the Cheerio in place. Place and hold an end of the skewer on top of the toothpick cross. With your free hand place the inverted bowl edge over the middle of the skewer. The mouse crawls under the gap, eats the Cheerio and the toothpicks separate causing the supporting skewer and bowl to fall over the mouse trapping it underneath.

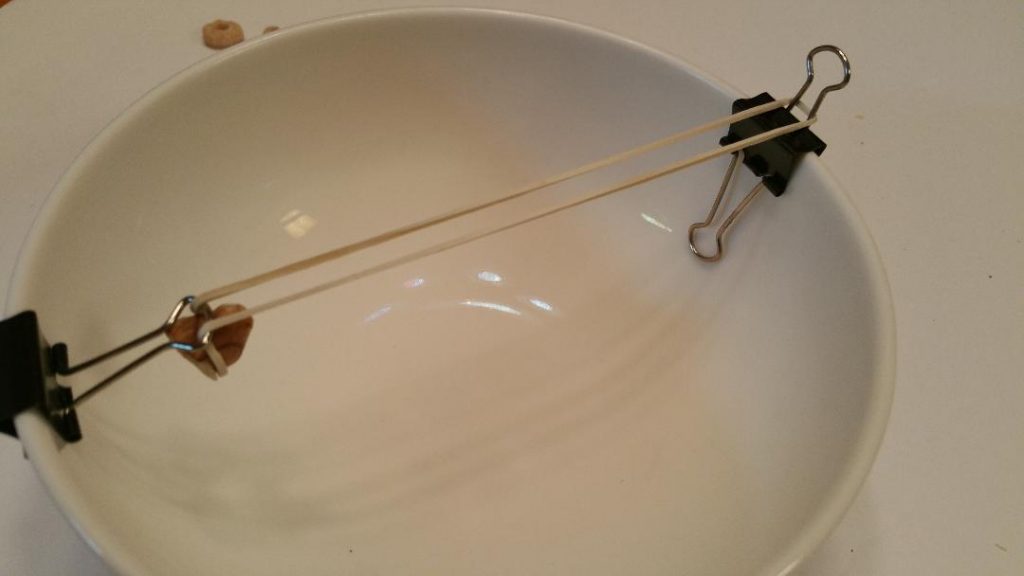
Bowl, binder clips and rubber band trap
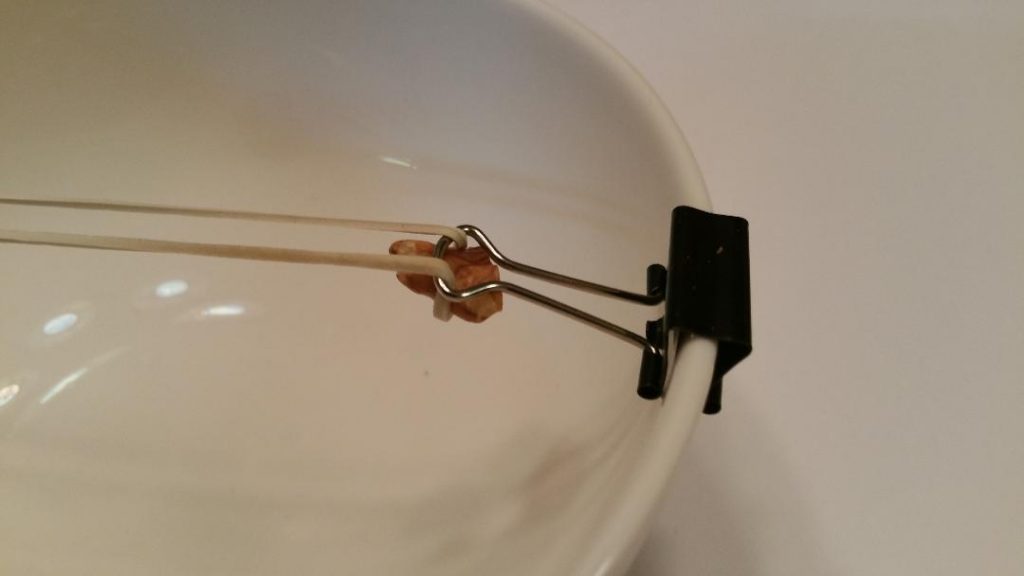
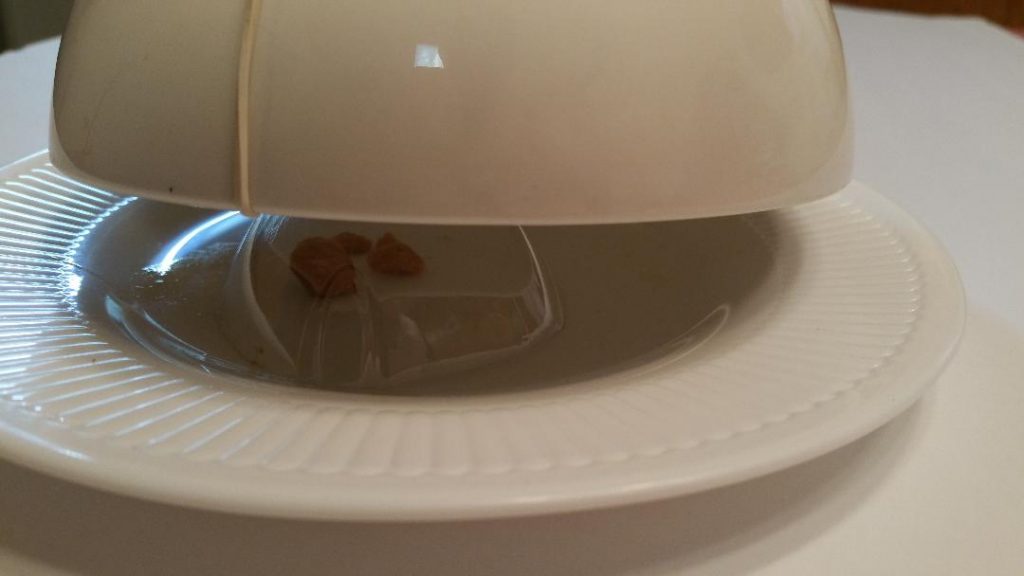
This is my best fail safe bowl trap design! It uses two 1/2″ binder clips as tie points for the rubber band and interlocking bait. This method will also work using wide mouth jars, cooking pots and pans. The bowl’s support/ fall mechanism is one arm of a binder clip. The binder clip arm used as the support/fall mechanism must be loose (floppy). Adjust as needed by squeezing the arm until it can not support the weight of the bowl without the taut rubber band.
The bait is held in place (button loop method) by the rubber band and arm of the opposite binder clip as shown. In this example a piece of walnut is being used as the bait.

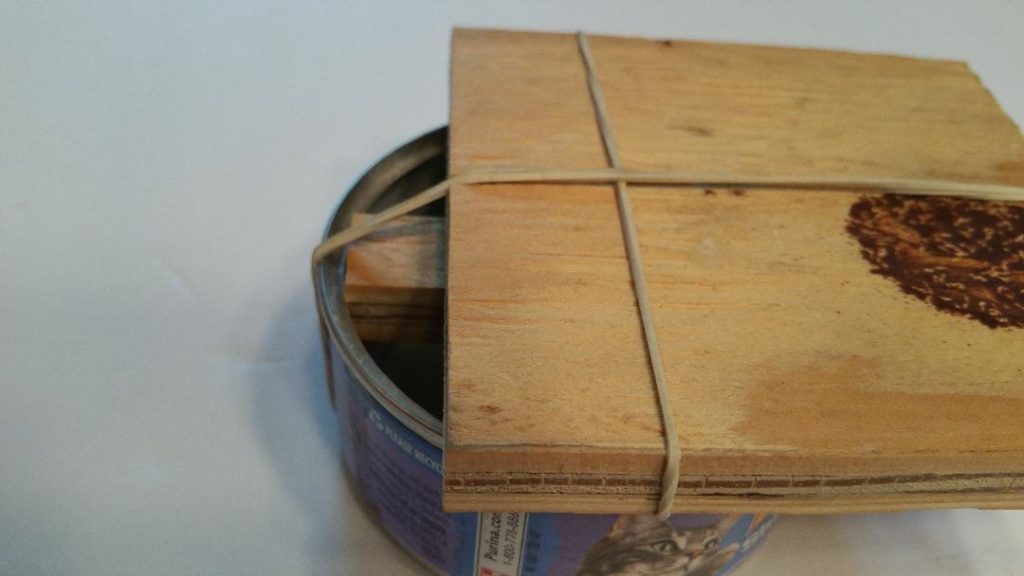
Here is an inverted version that uses a cat food can instead of a bowl and a cover held taut with rubber bands.
Bowl and wire ‘Swing’ trap
This design to prop up the bowl from underneath uses 12 gauge copper electrical wire for the frame and 14 gauge wire for the bait hooks. When the mouse eats the bait the hooks release and the wire prop flattens under the weight of the bowl trapping the mouse. A peanut and also a Honey Nut Cheerio is being used as bait.

Bowl, wood and string ‘Billboard’ trap
Another under bowl prop design made using 1/4″ plywood and string. Expect the trapped mouse to chew the wood so make a few of them or make them out of metal.
Bowl, wire and rubber band ‘Z’ trap
This simple ‘Z’ shaped bowl prop design uses coat hanger wire and a single rubber band. It is set with piece of walnut as bait.
Trap Door Bottle Traps
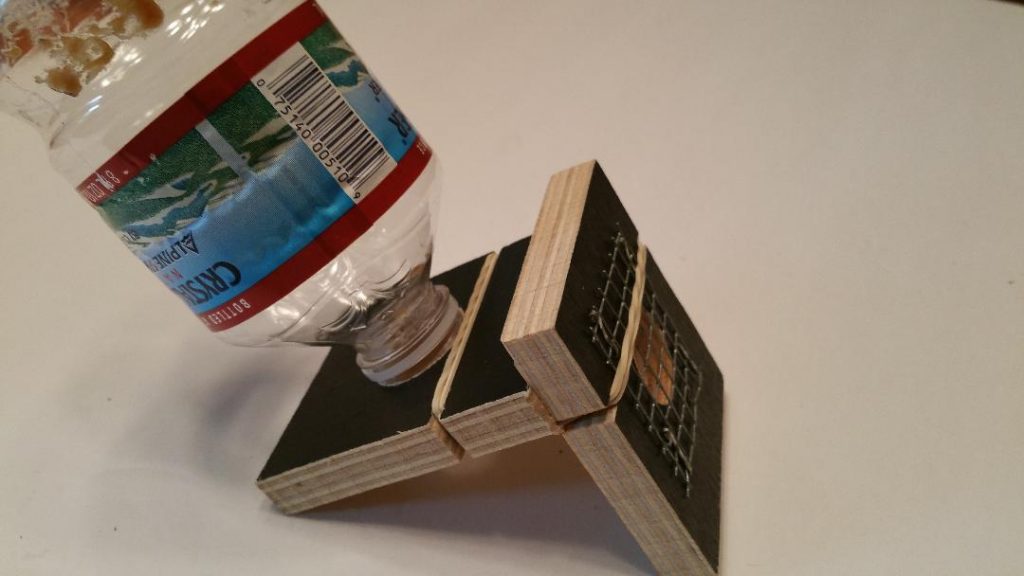
These trap door designs are a little more involved yet require little woodworking skills to make. I used scrap cabinet grade 1/2″ and 1/4″ plywood, some small rubber bands and a 1 inch Forstner bit to drill the holes. I also added screened openings for air exchange but a 1/4″ hole could be used instead. The dimensions are 2-1/2″ X 3″ with the 1 inch hole centered. The slots for the rubber bands are 1 inch from the top edge. The other version shown (using 1/4″ plywood) uses a longer piece of wood as a counter balance for lighter water bottle use. The bottles are hand tight screwed into the holes.
Use one or two rubber bands to get the right amount of closing power while allowing the trap to support the bottle in the standing armed position. The 1/2″ plywood trap has two fixed setup angle positions that change the trap’s arming sensitivity. The 1/4″ plywood versions arming sensitivity is adjustable by moving the smaller piece of plywood up and down on the longer piece. Place peanut butter within the highest point of the bottle. The mouse enters the trap door hole and climbs in the bottle to reach the bait. The weight of the mouse causes the bottle to tip over allowing the trap door to forcefully close and remain closed.
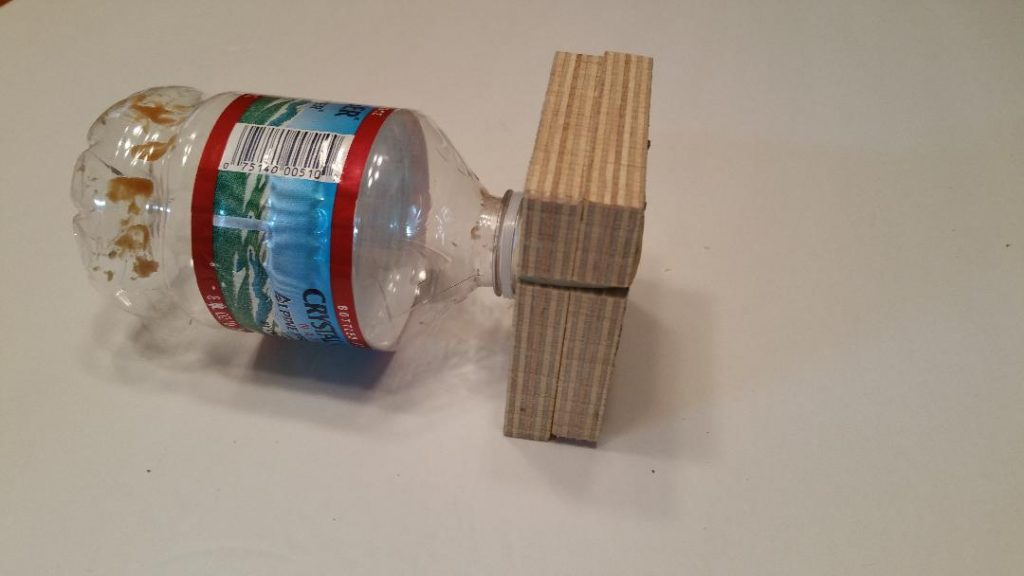
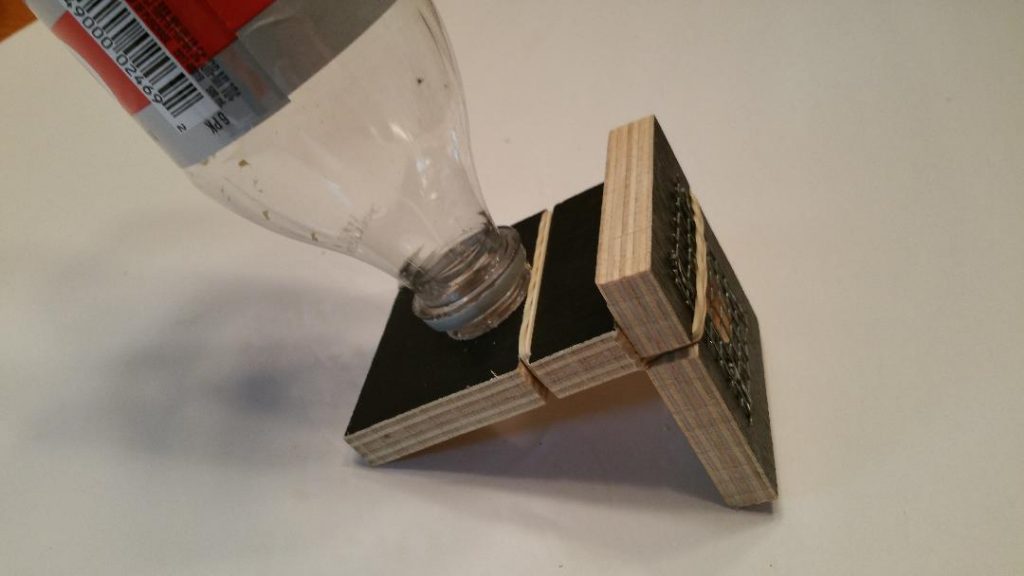
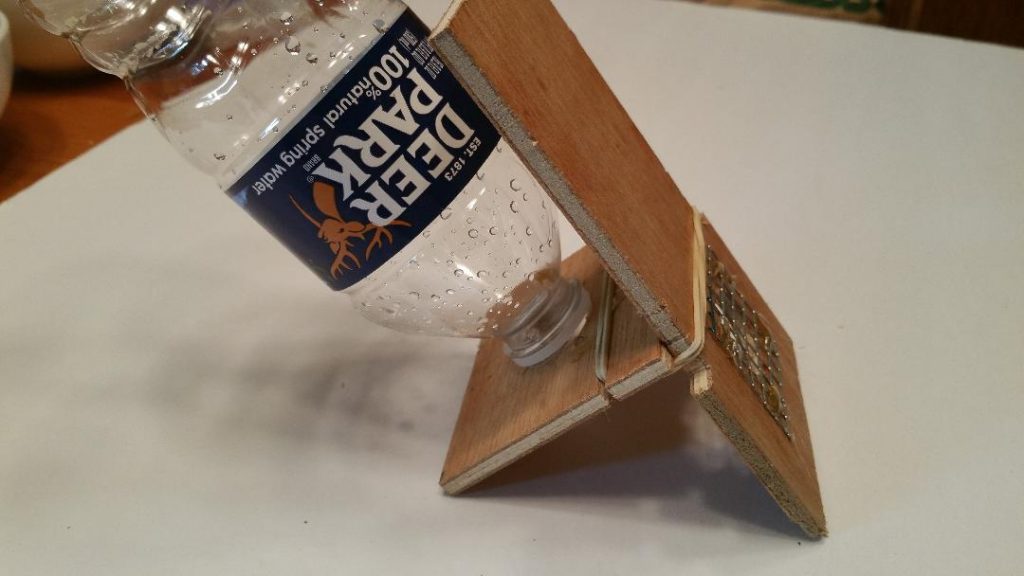
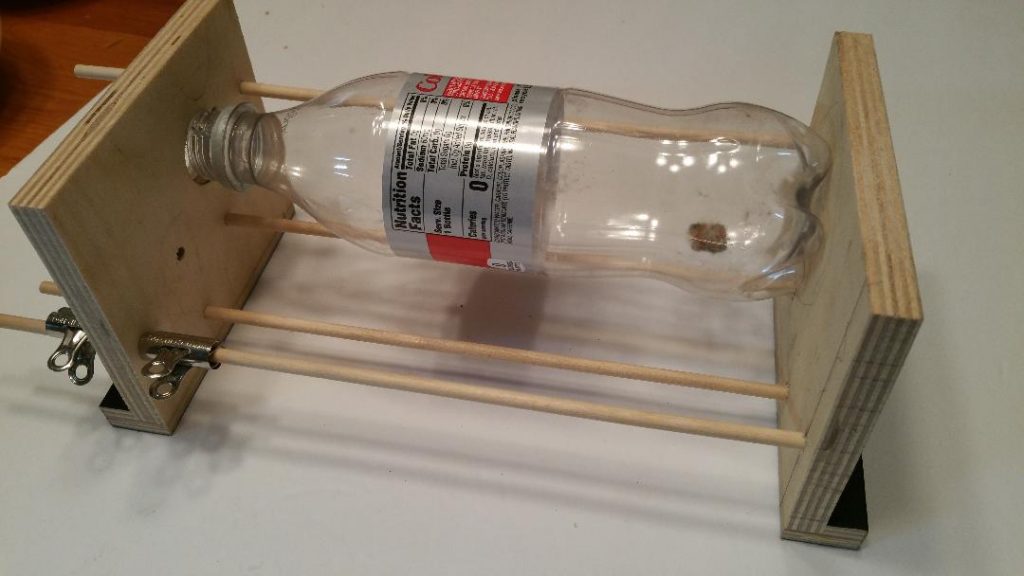
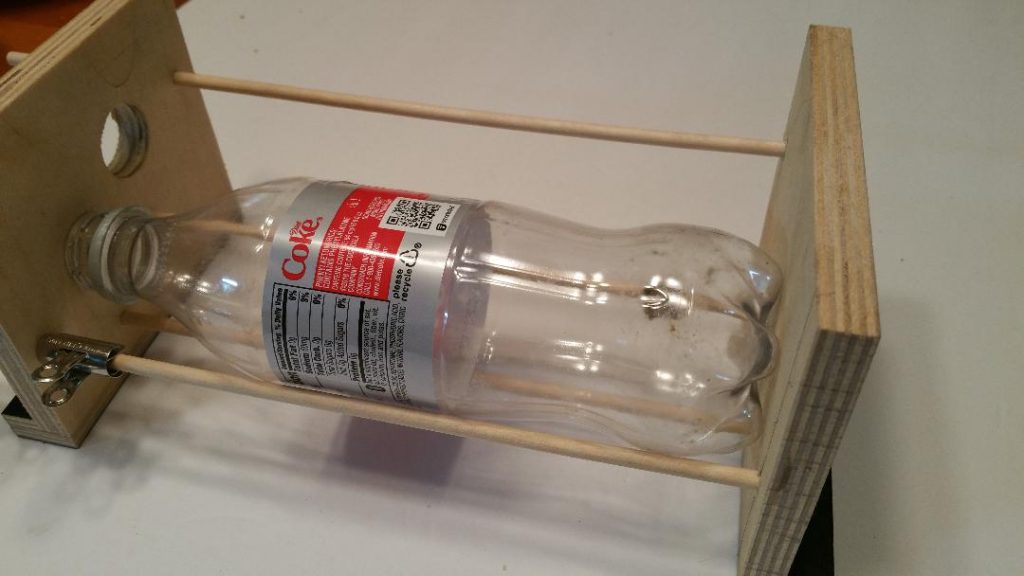
Balance Beam Bottle Trap
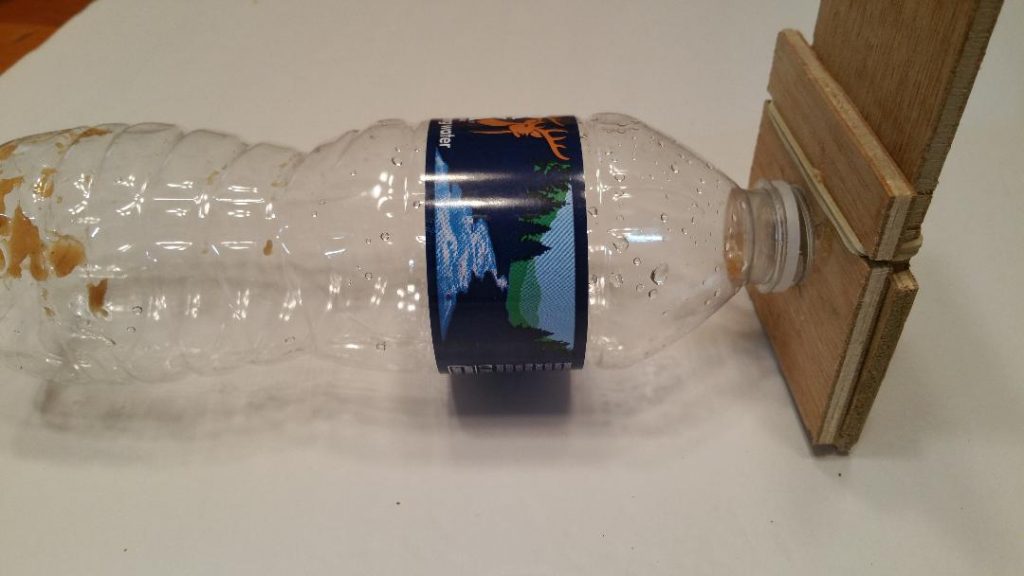
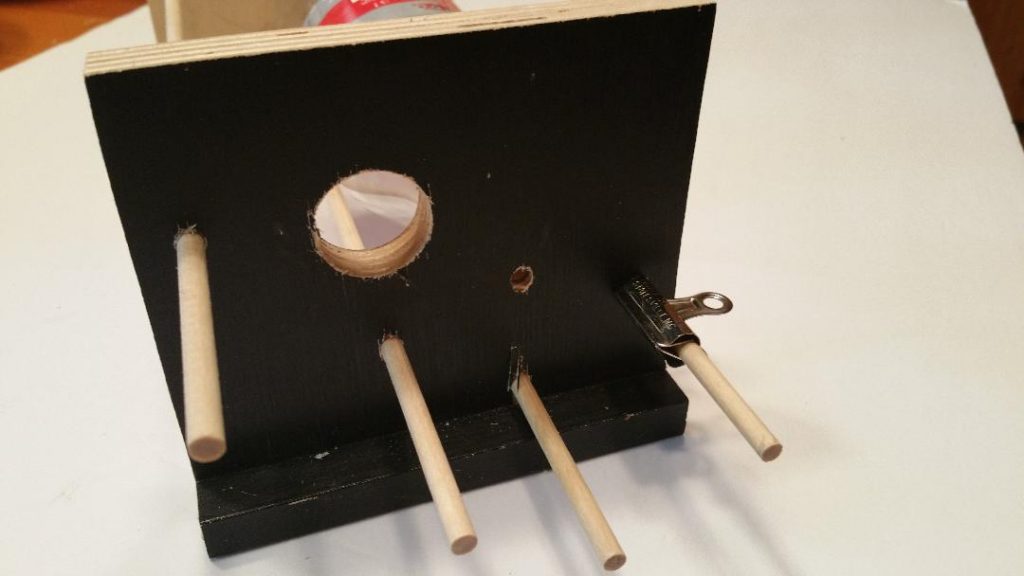
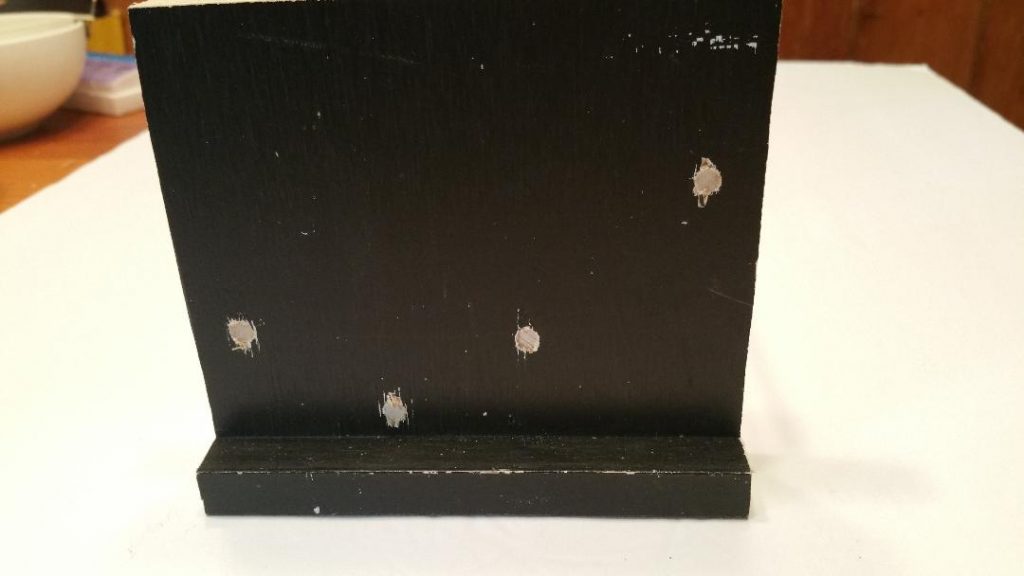
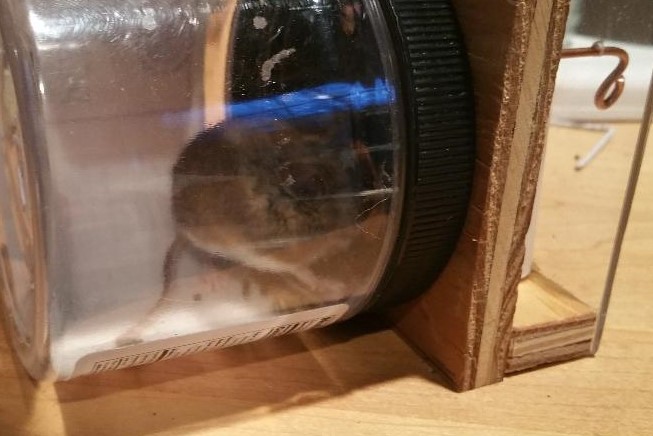
This is my adjustable bottle trap design that lets me use water, soft drink bottles or cans of different lengths and widths. The mouse enters the opening to retrieve the bait at the end of the bottle. When the mouse walks in the bottle the weight of the bottle and mouse shift on the supporting balance beam and the bottle drops to the lower rails blocking off the bottle’s entrance hole. I made this with 1/2″ plywood and 3/16″ dowels. The metal clips hold the sliding plywood side piece parallel to the opposite fixed plywood piece. This trap can also be made from metal or plastic. You should be able to gauge the hole pattern from the last image shown.
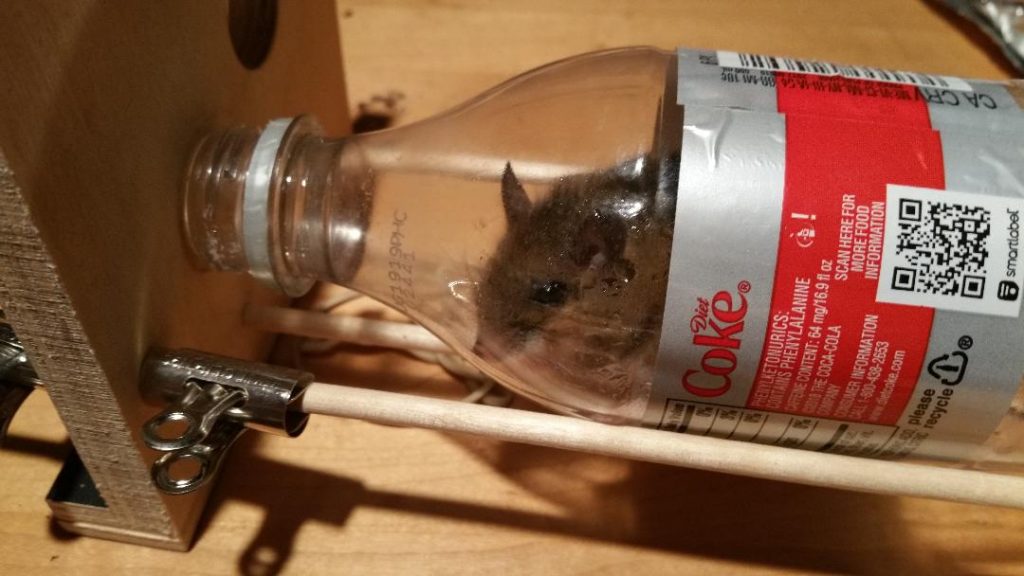
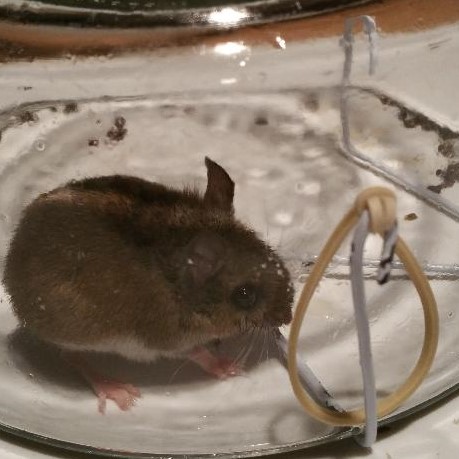
“Patiently waiting for my release.”
Cat Food Can Traps
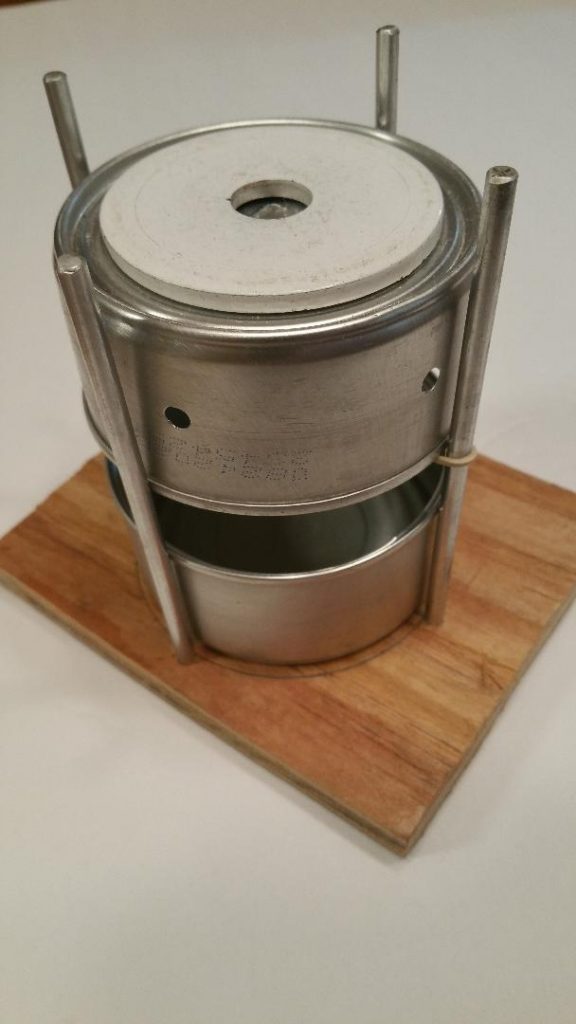
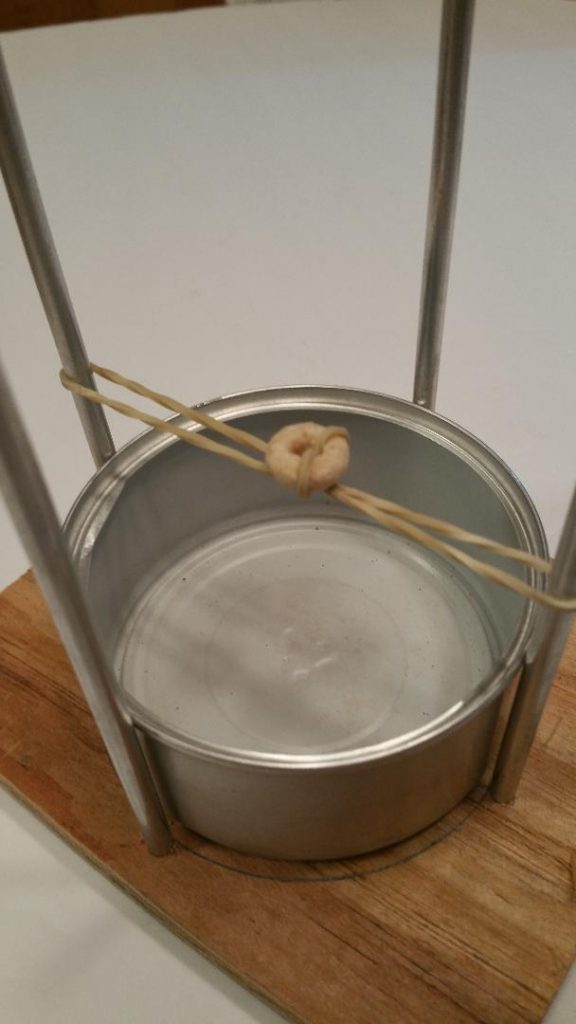
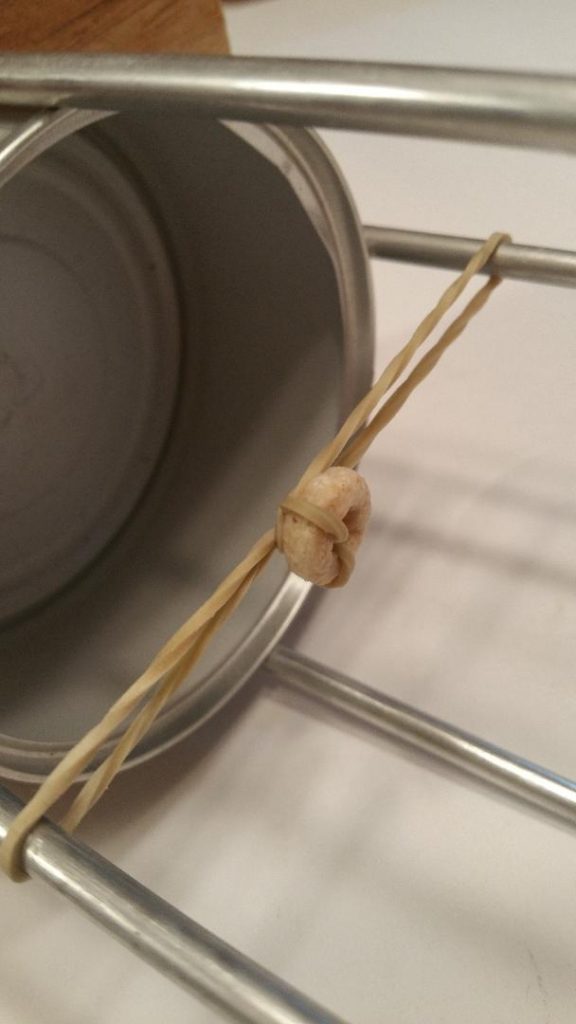
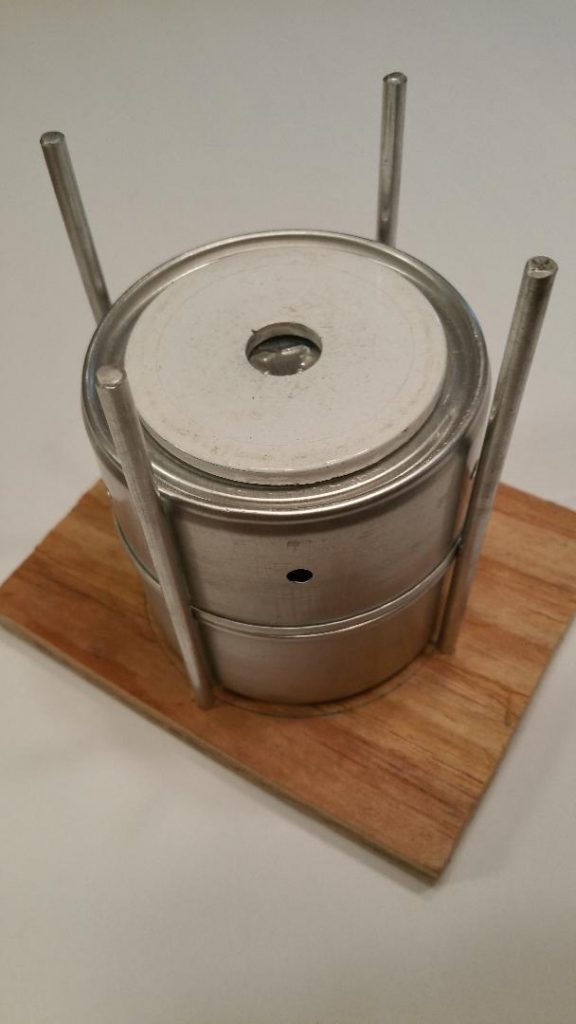
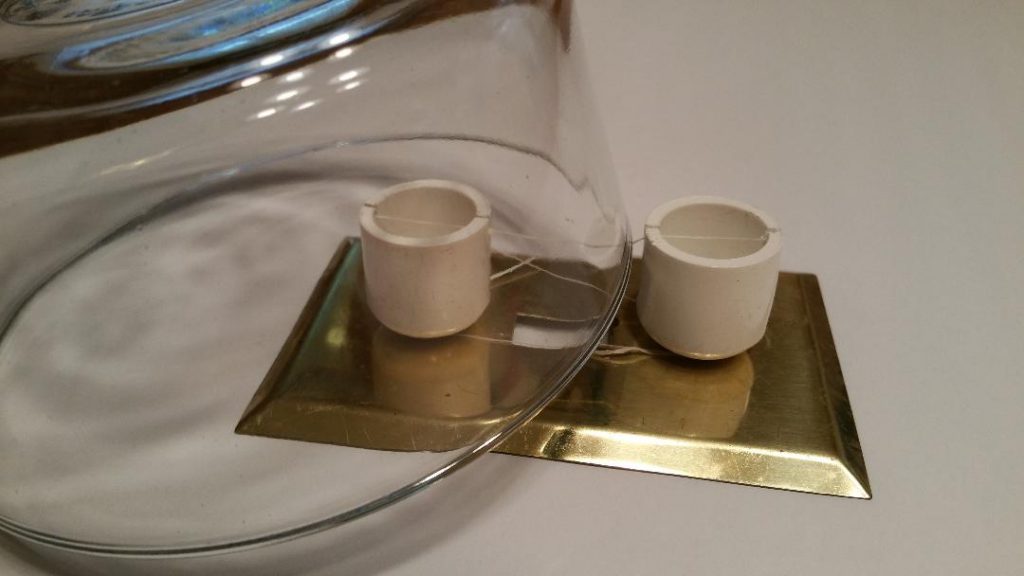
Here are a couple of designs using aluminum cat food cans. The first design uses two small taut rubber bands linked together with the bait to suspend the weighted can above the bottom can. When the rubber bands are stretched between two posts there is enough tension and resulting friction of the rubber bands to suspend the weighted top can in place. The mouse enters between the cans, stands upright to eat the bait causing the rubber bands to separate and the upper can to drop, trapping the mouse inside. The bottom can is easily replaceable to dispose of any mouse droppings. I used aluminum rods for the posts but wooden dowels work just as well. A heavy steel washer is epoxied to the upper can. The second design uses the balance beam method much like the balance beam bottle trap above but uses fewer parts.
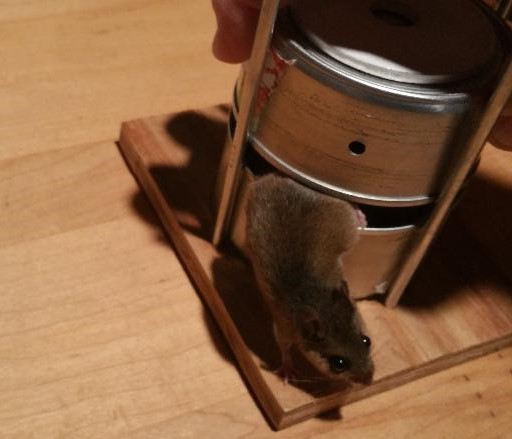
“I’m outta here” 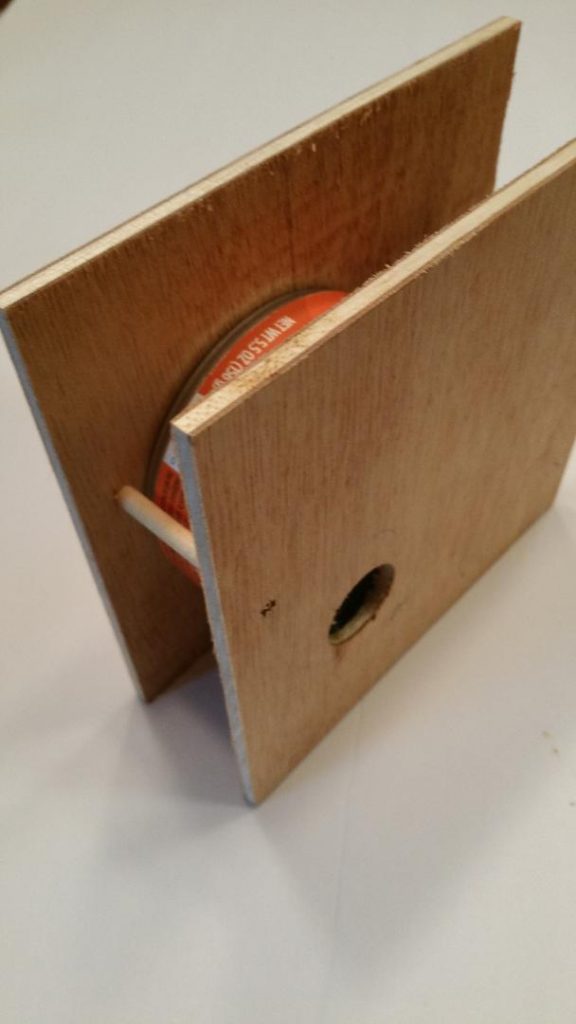
Set (upper) position. 
Tripped (lower) position. 
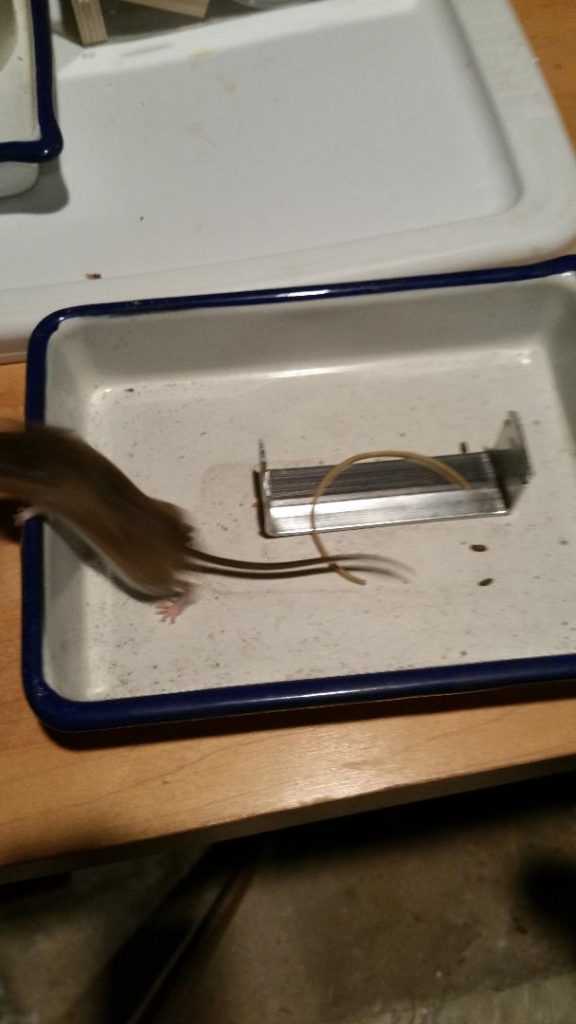
Electrical Junction Box Mouse Trap
Used electrical boxes are great to use instead of bowls. They are heavy and have multiple openings for air exchange. I used a flattened piece of aluminum door threshold trim and a rubber band to make this design. Cut one vertical deep notch on the bait holding end and two shallow opposing, horizontal notches on the opposite end to hold the taut rubber band.
A single device junction box. 
Sling Shot Mouse Trap
This unique design uses a bowl, single rubber band and a metal coat hanger to make. Any solid bait that can hold the rubber band against the small end of the sling shot will work. A piece of a cookie and peanut is used in the below examples. The coat hanger wire length is about 14 inches. 12 gauge copper electrical wire also works well.
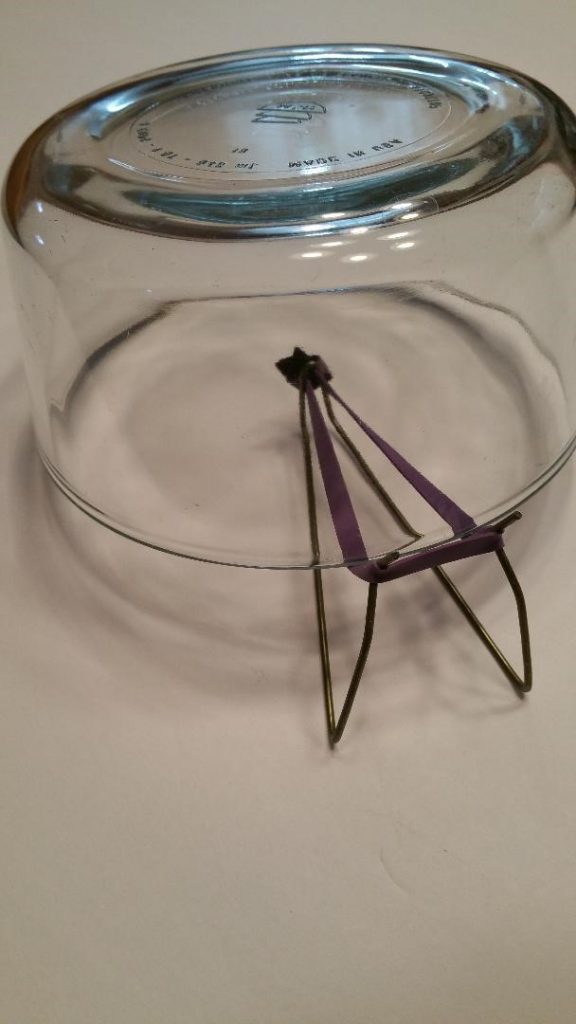

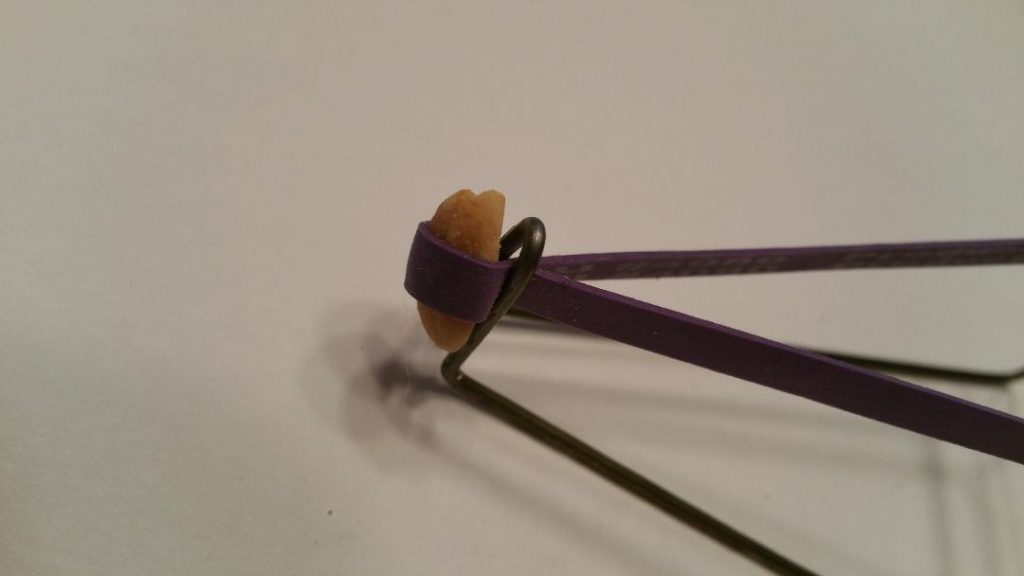
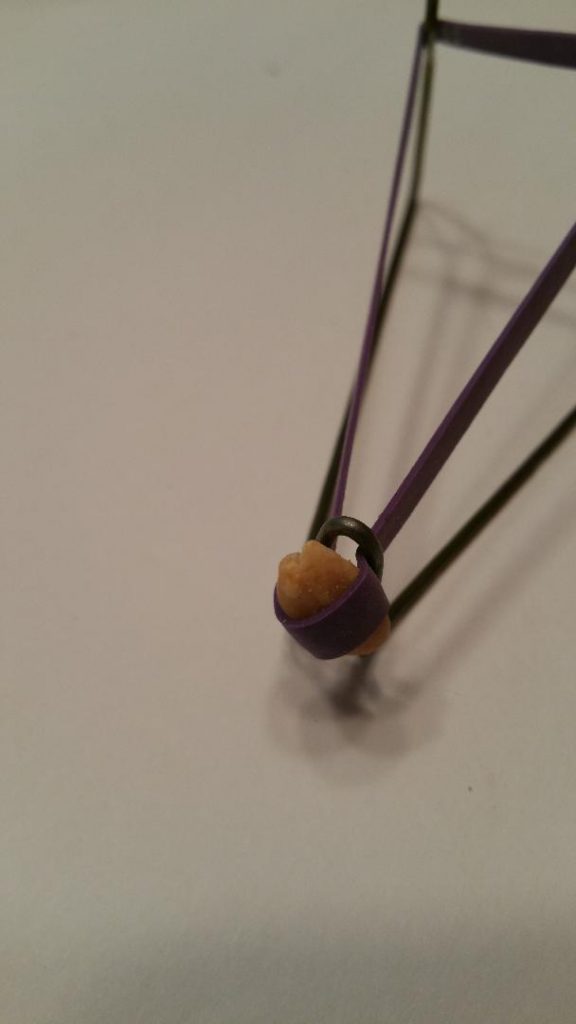
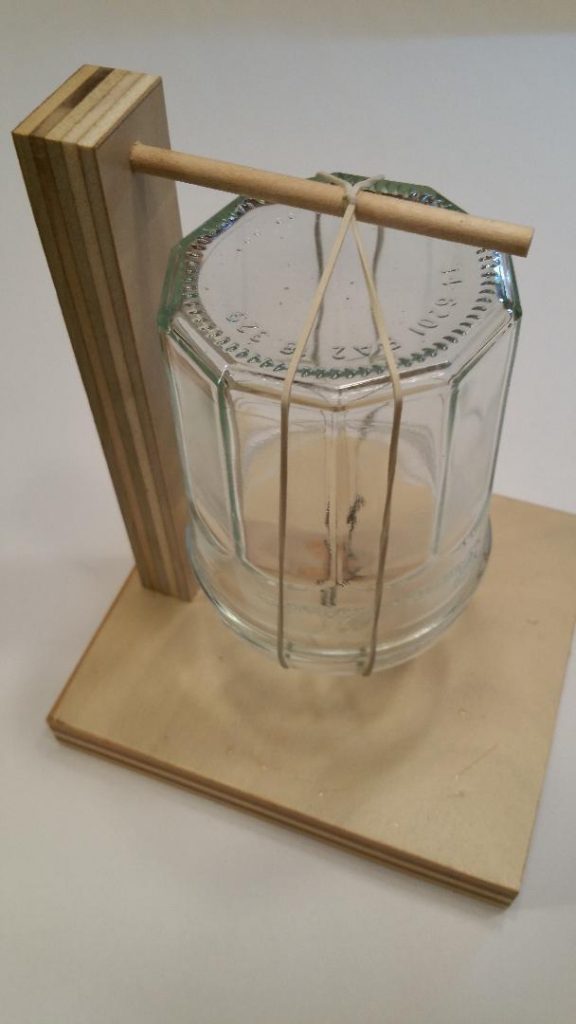
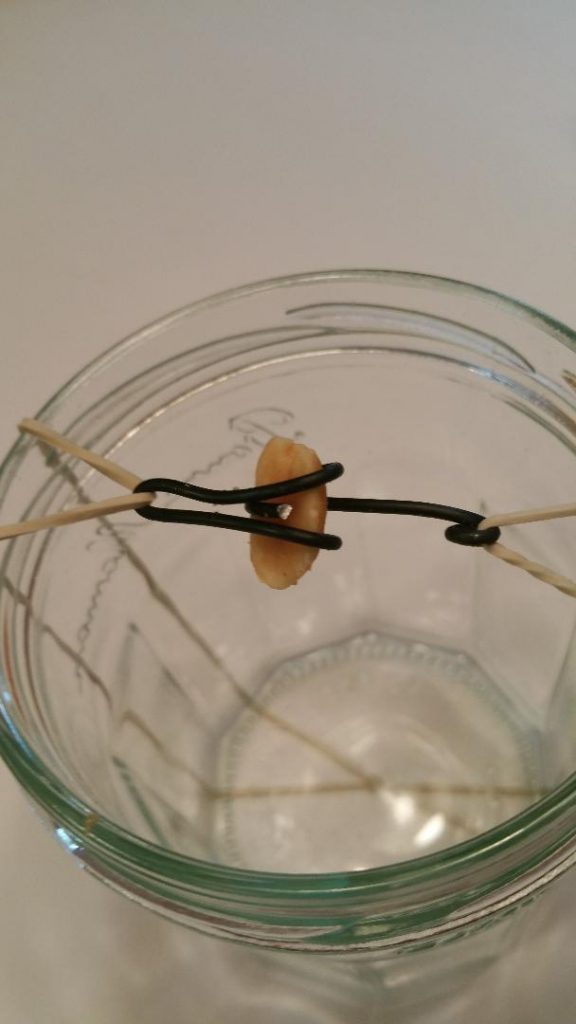
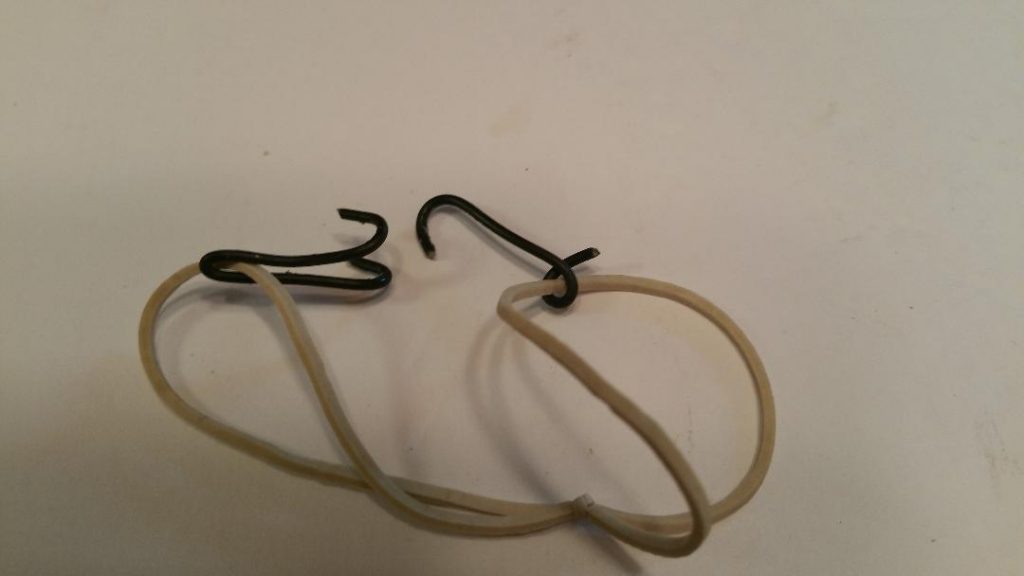
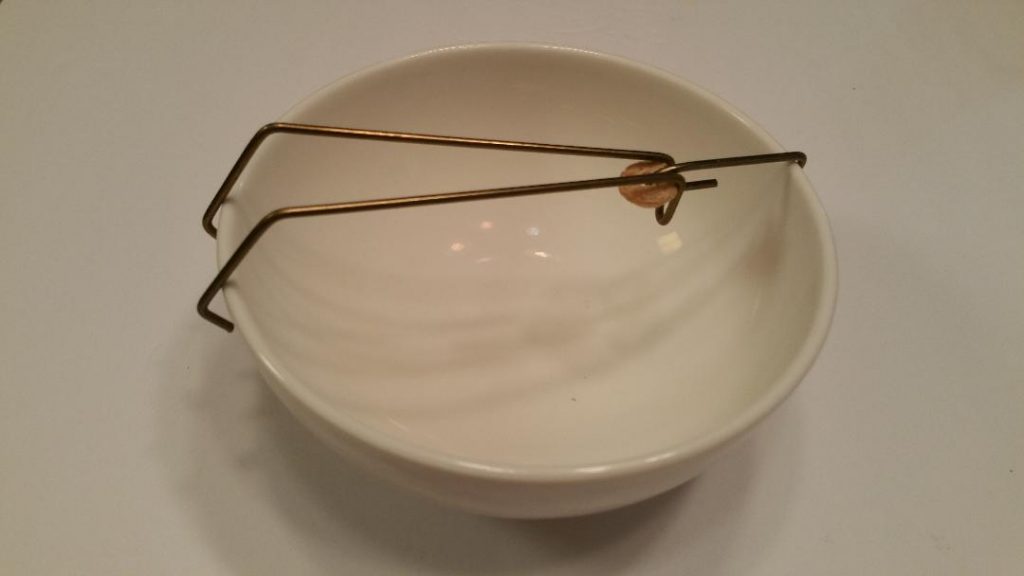
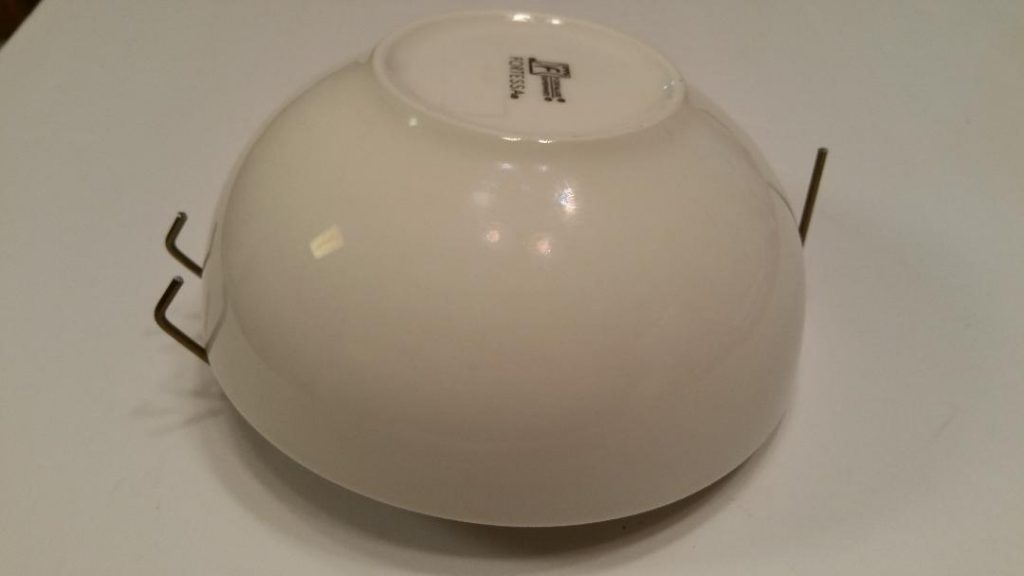
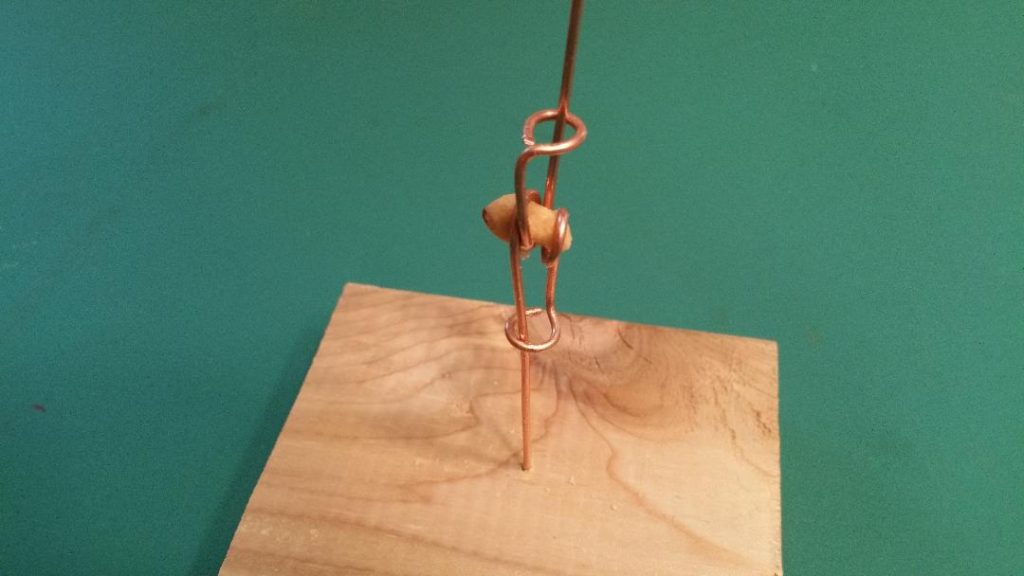
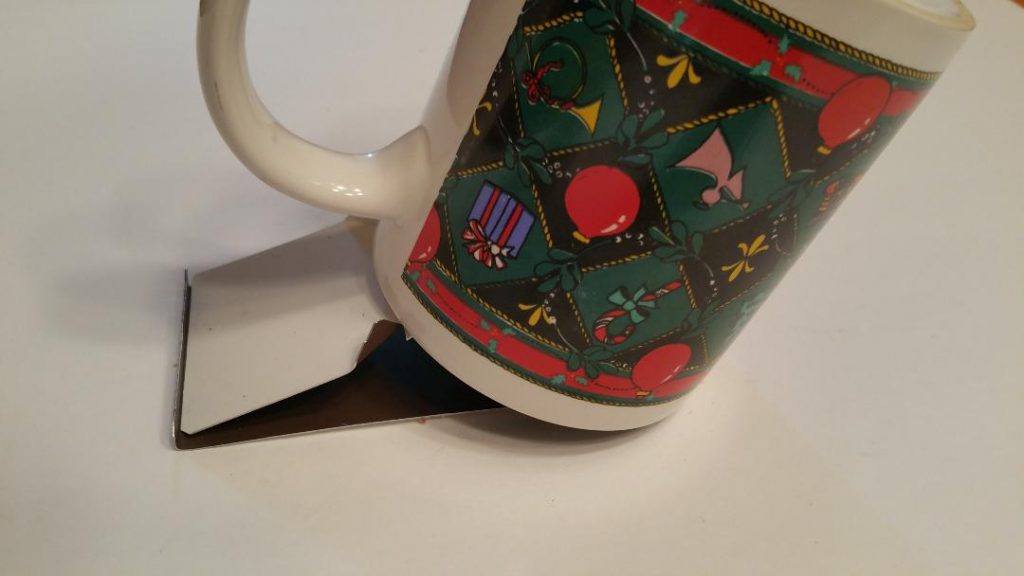
Suspended Jar/Mug Trap
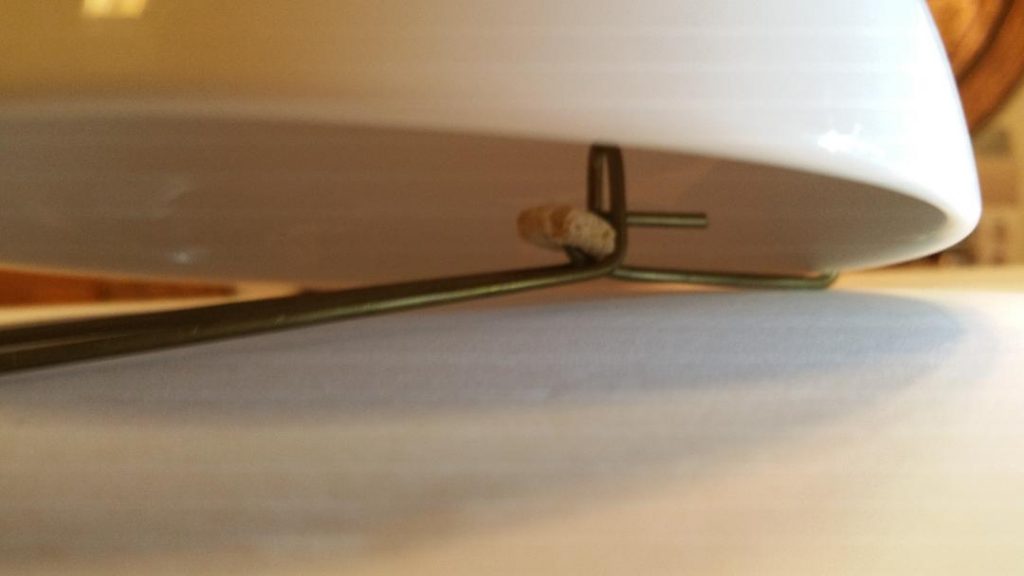
Make a holder to suspend a jar or your least favorite mug as shown. I used wire hooks to hold the bait in this design. Note how the single hook is positioned between the double hook to hold the bait in place.
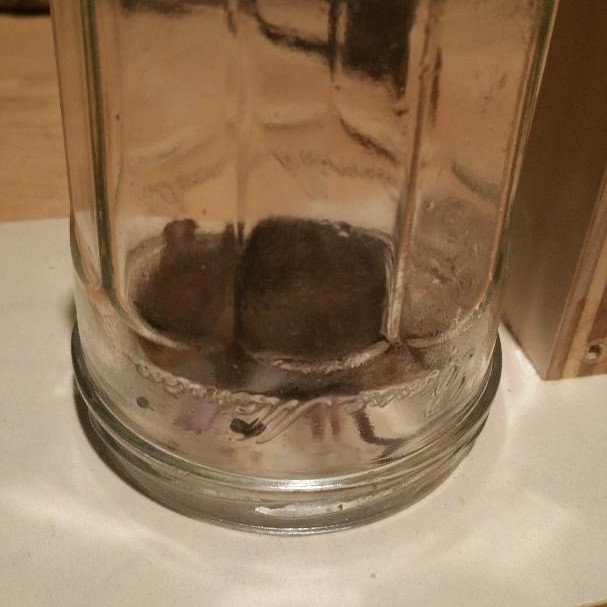
“RATS!!! I fell for it again…”
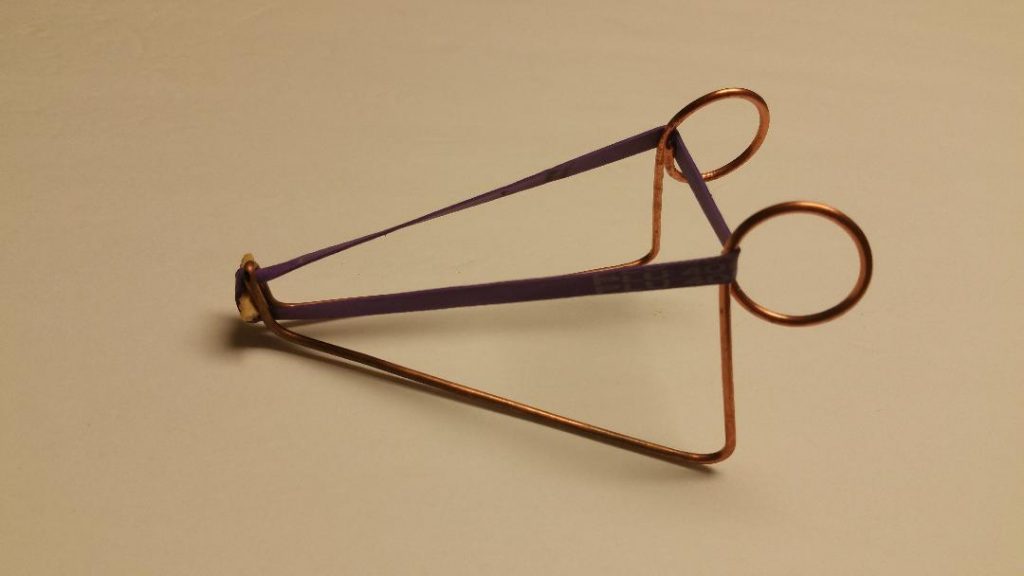
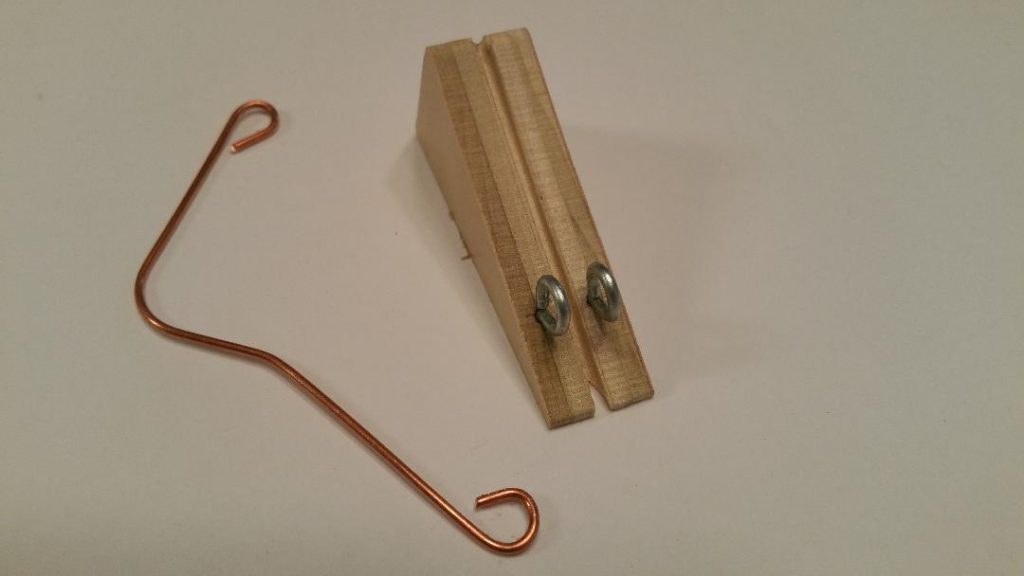
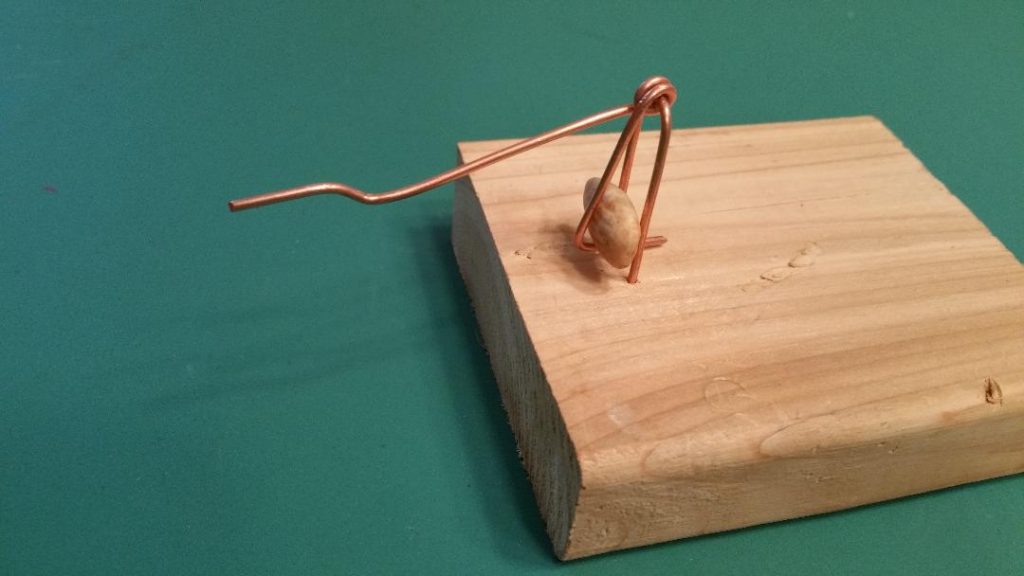
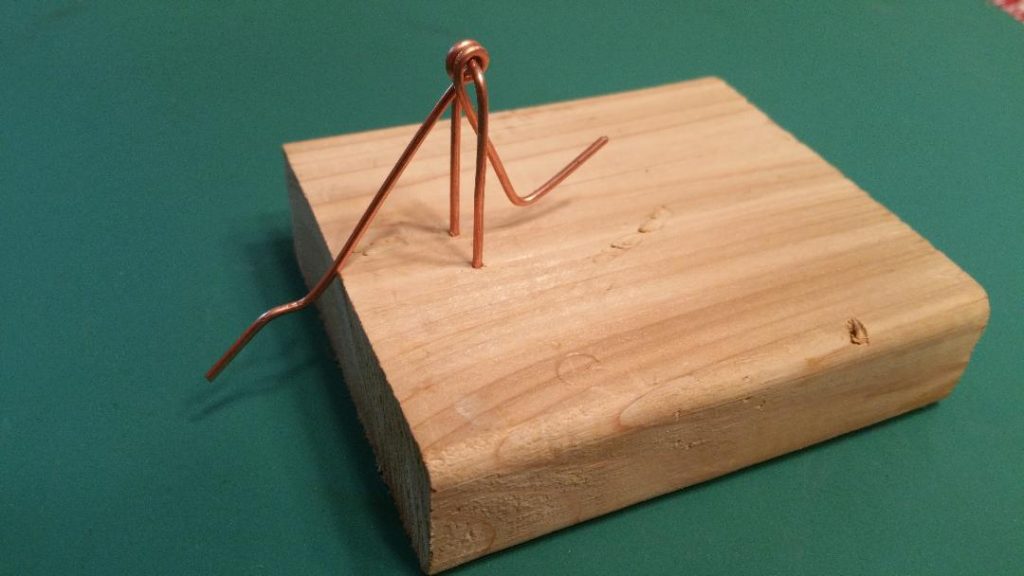
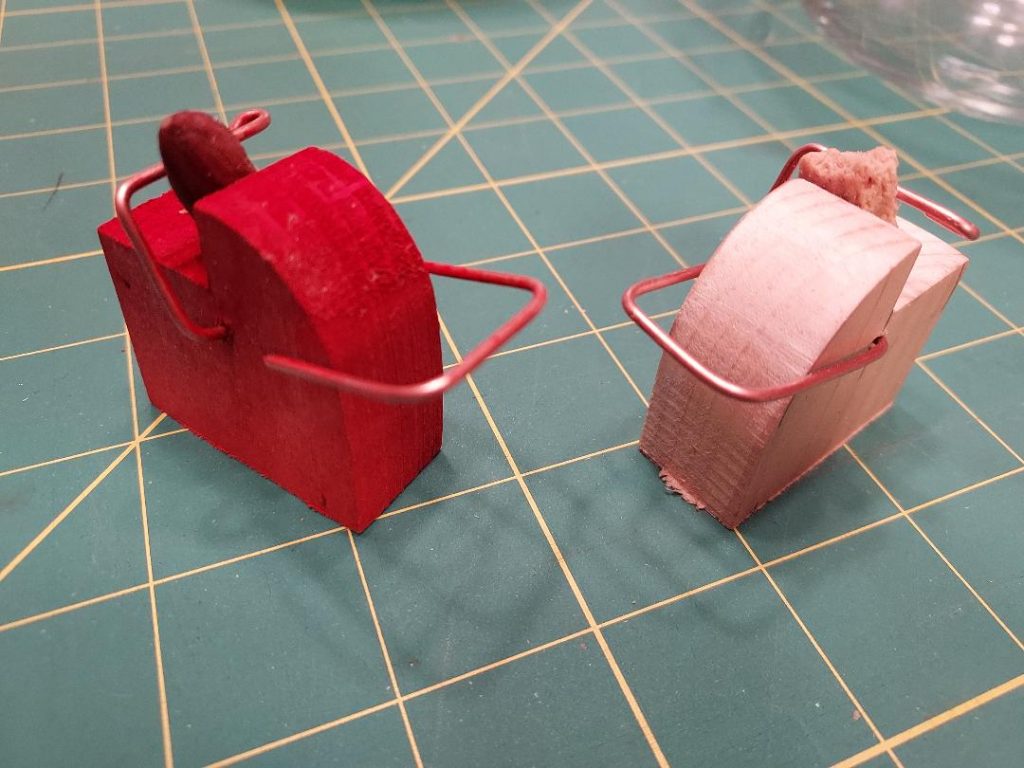
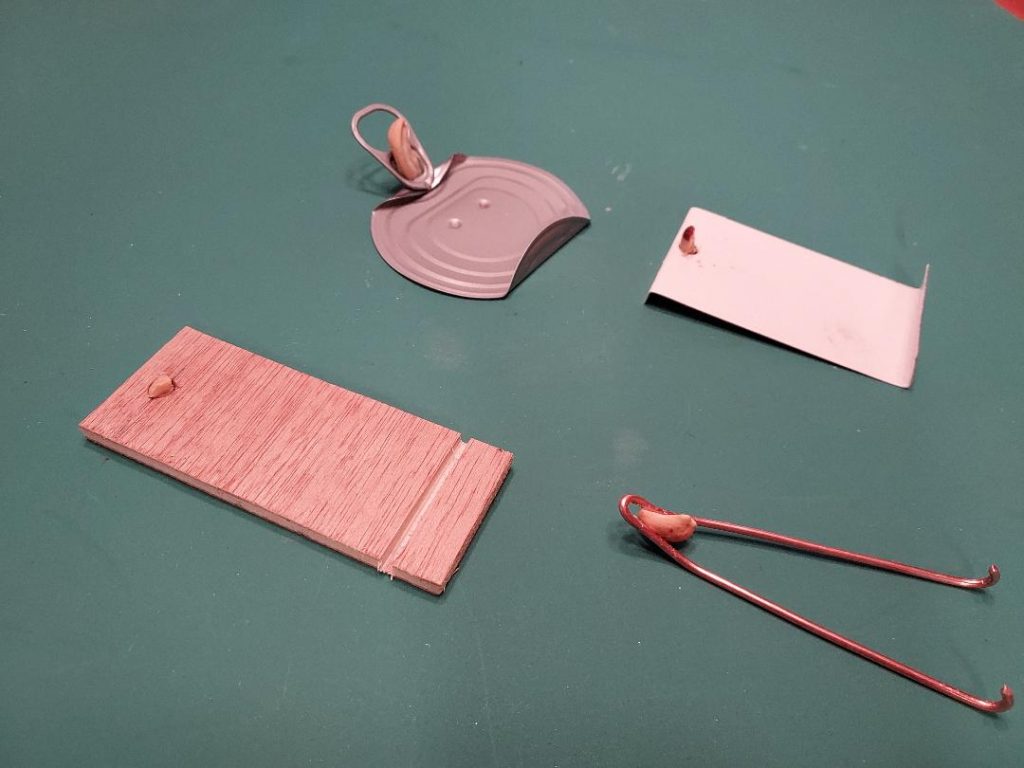
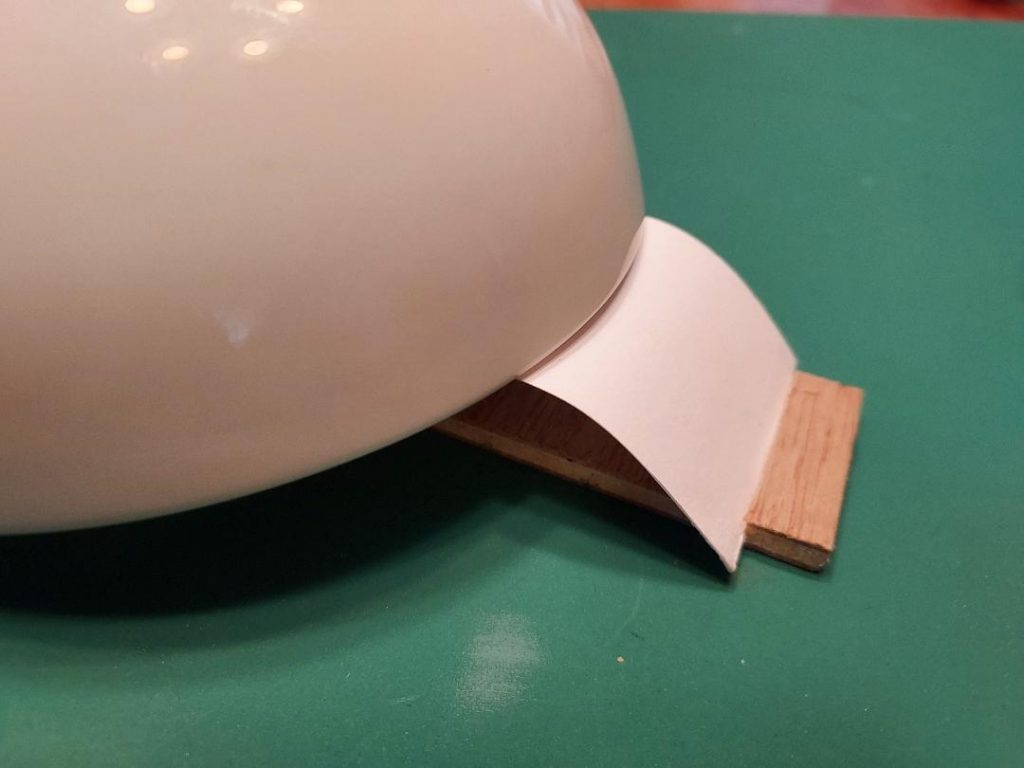
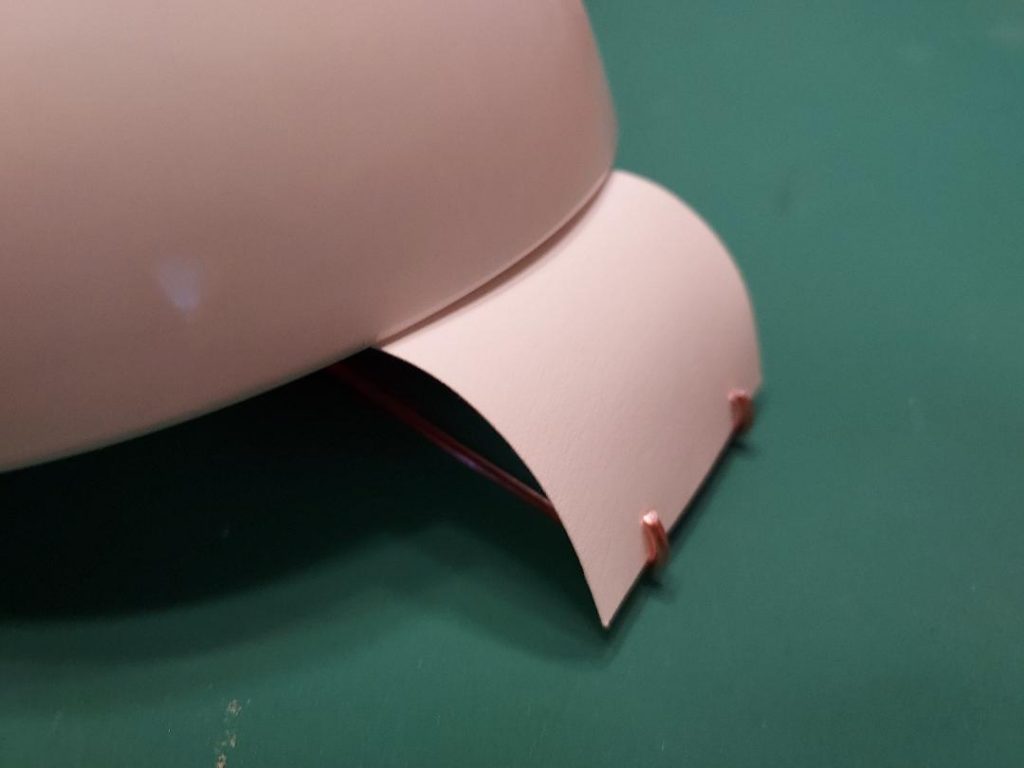
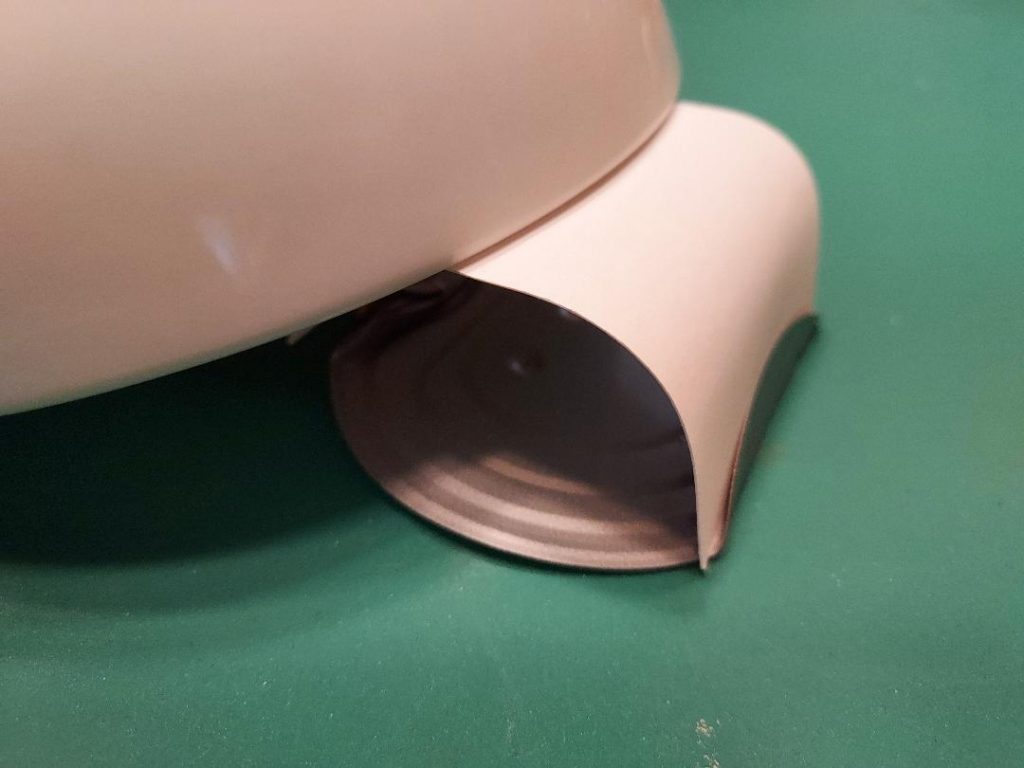
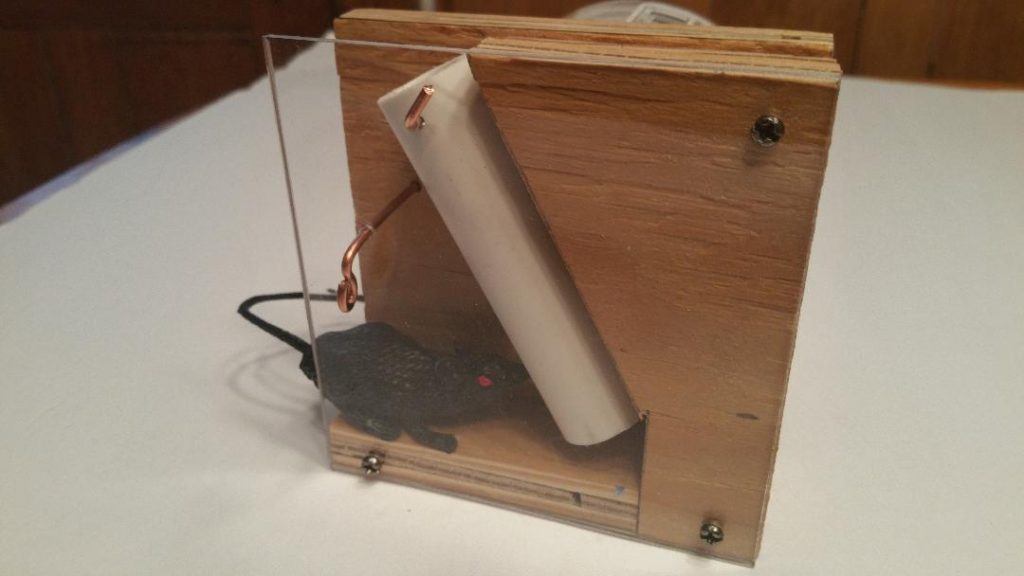
Bowl and ‘Wood Mouse’ Trap
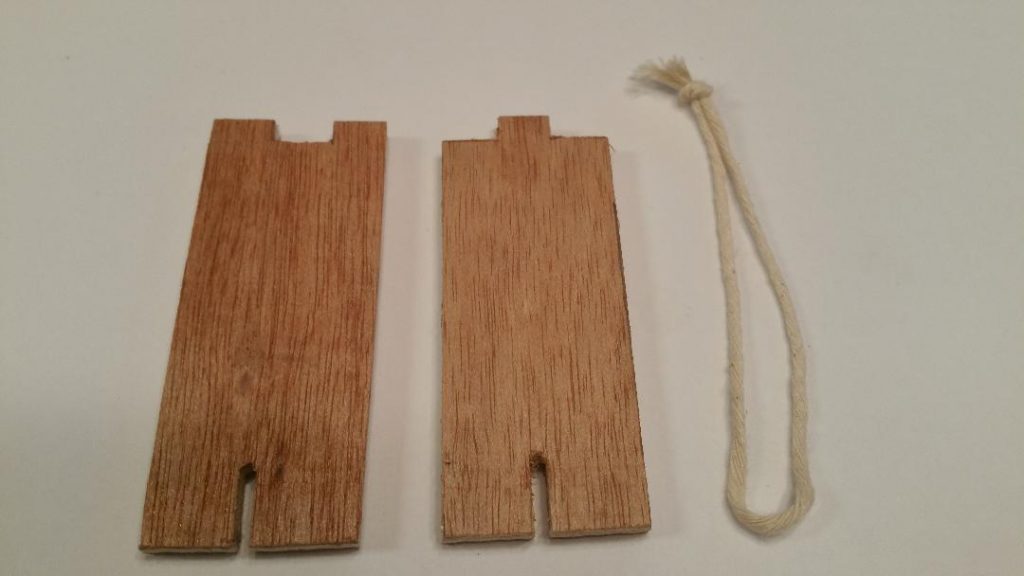
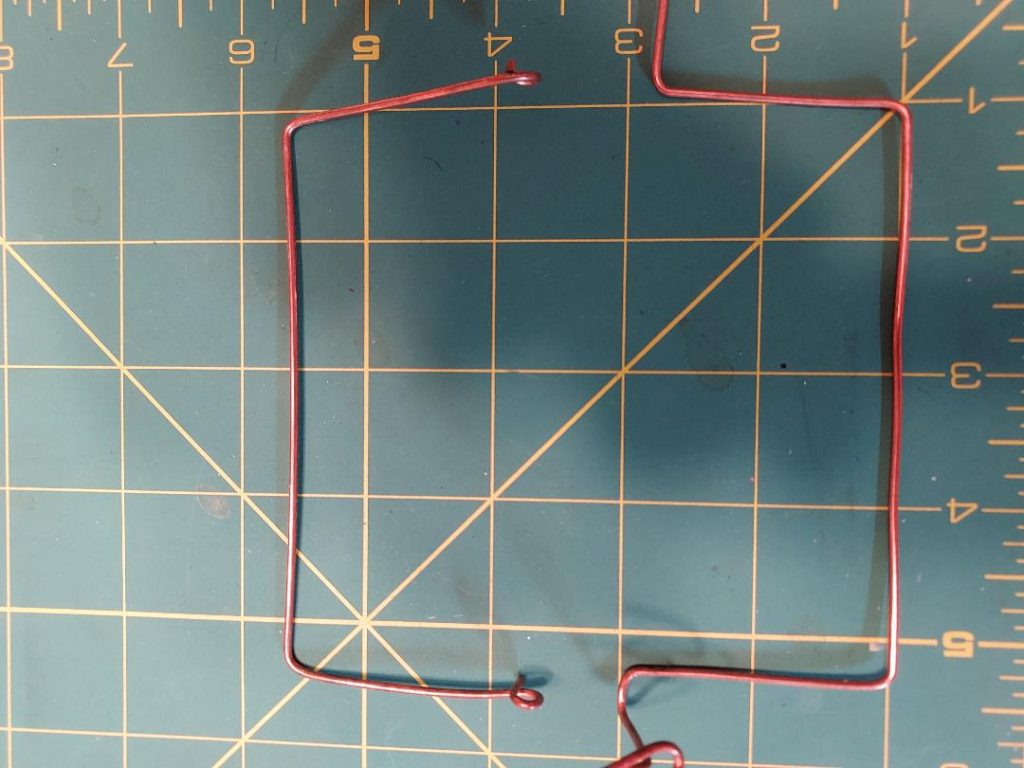
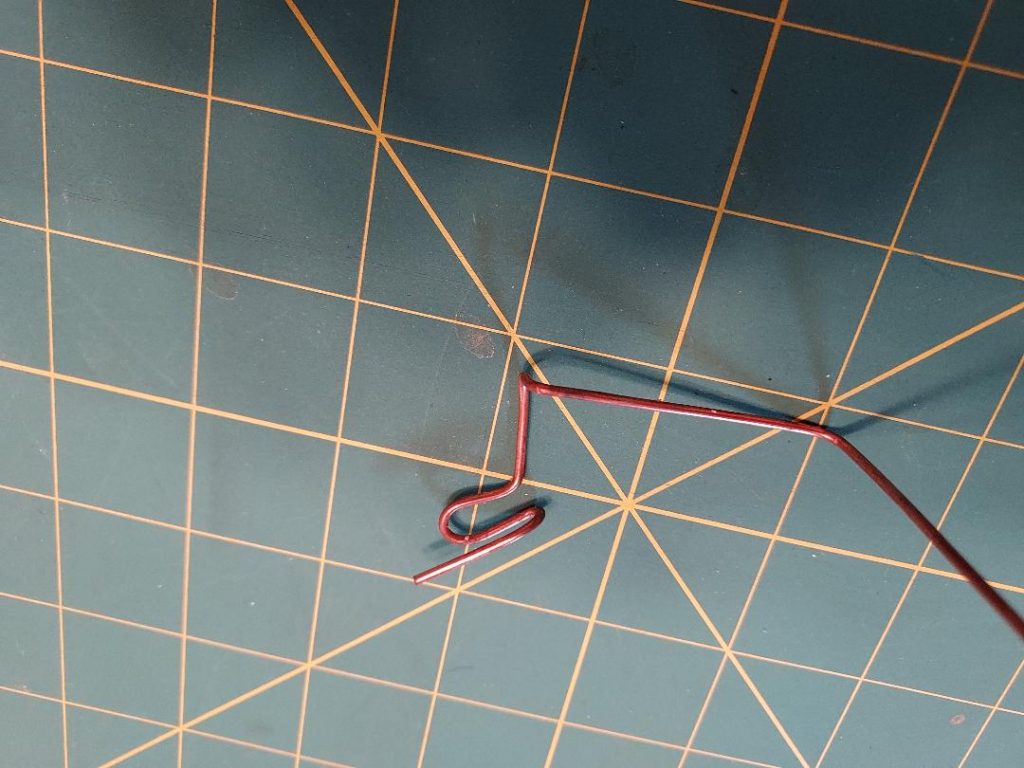
Of course, the best way to catch a mouse is with another mouse! This design is made using 3/4″ plywood, 1/4″ eye screws and 14 gauge copper electrical wire. After cutting the body shape cut a shallow, narrow slot along the top of the triangle. Add the eye screws and shape the wire. Place a sliver of bait using nuts, cookies or pretzel piece through the eye screws and wire loop end, then place the bowl edge on the wire tail close to the back of the mouse. When the mouse eats the bait it releases the looped wire end allowing the tail to drop and the bowl to fall over the mouse.
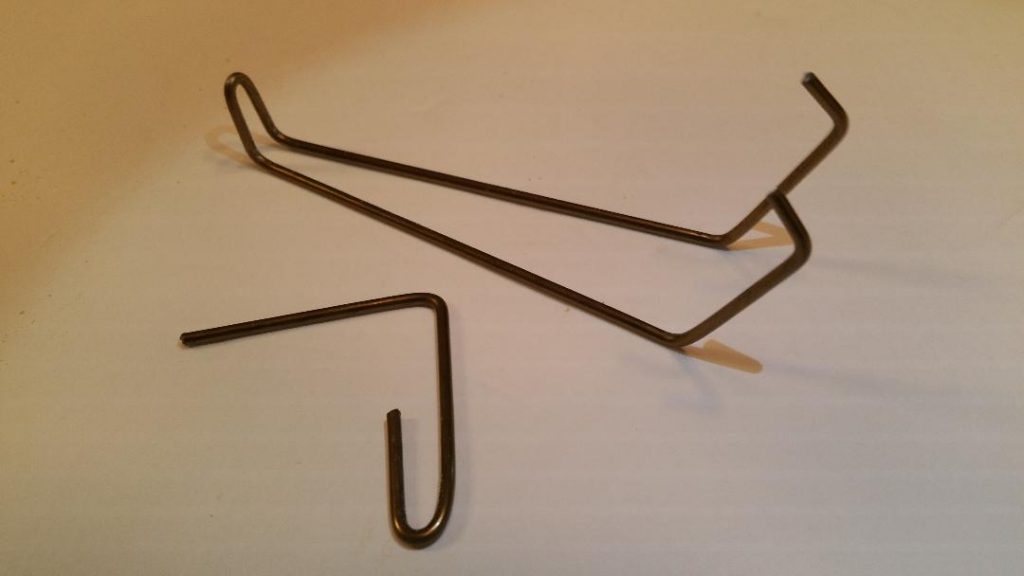
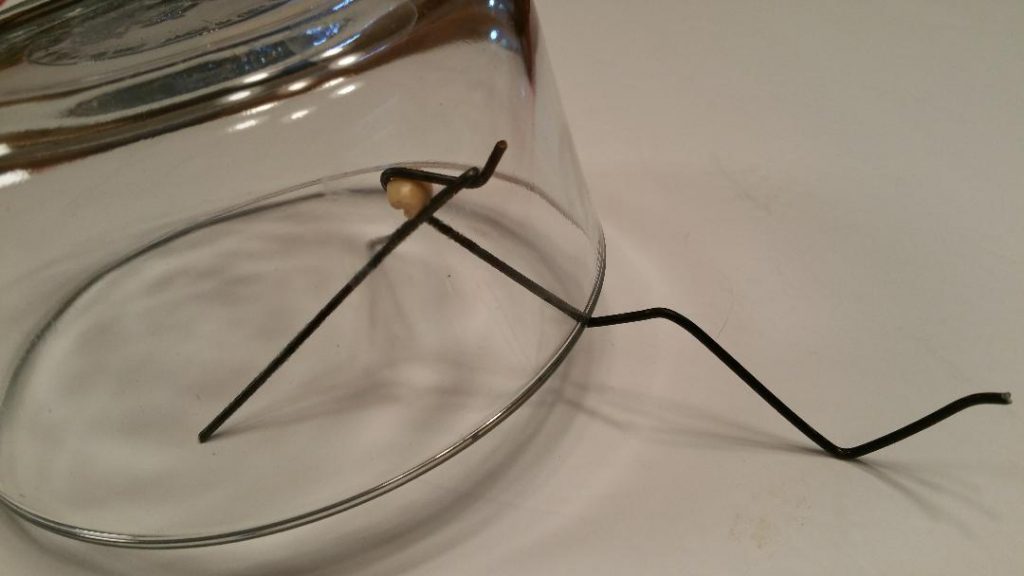
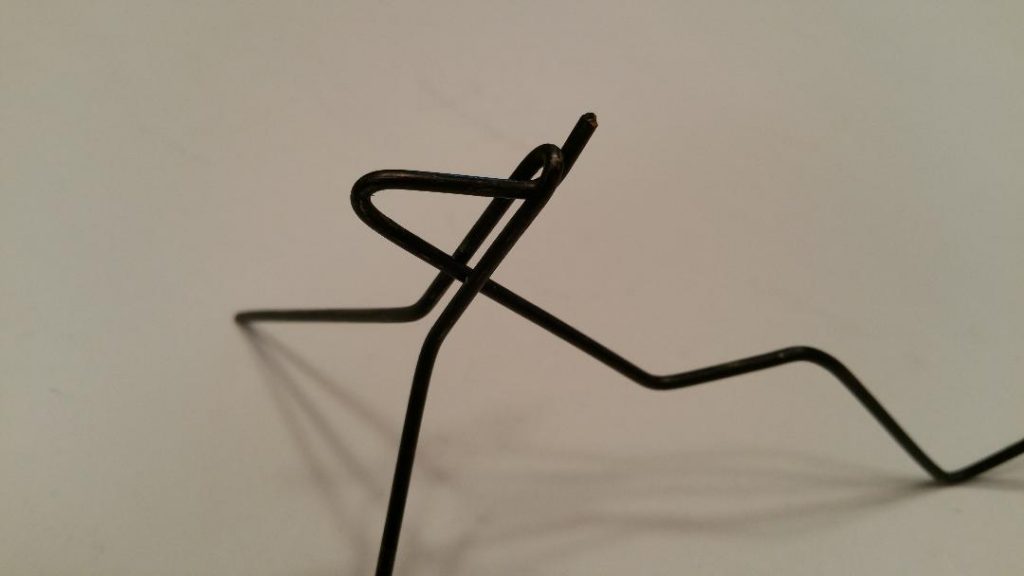
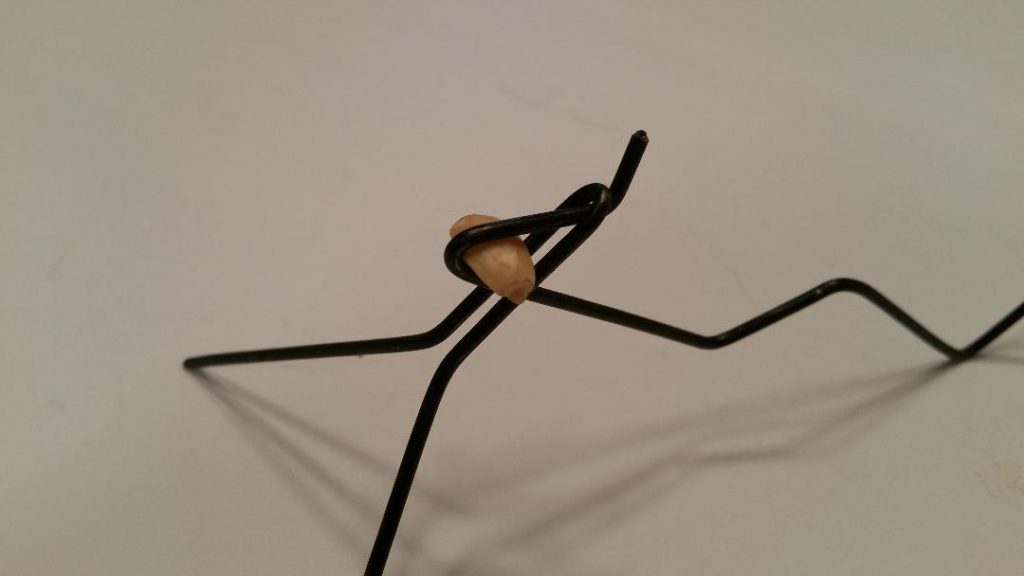
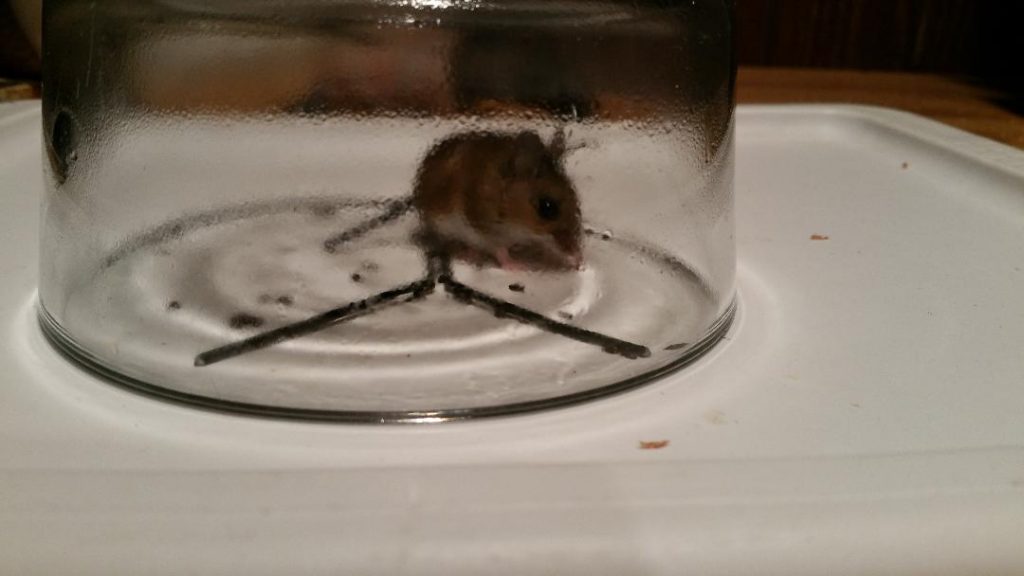
Bowl and Wire ‘Praying Mantis’ Mouse Trap
Only coat hanger wire and bowl is used to make this trap design. Make the length of the open hook wire piece to fit the diameter of the bowl. After inserting the interlocking bait, apply pressure to the tail end of the open hook piece against the outside of the bowl to keep it taut before you turn the bowl upside down.
Bowl and Wire ‘Lizard’ Mouse Trap
Here is yet another coat hanger wire design of mine.
A peanut half as bait. 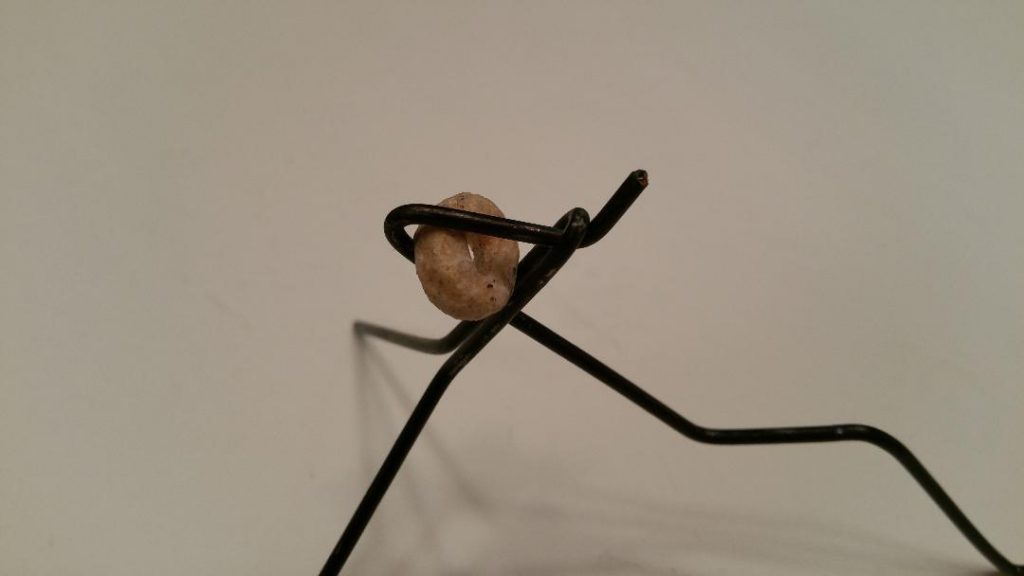
A Cheerio as bait. 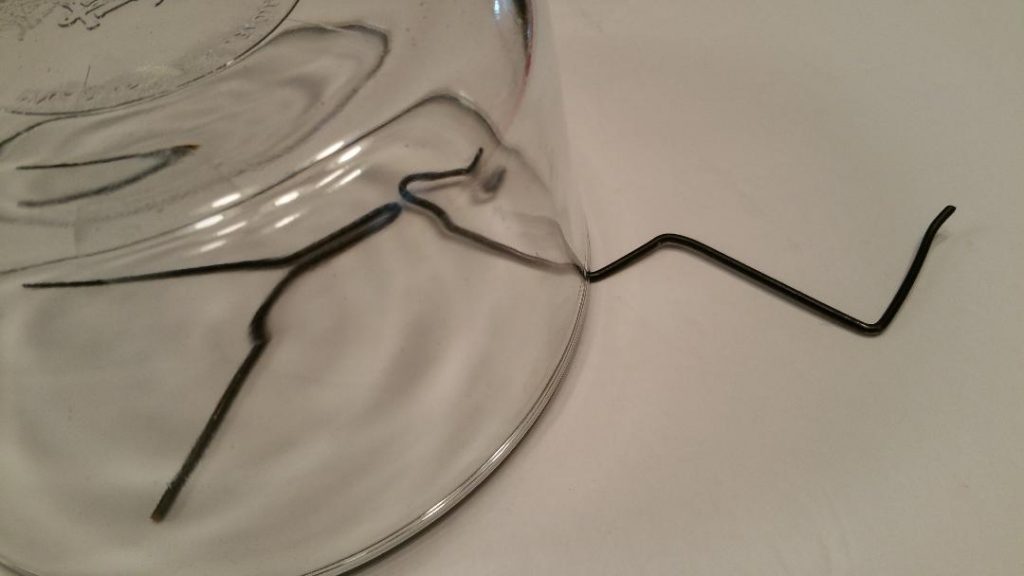
Tripped. The wire provides and air gap. 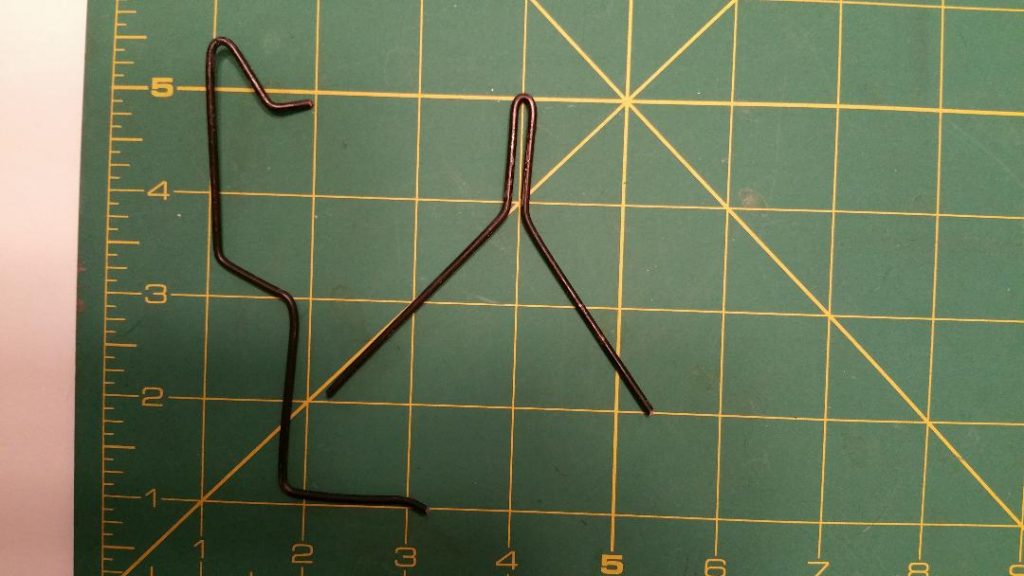
Dimensions in inches.
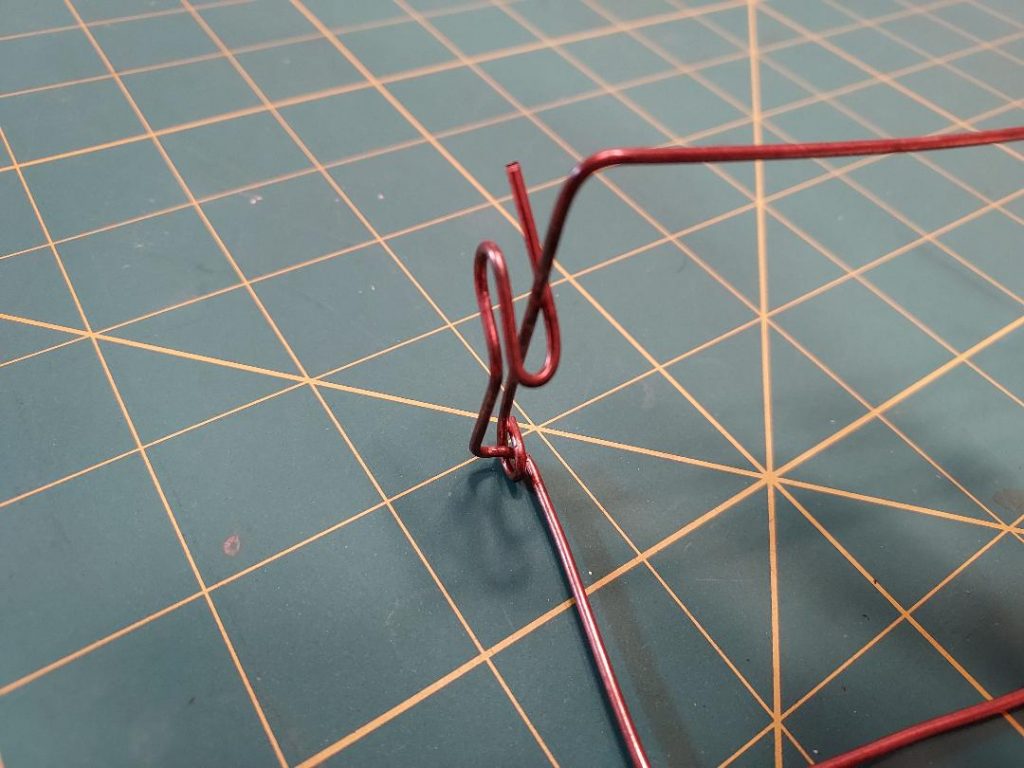
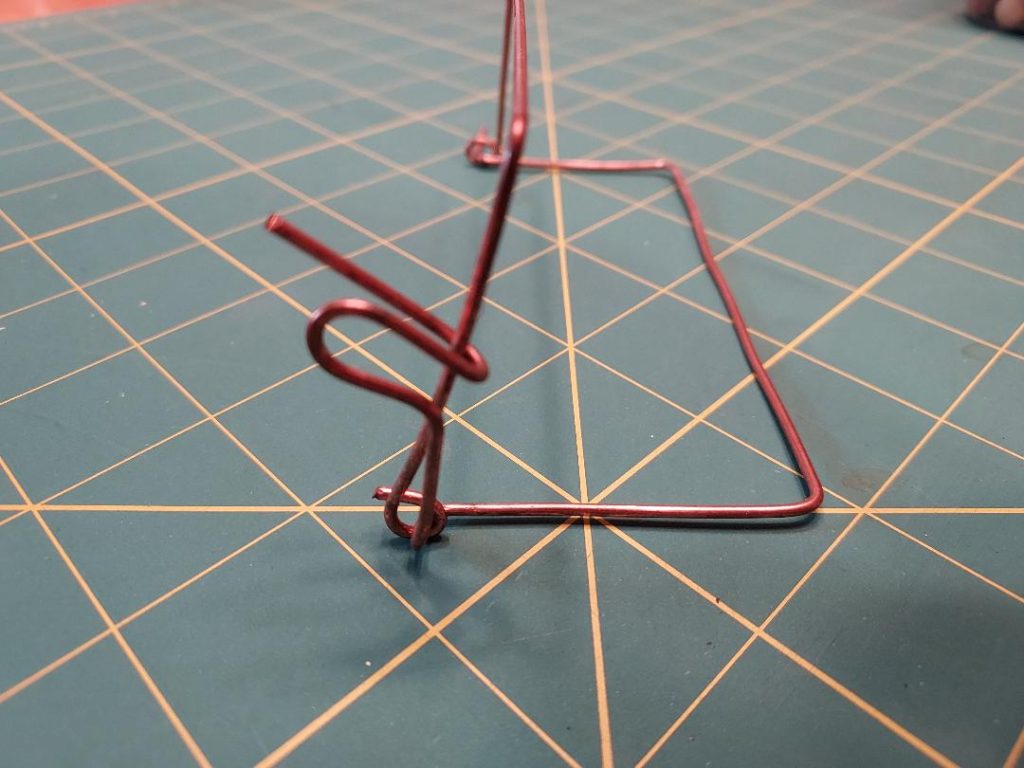
Bowl and Wire ‘Dragonfly’ Mouse Trap
Another interlocking bait type design of mine using 12 gauge copper electrical wire:
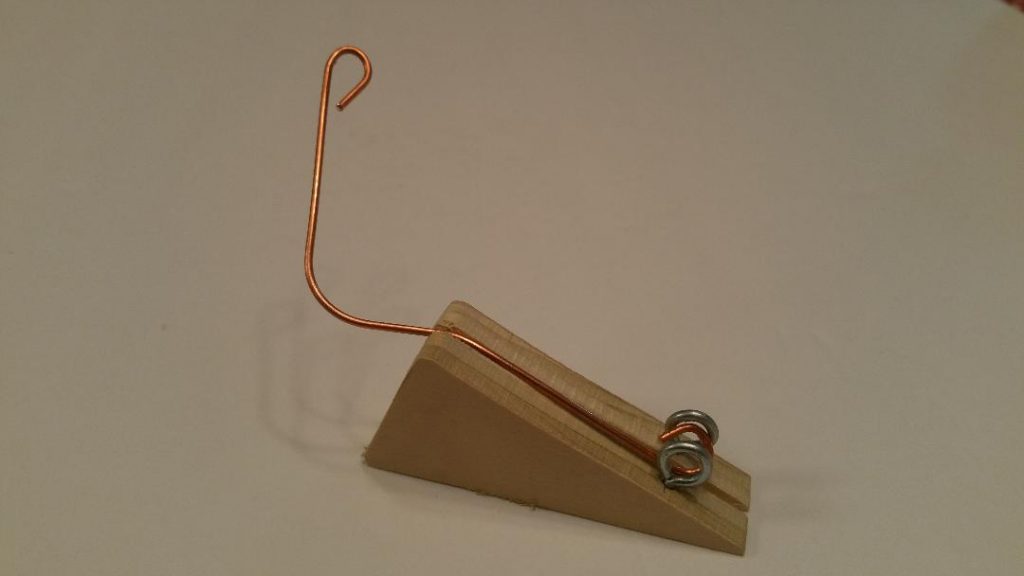
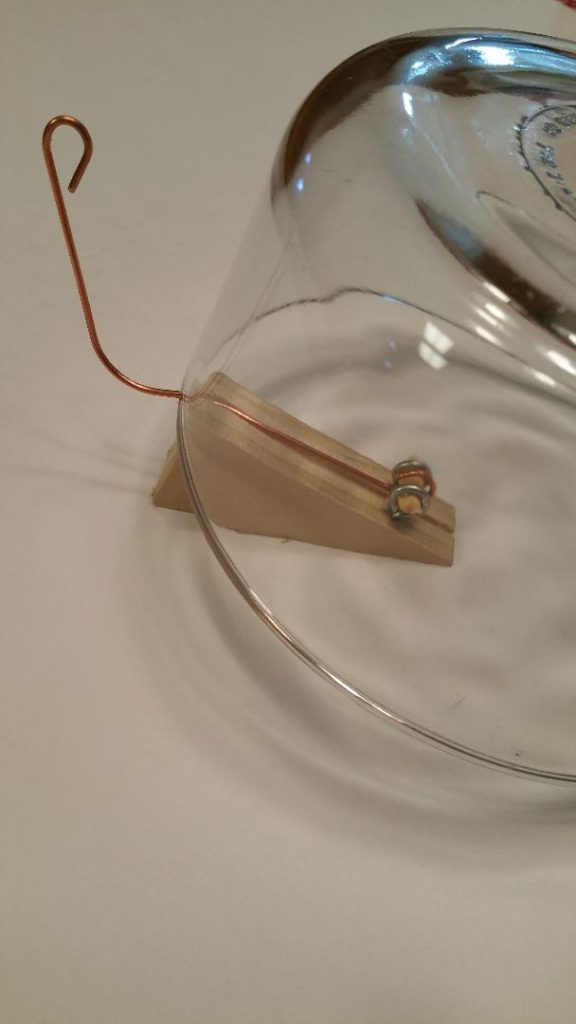
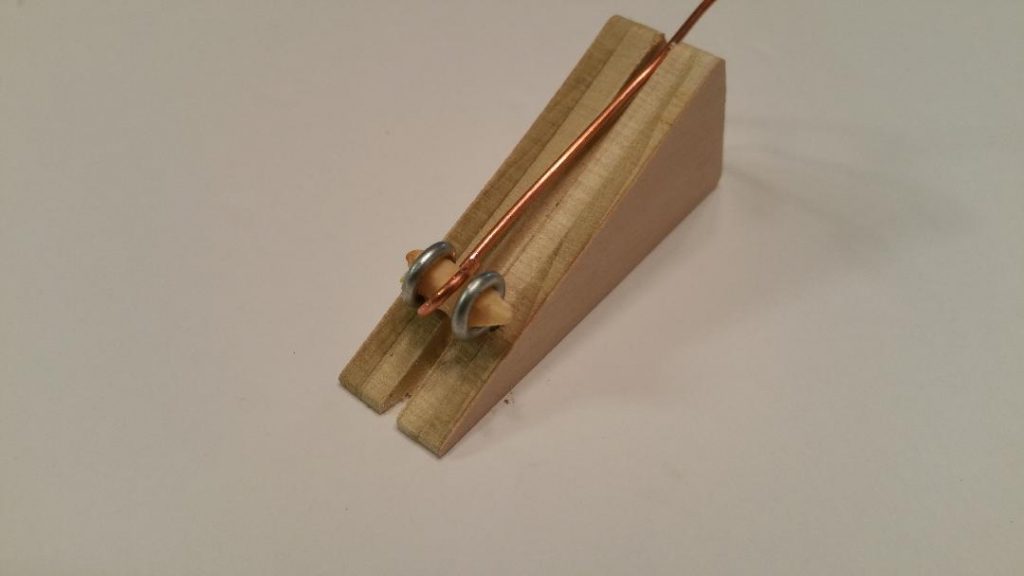
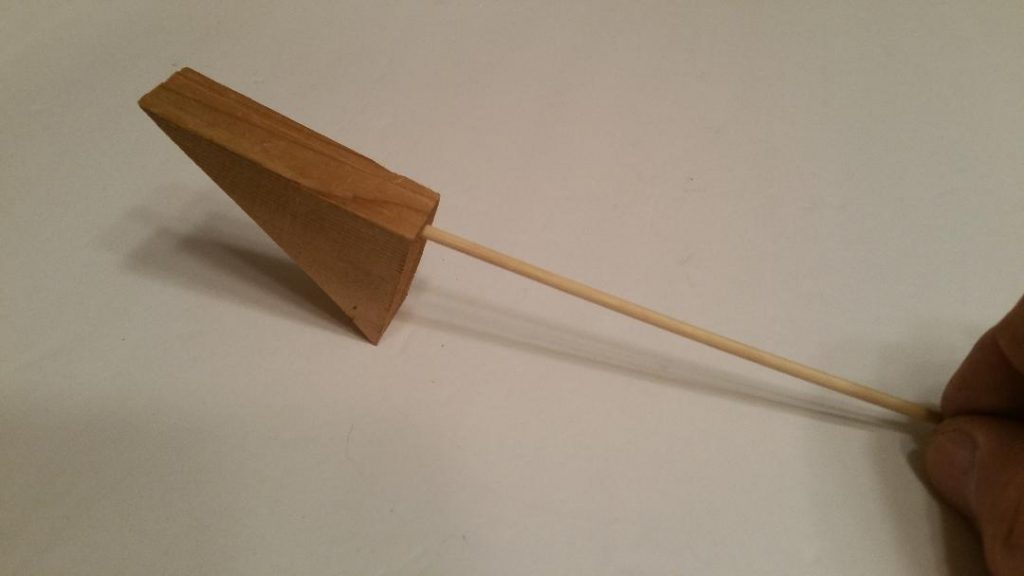
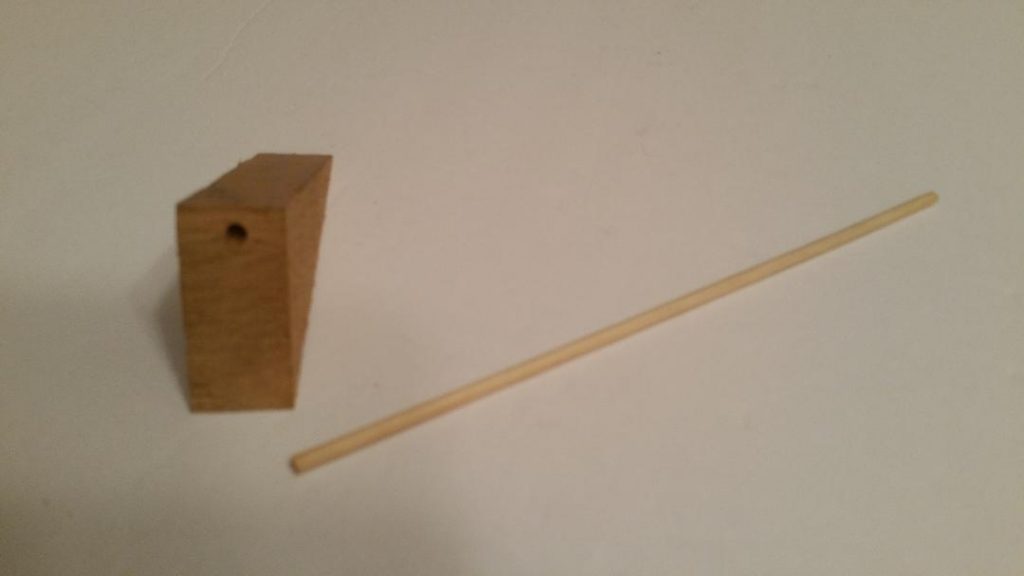
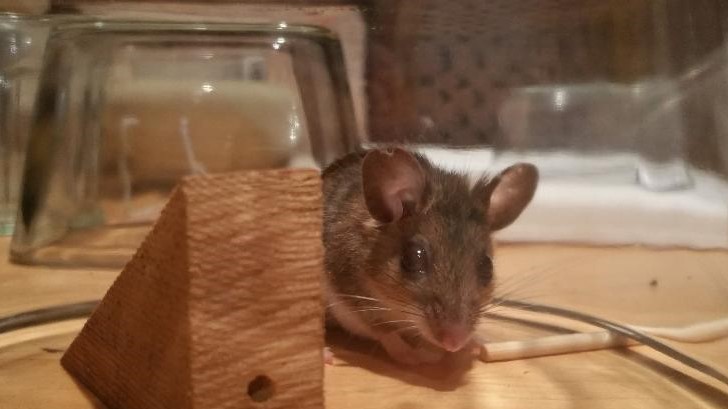
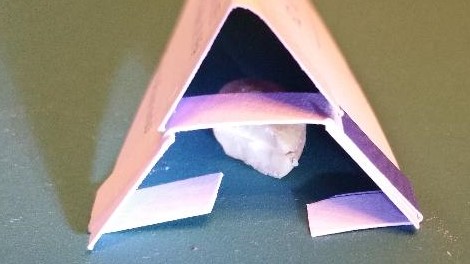
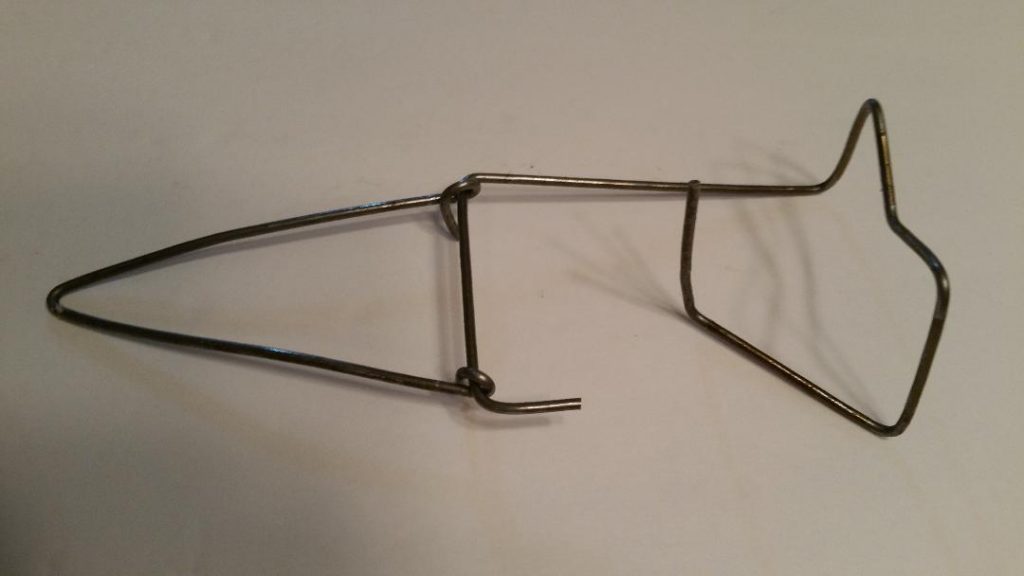
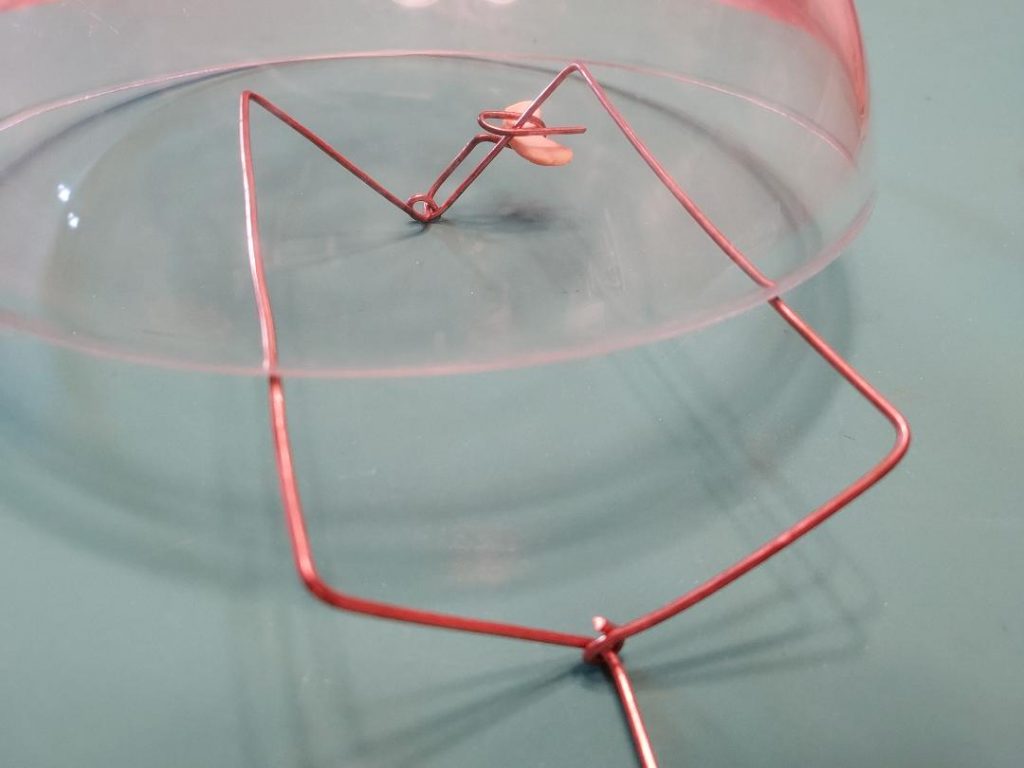
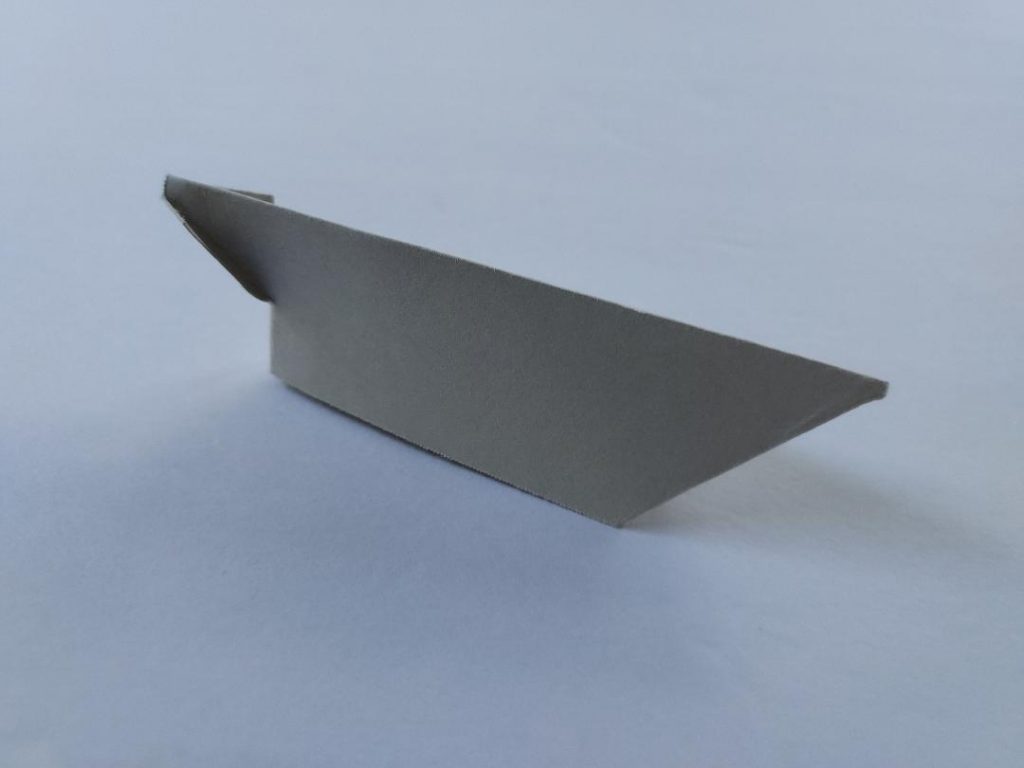
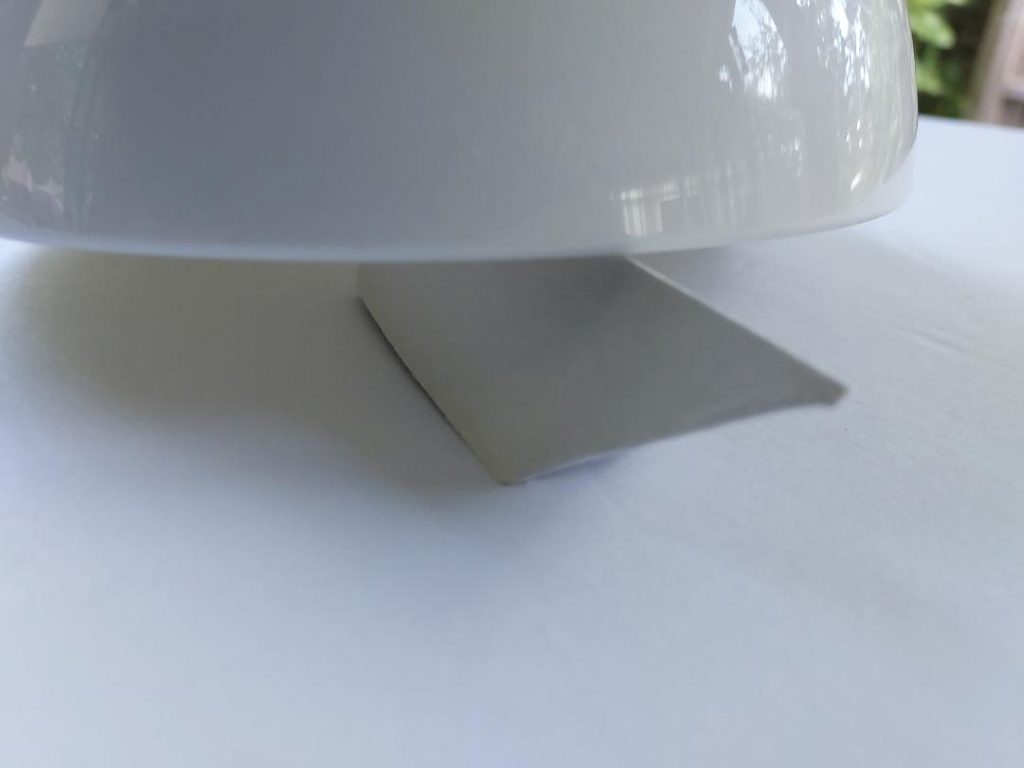
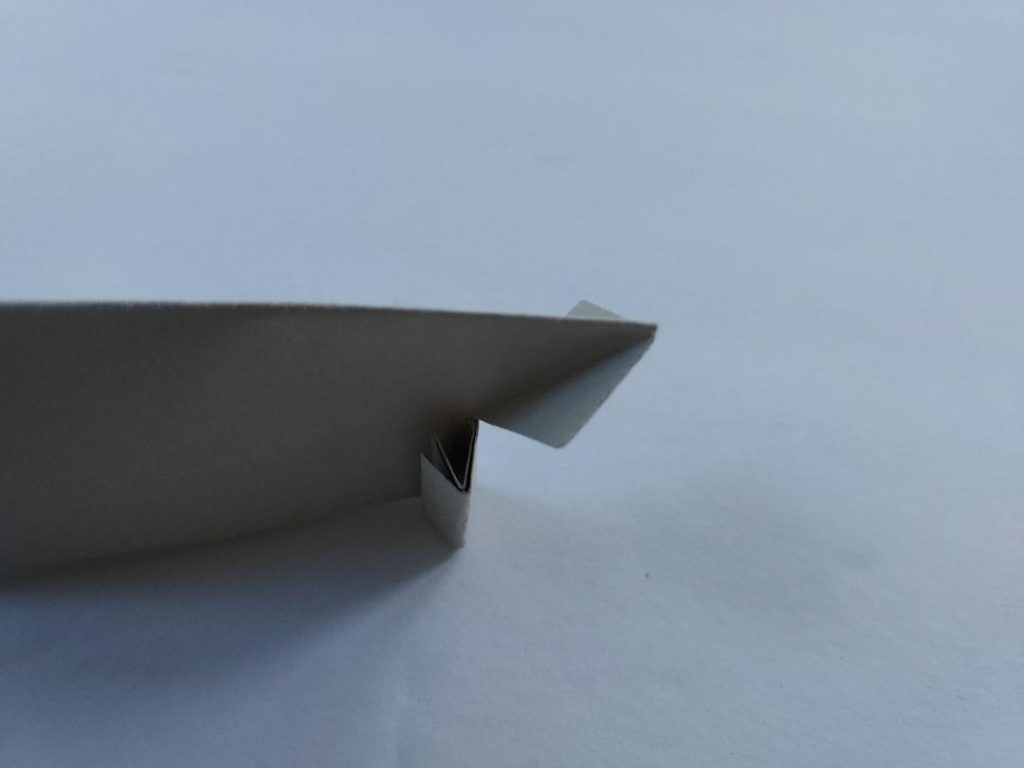
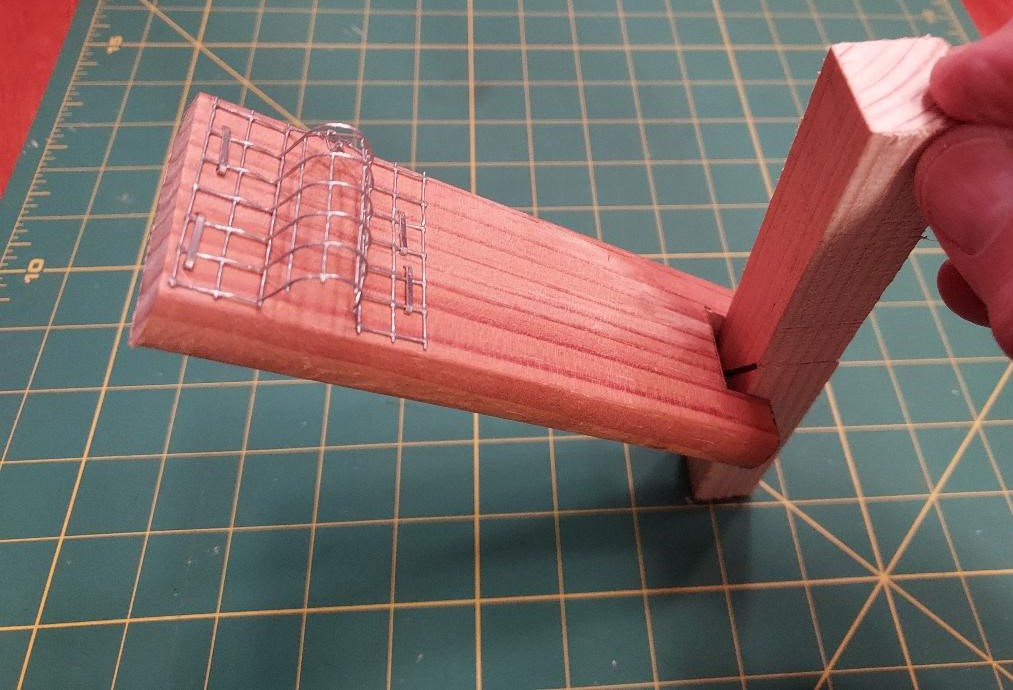
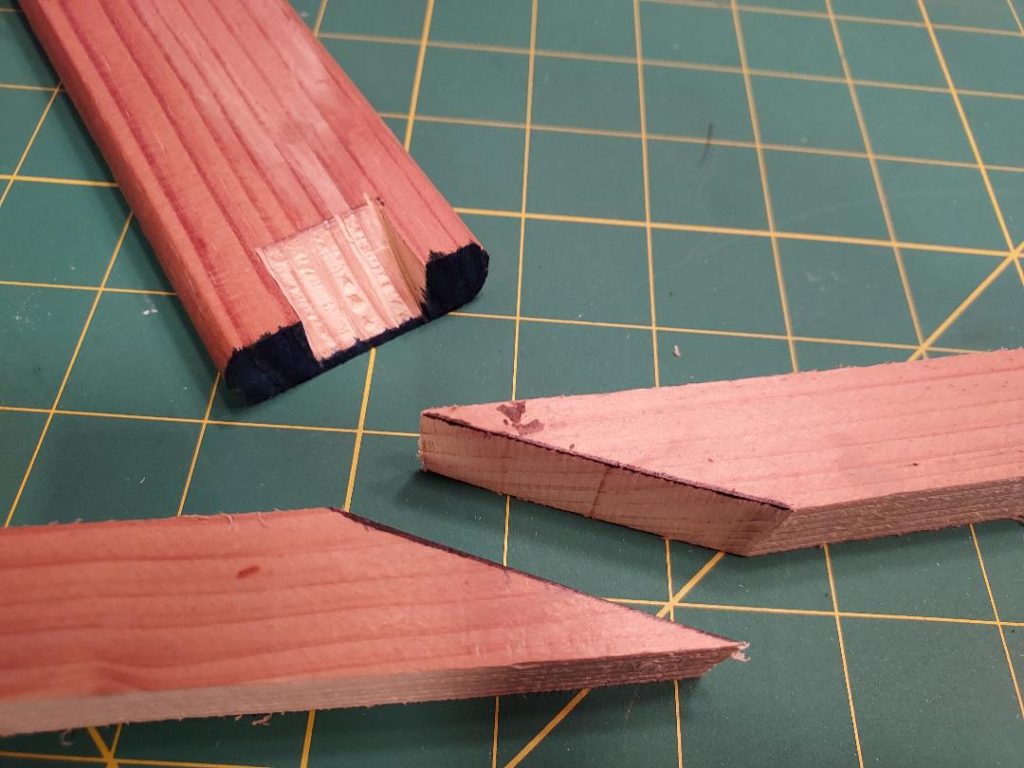
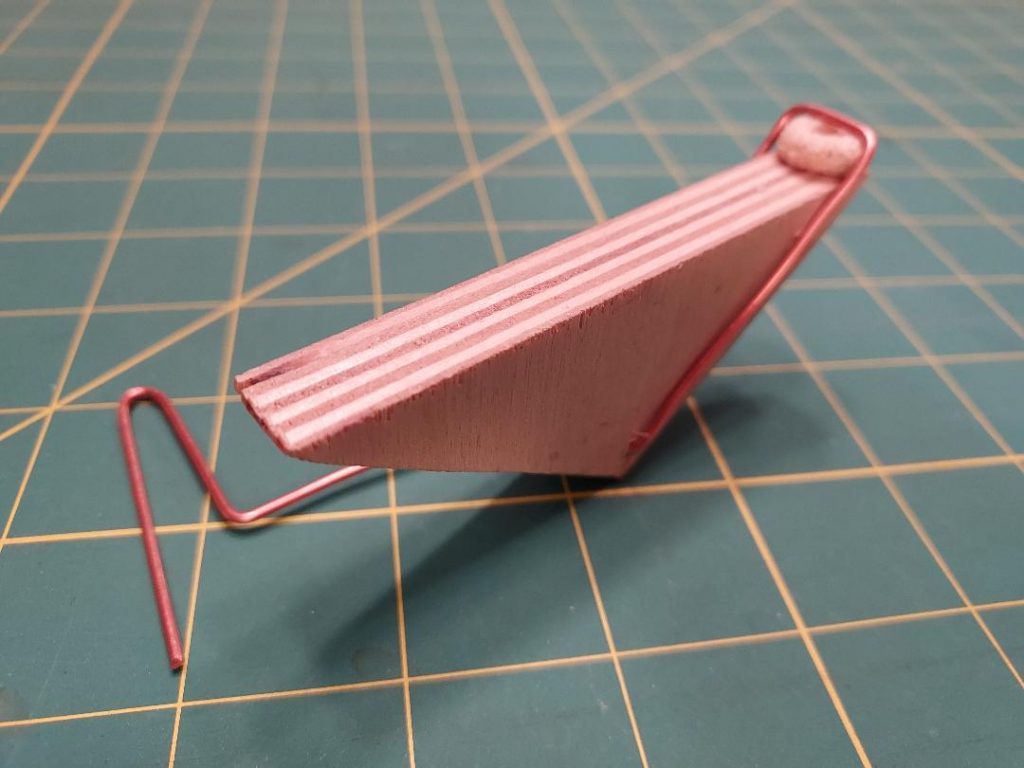
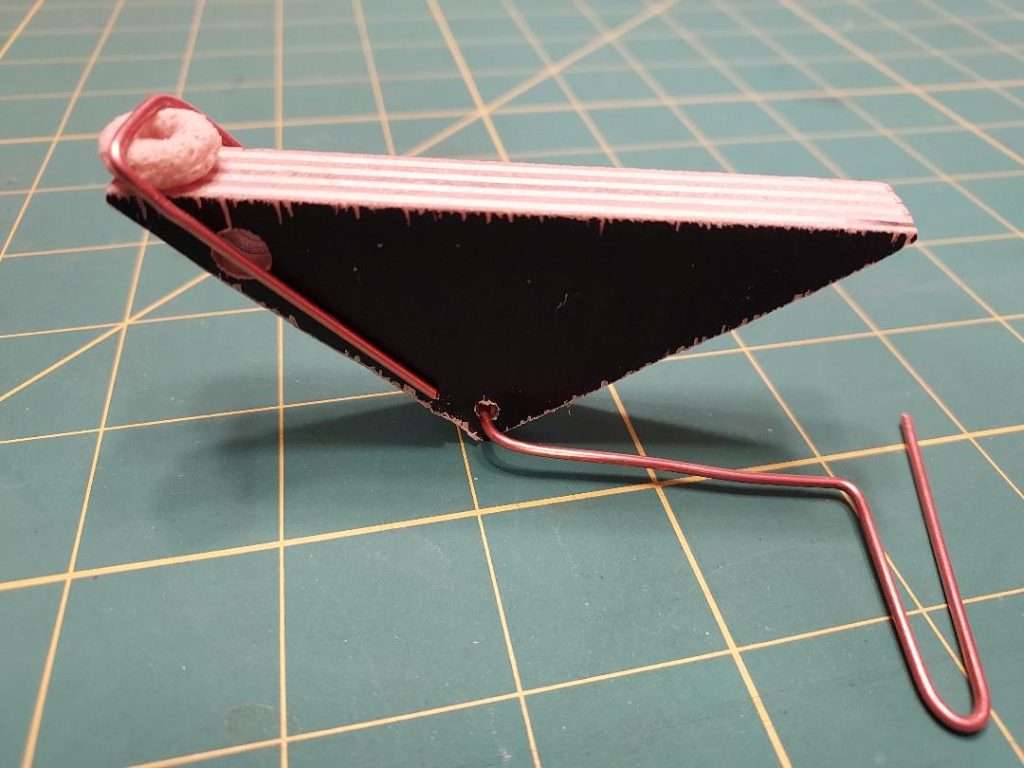
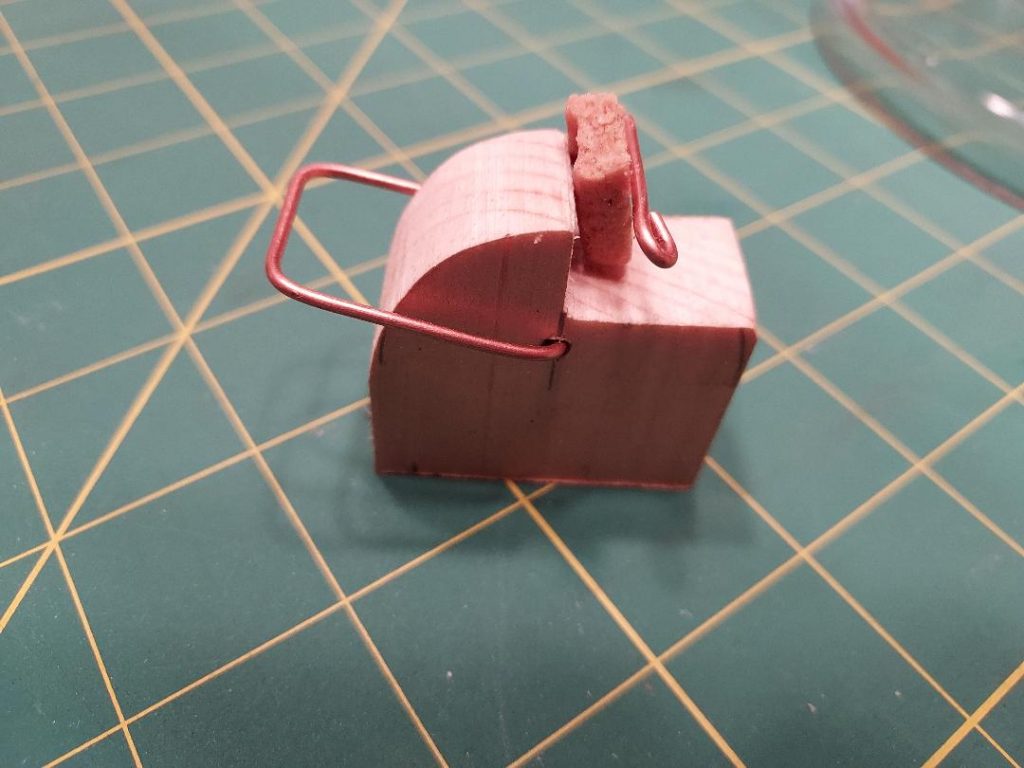
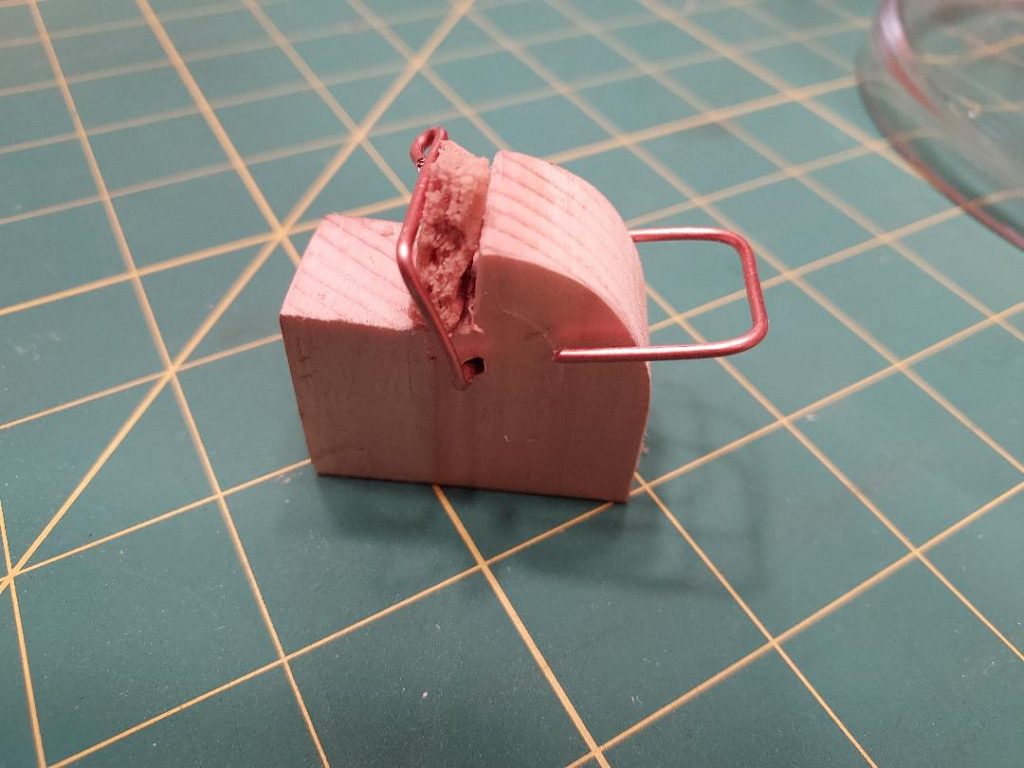
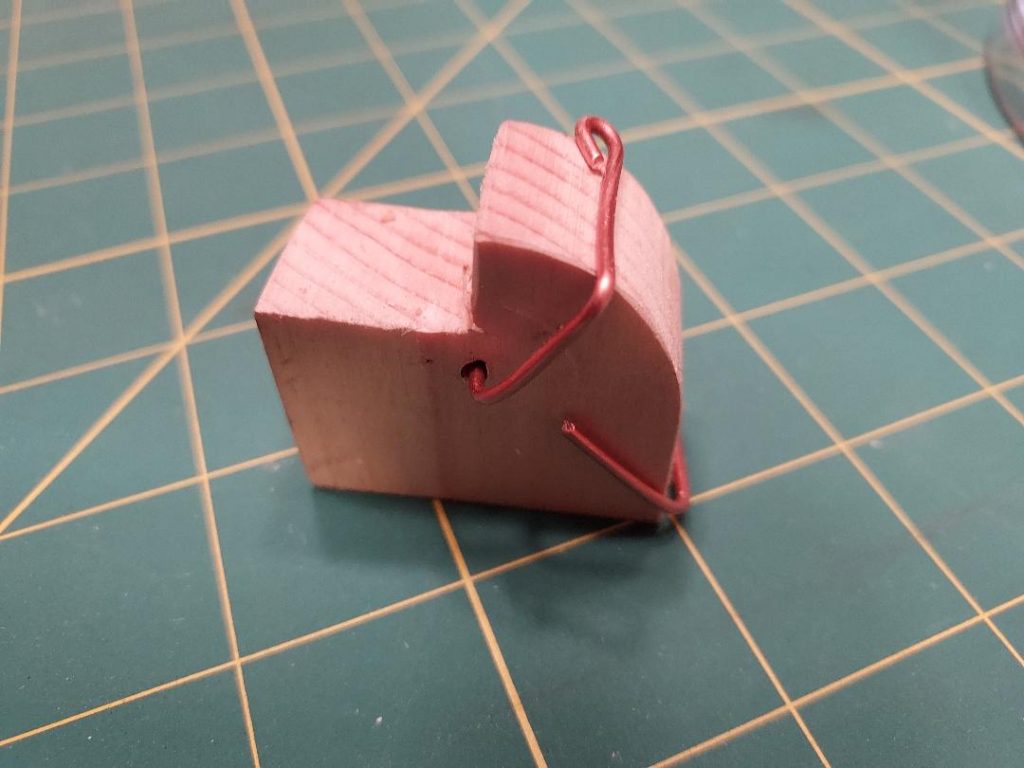
The ‘Leaping Mouse’ Mouse Trap
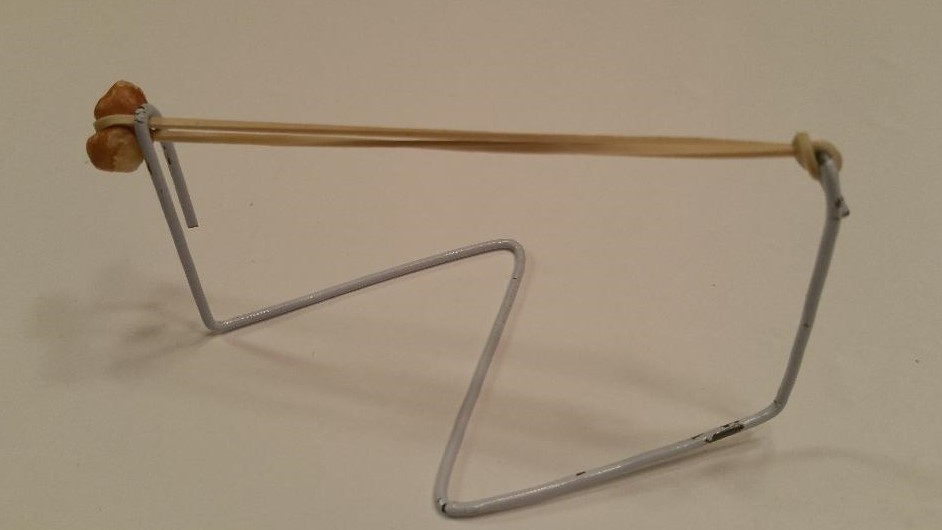
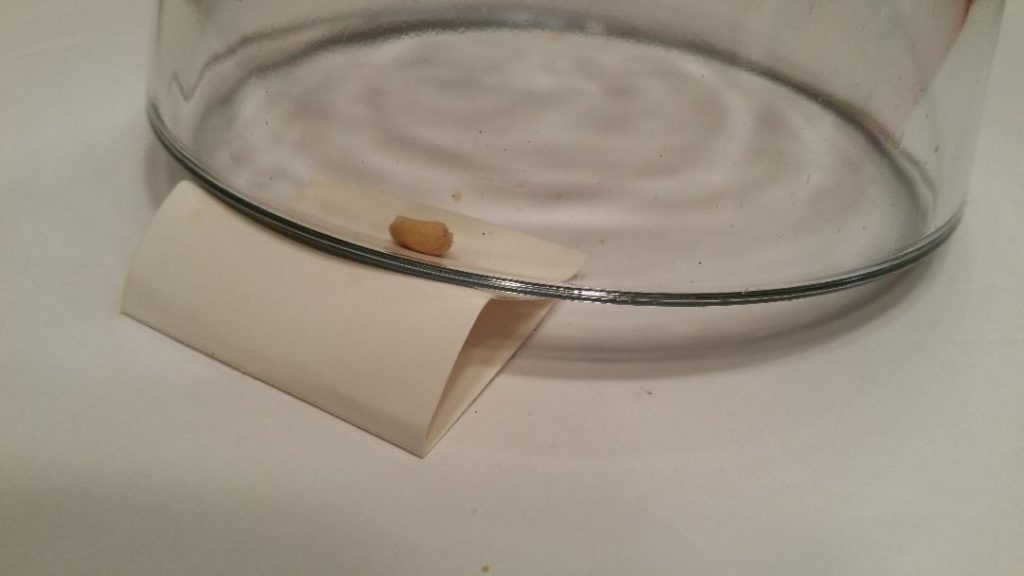
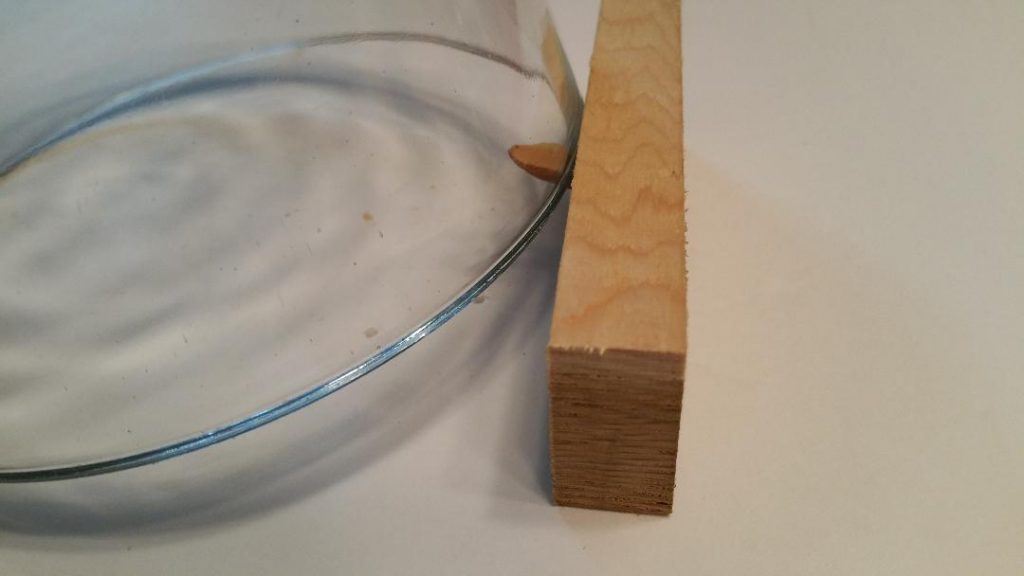
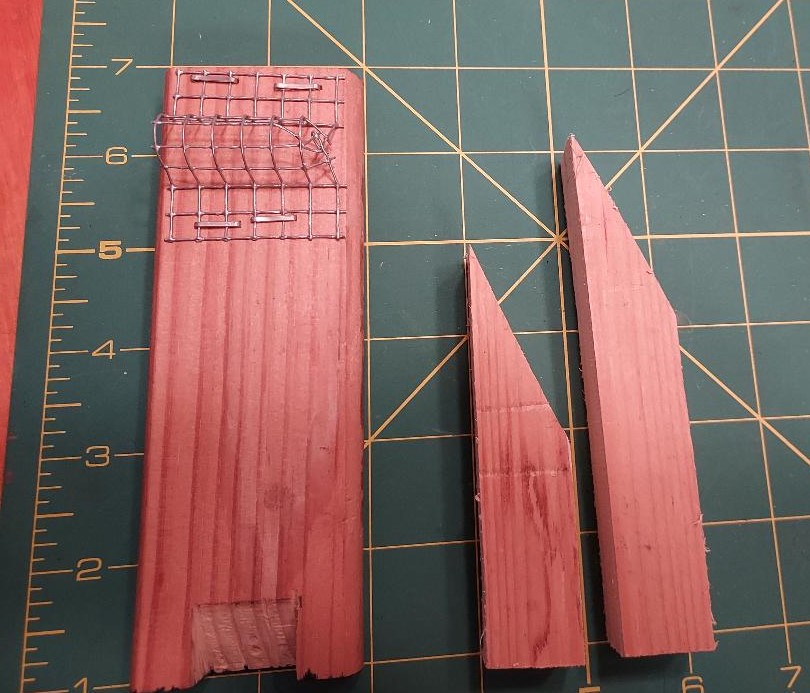
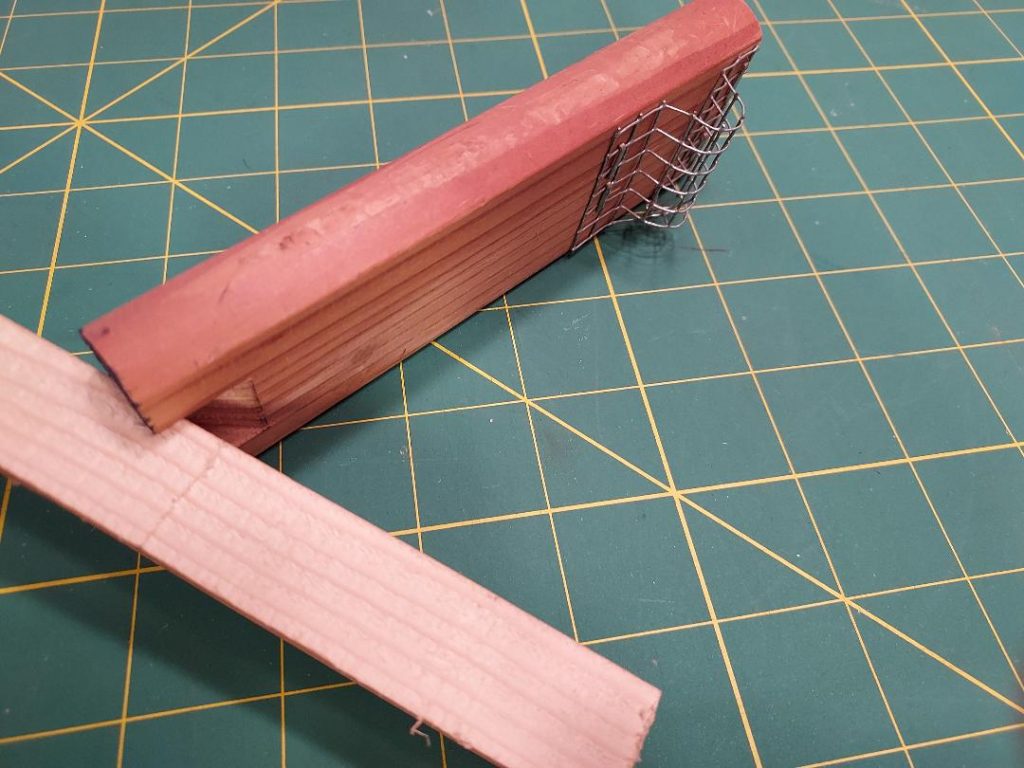
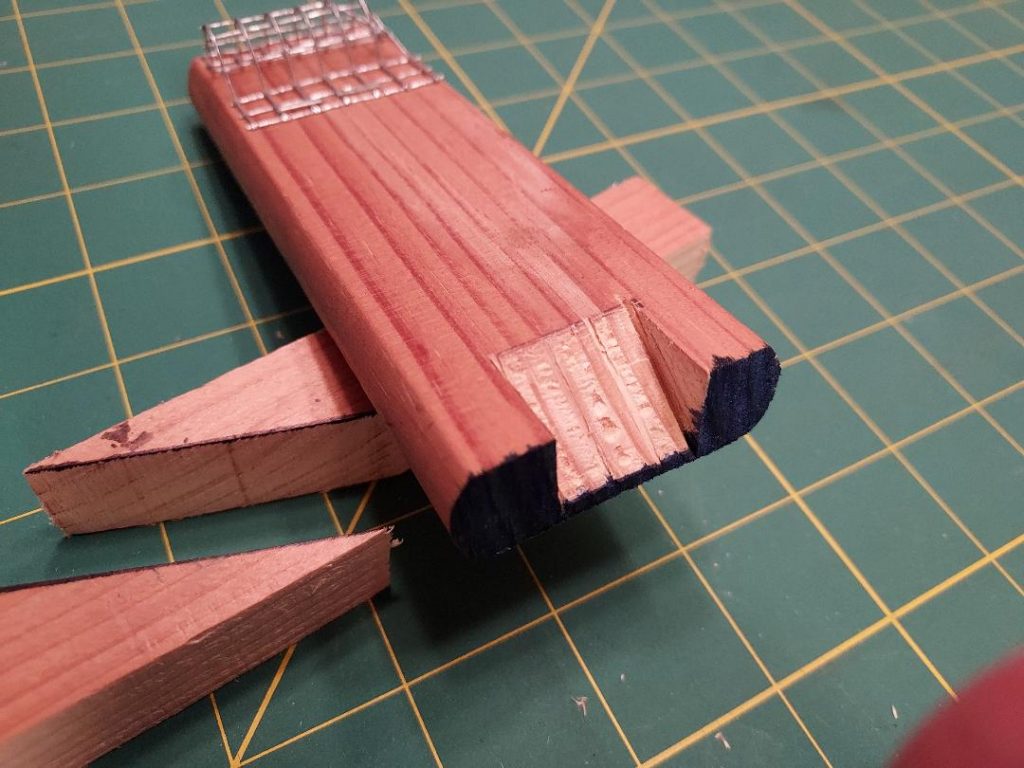
This is my hairpin trigger mouse trap design that trips by the weight or disruptive movement of the mouse. It is made from a 1/2″ thick X 1-1/2″ X 2- 1/2″ piece of triangular wood and a 6″ long piece of 1/8″ diameter wooden skewer/dowel. Drill a hole 1/4″ from the edge as wide and as deep as the diameter of the skewer/dowel. Not so deep as to limit the range of motion of the skewer/dowel. It must fit somewhat loosely.
Bait the top side with peanut butter or other sticky food attractant. A deep hole could be added near the top edge to hold bits of hard bait too. While holding the wood triangle with one hand in an elevated, inclined position place the skewer into the hole and apply downward pressure on the far end of the skewer. Release the wood triangle and it should stay in the inclined position. Now, carefully place the bowl over the leaping mouse and rest the bowl’s edge on the skewer. Try scaling it up for larger critters!
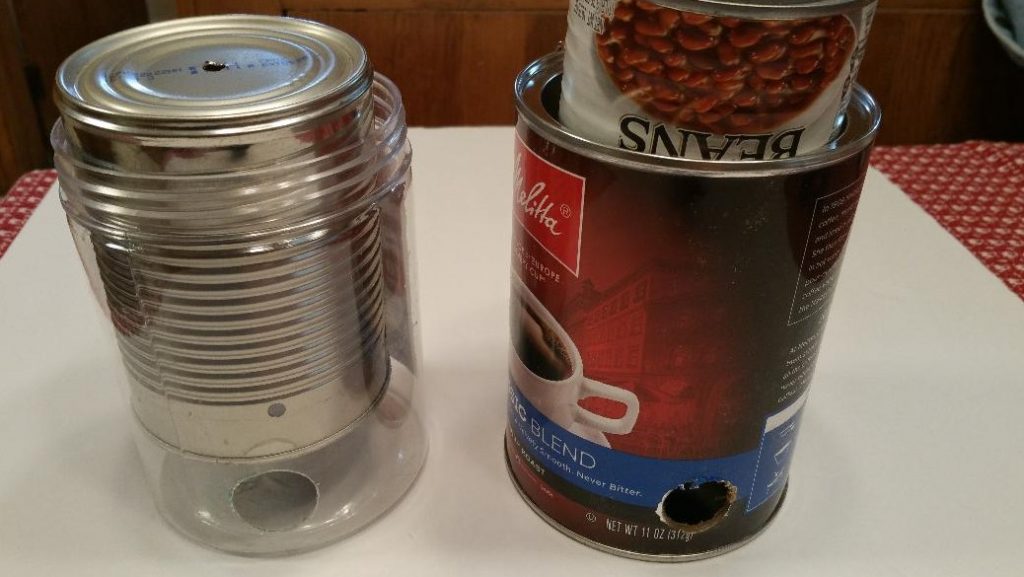
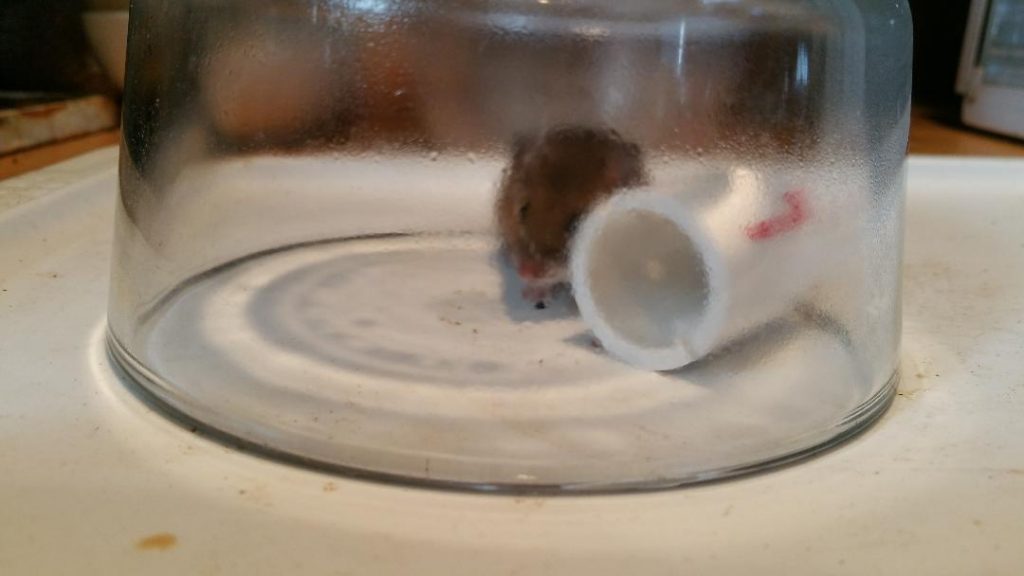
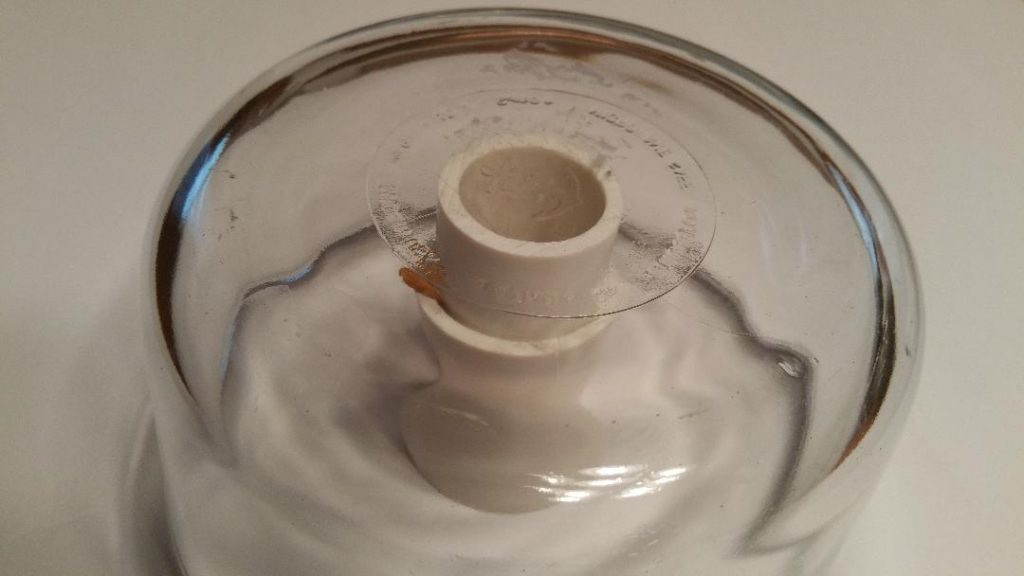
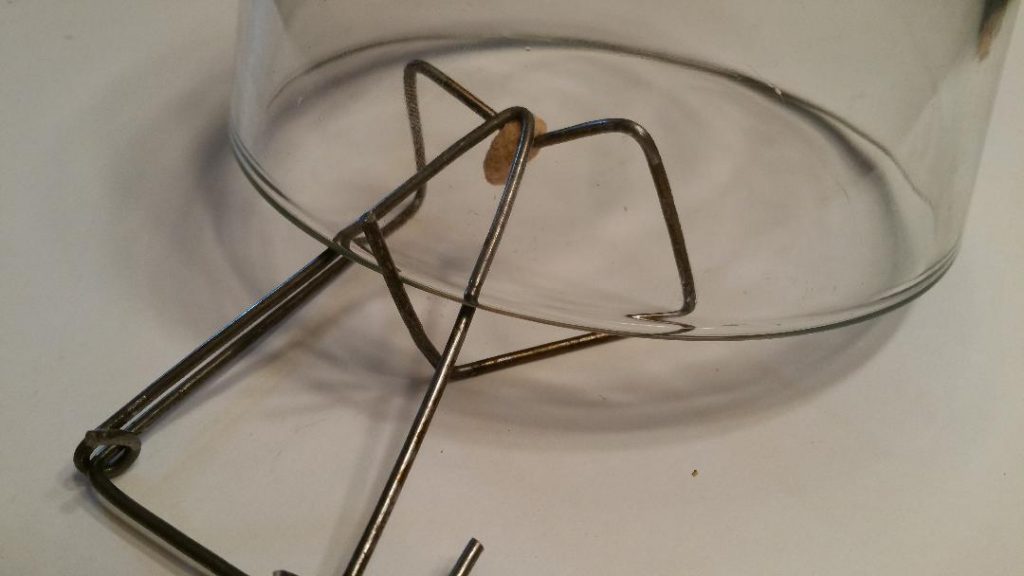
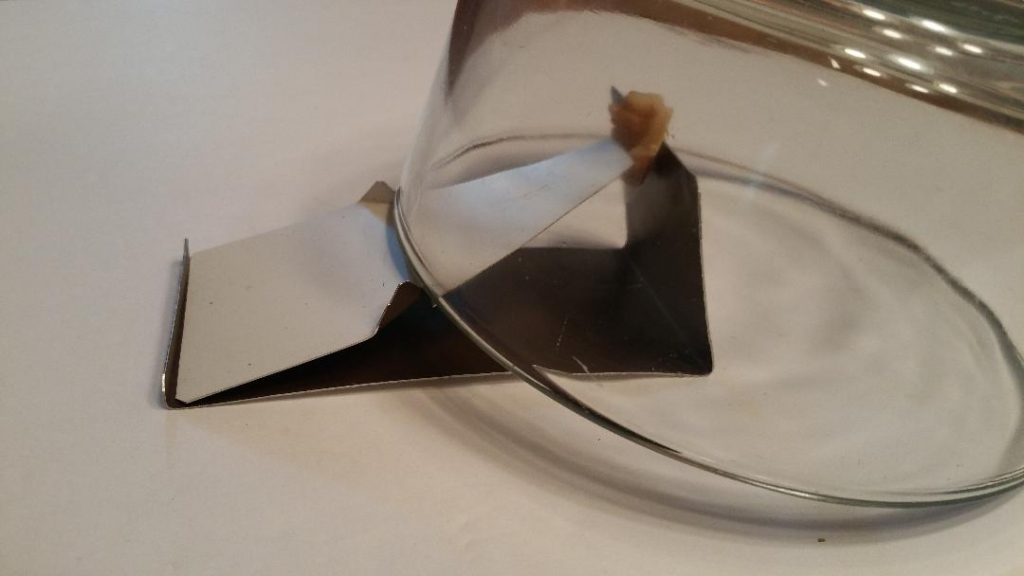
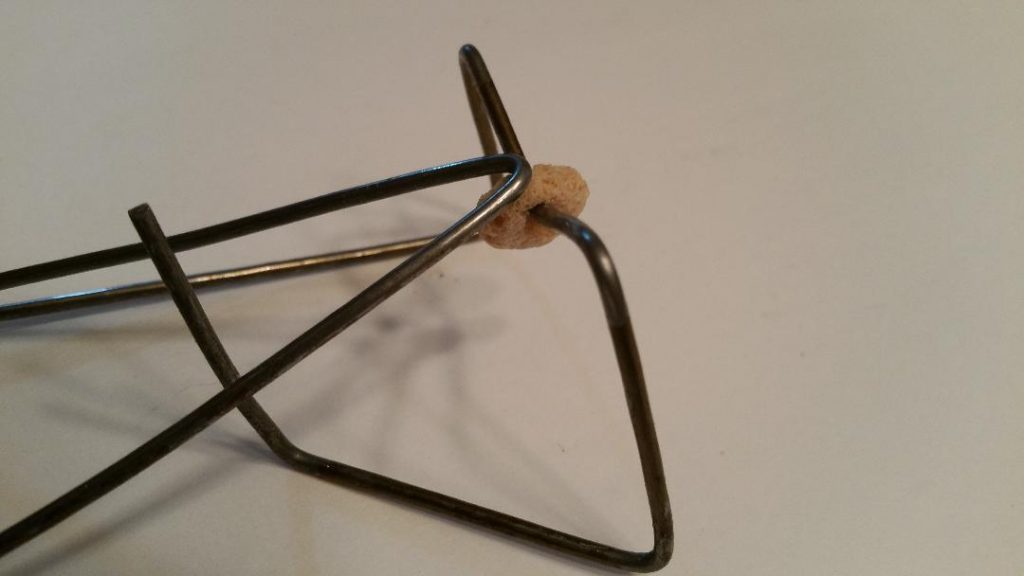
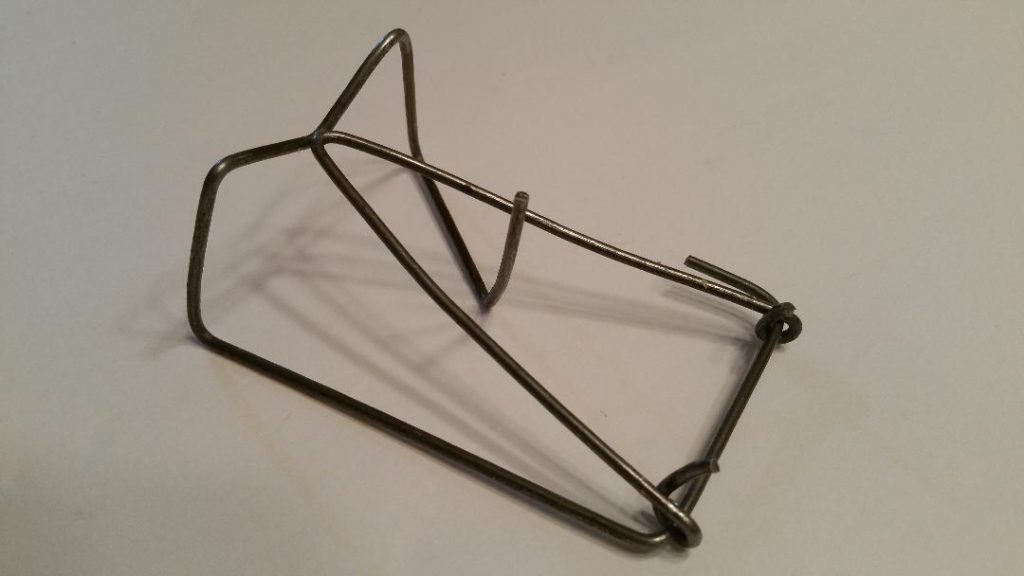
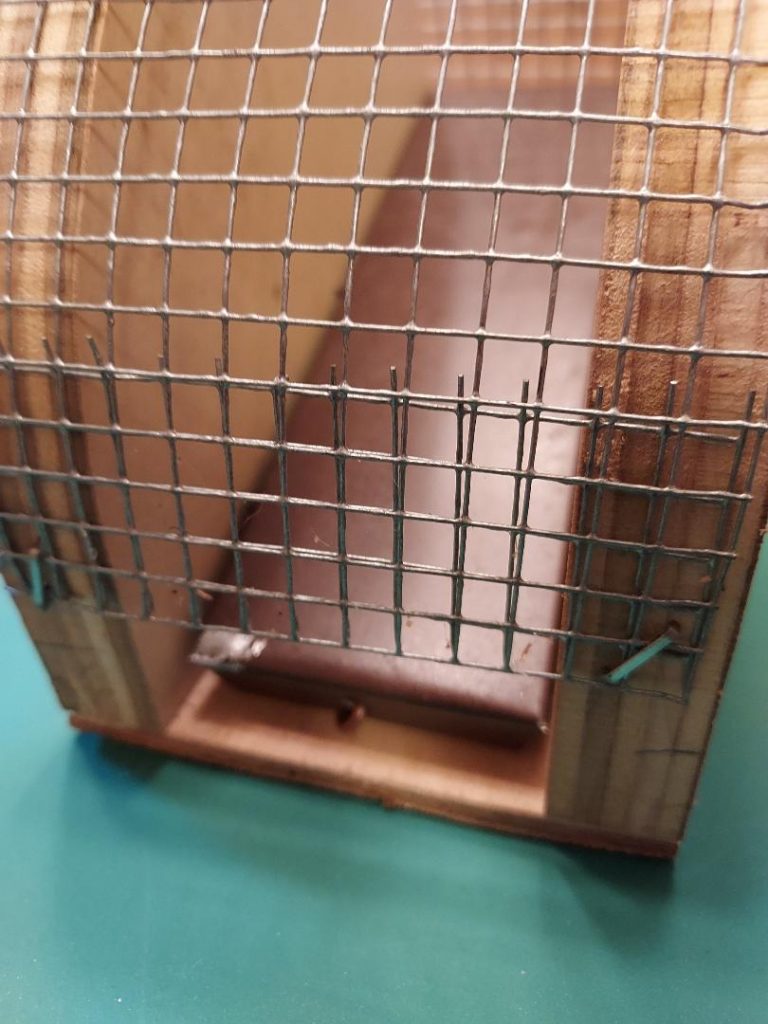
Can-DO Mouse Trap
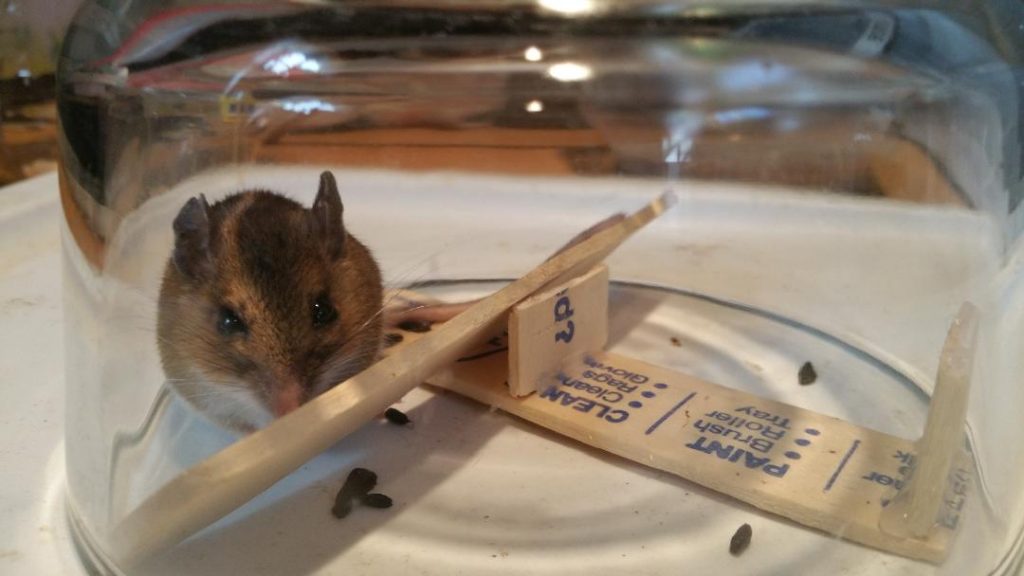
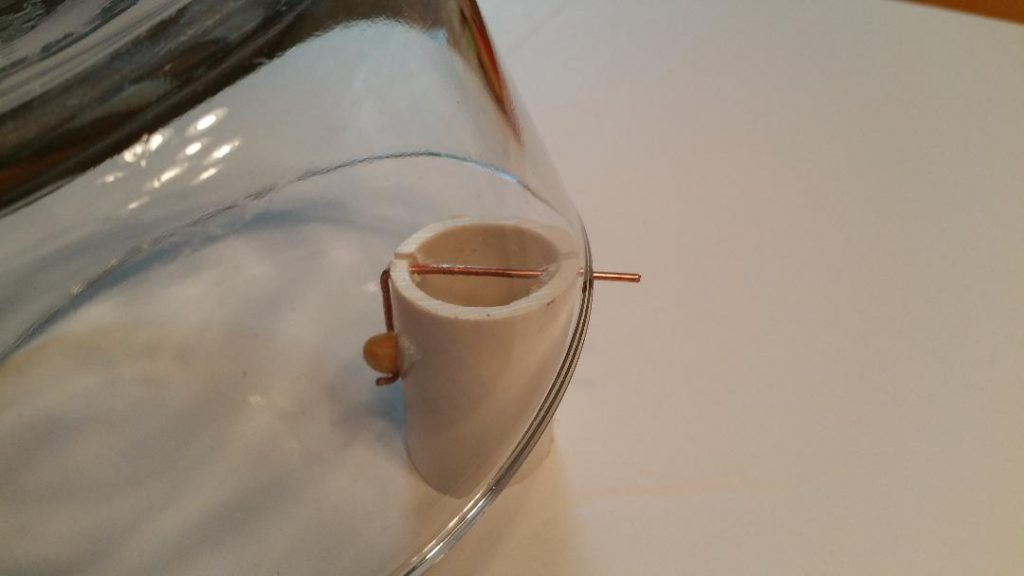
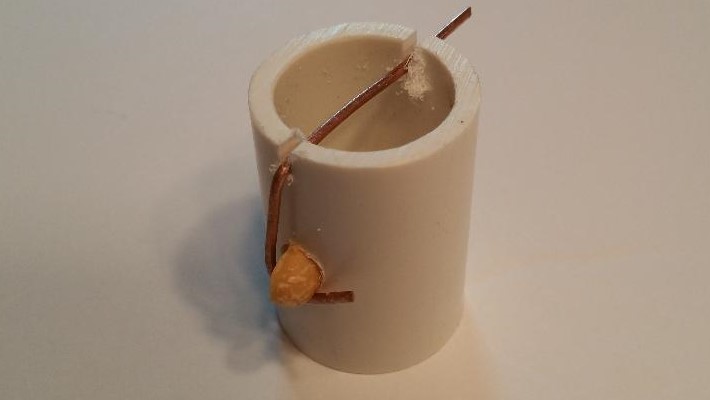
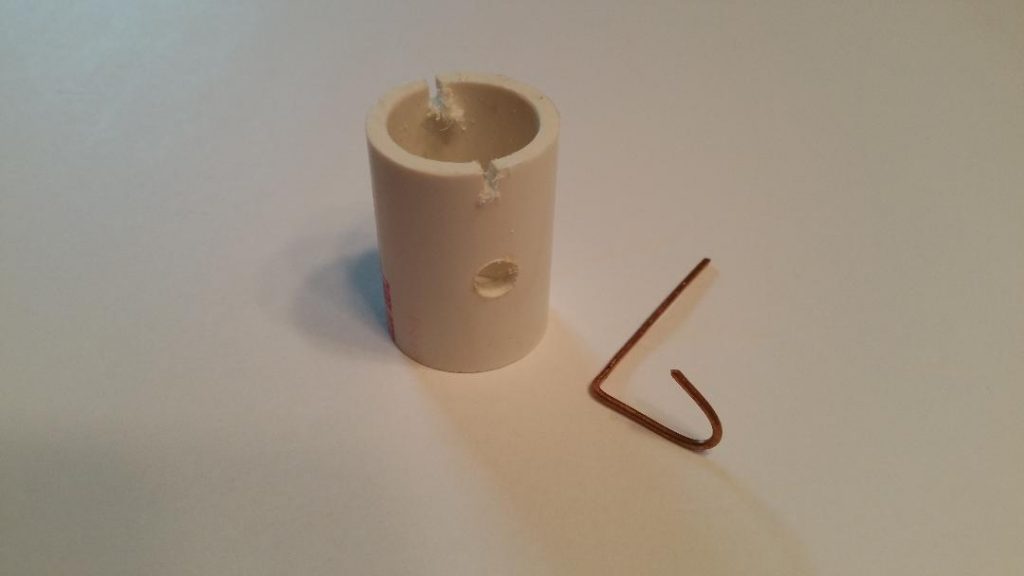
My Can-DO (can drop over) mouse trap design uses the bait and a wire loop to hold the inner can above the trap’s entrance hole. The bait is squeezed between the narrow bend of the hanging wire loop. The hanging wire loop is held in place on the rim of the outer container and positioned opposite of the entrance hole. Place the inner can in the larger, outer container at a slight angle so the rim of the inner can rests on the bait. The trap is now set! This design can also be made using plastic pipe, jars, etc. Select cans or jars that leaves about a 1/4″ to 3/8″ gap between the inner and outer container sides. Always drill or punch air holes in the inner can! If a glass container is used instead of a perforated can place a skewer or nail in the bottom of the outer container to provide an air gap. Below are some examples using different sized cans and containers. The entrance opening is 7/8″ and is about a 1/2″ above the bottom of the outer container. Use 14 or 12 gauge wire to make the wire loop. Size the length of the wire loop so that it holds the inner can at or above the entrance opening. The mouse enters the trap, consumes the bait, releasing the inner can that drops over the mouse.
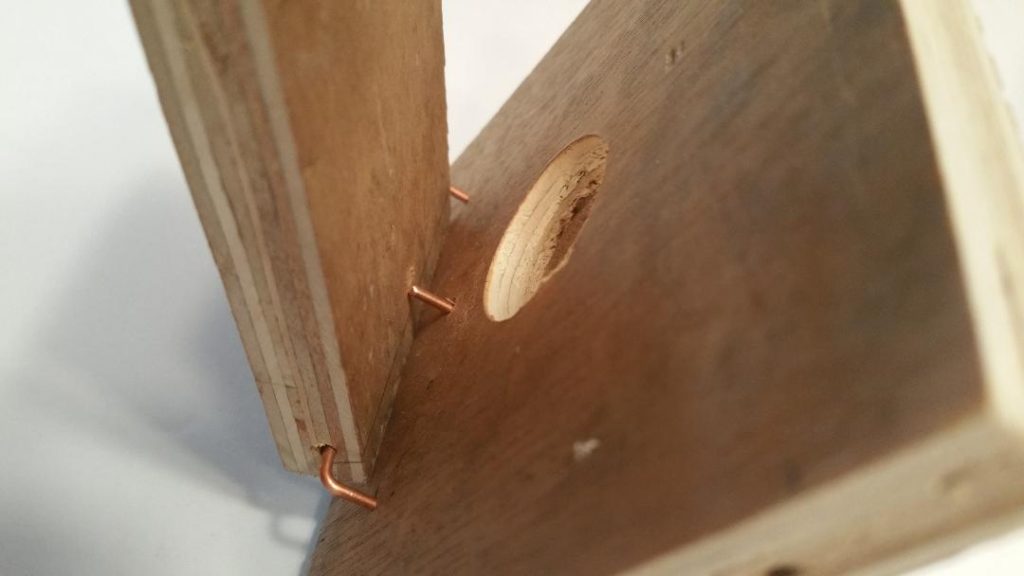
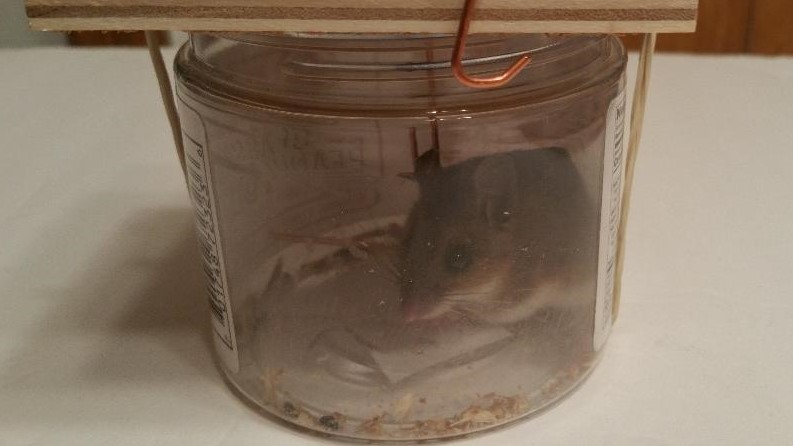
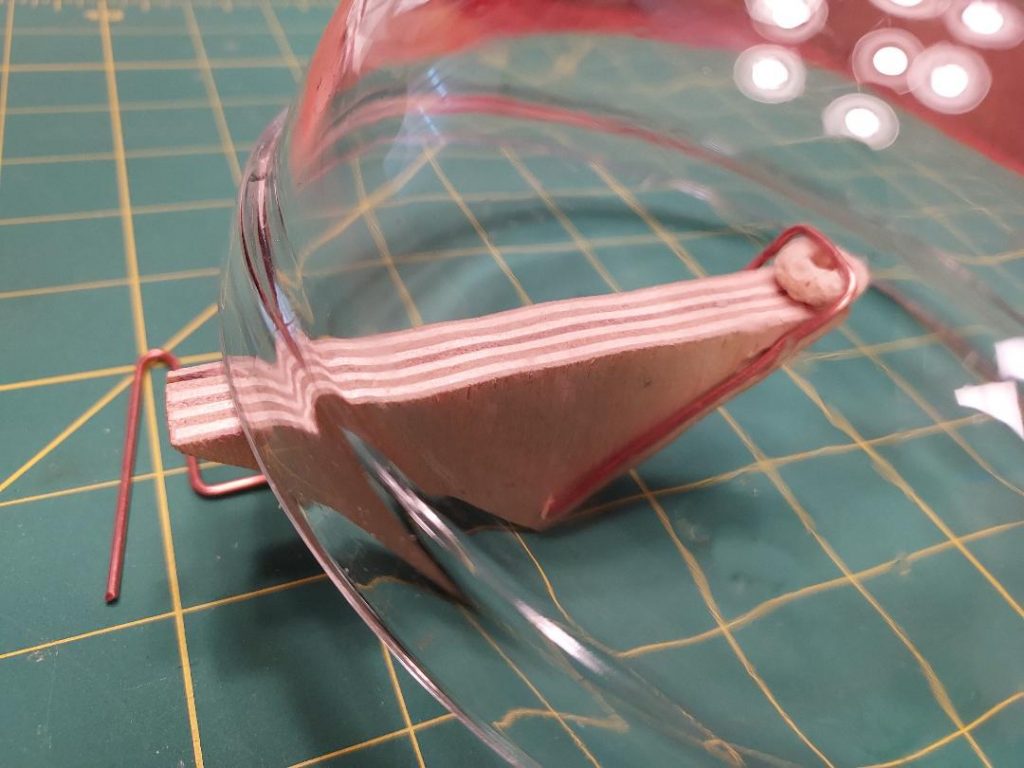
The ‘Dunny’ Mouse Trap
You can probably guess that I spent a lot of time coming up with this one. 🙂 Seriously though, more so on the bait hold and lid release mechanism.
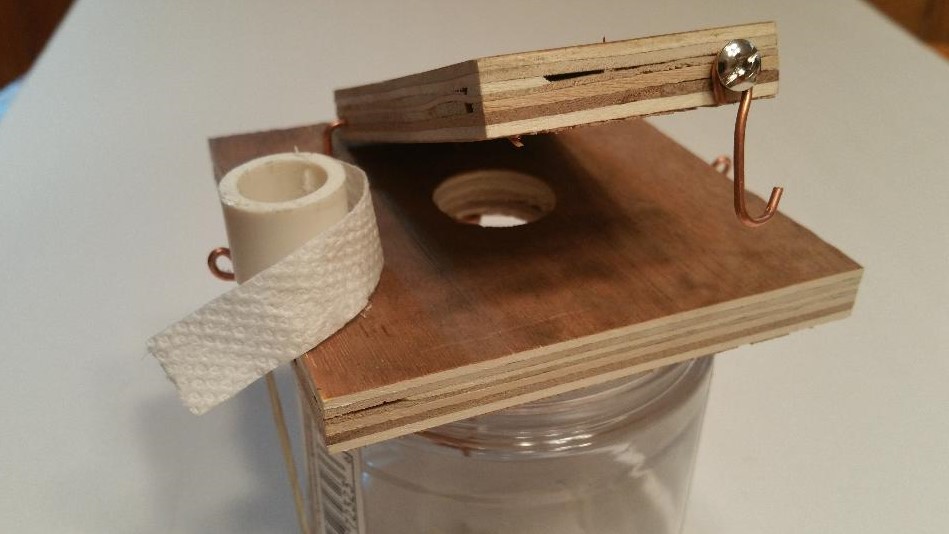
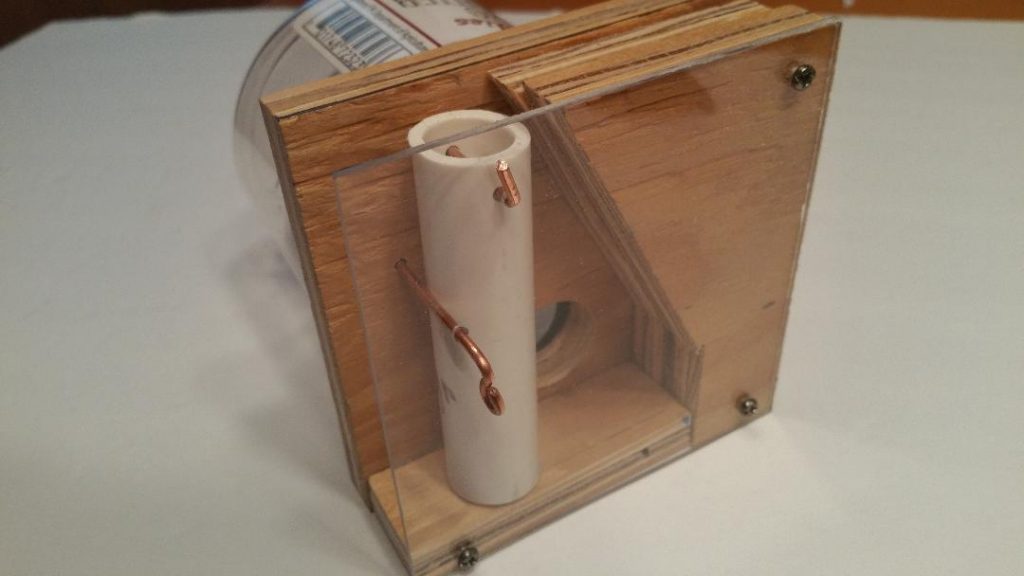
The base and lid are made of 1/2″ plywood. The base measures 4″ X 4″ and has a 1″ hole in the center. There is also a smaller hole behind the larger hole for the plunger wire to hold the lid up. The lid is 2″ X 3-1/2″ and the front of it is positioned flush (no pun intended) to the front edge of the base. The wire used is 14 gauge copper electrical wire. You should be able to purchase the mouse sized toilet paper at any House of Mouse department stores. The offset floppy hook on the lid automatically latches the lid closed when the lid drops down. This trap can be held in place over a container with a rubber band or you can attach the container’s lid to the bottom of the trap base and make the same through holes. Here are more images of the bait hold and lid release mechanism:
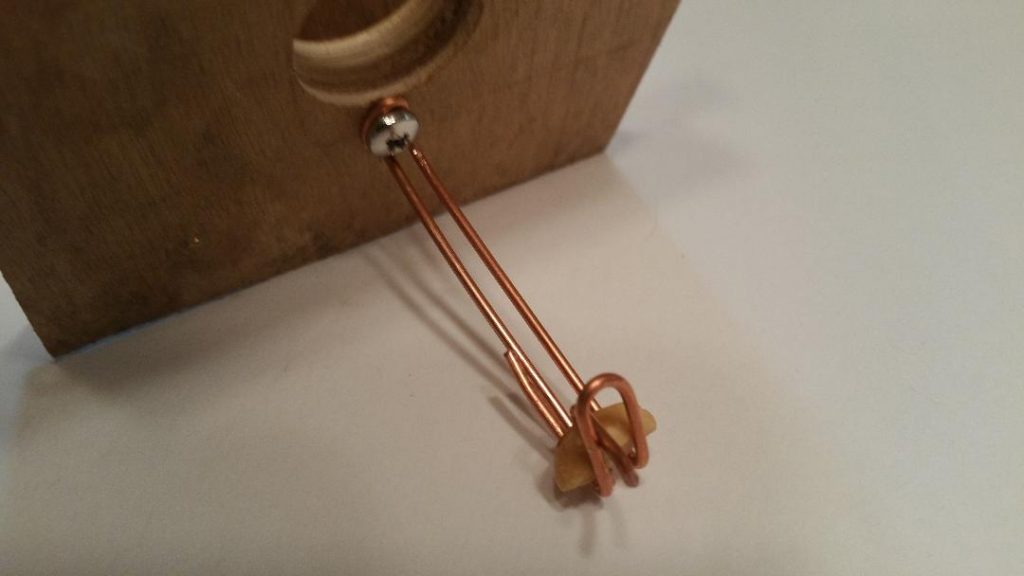
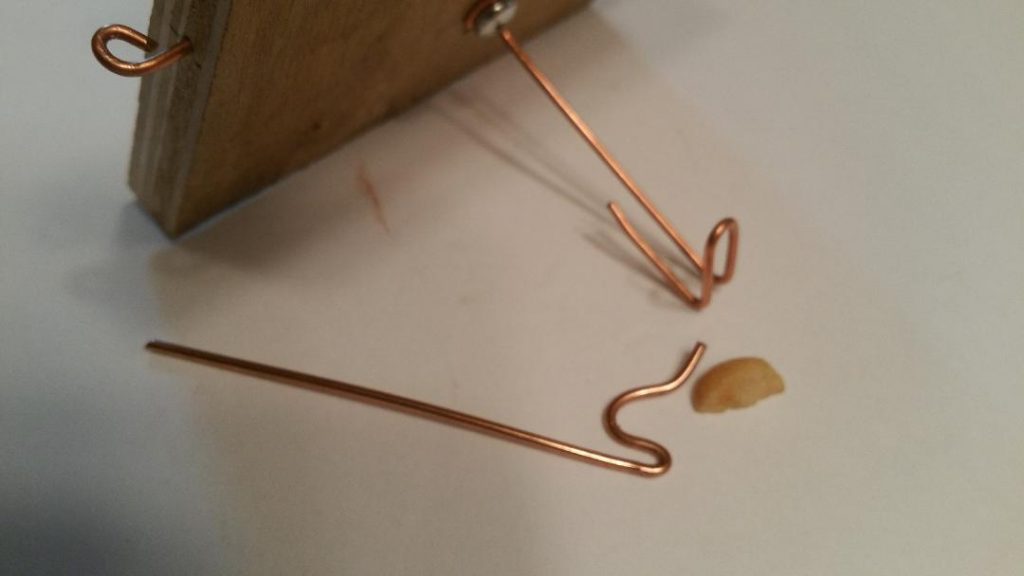
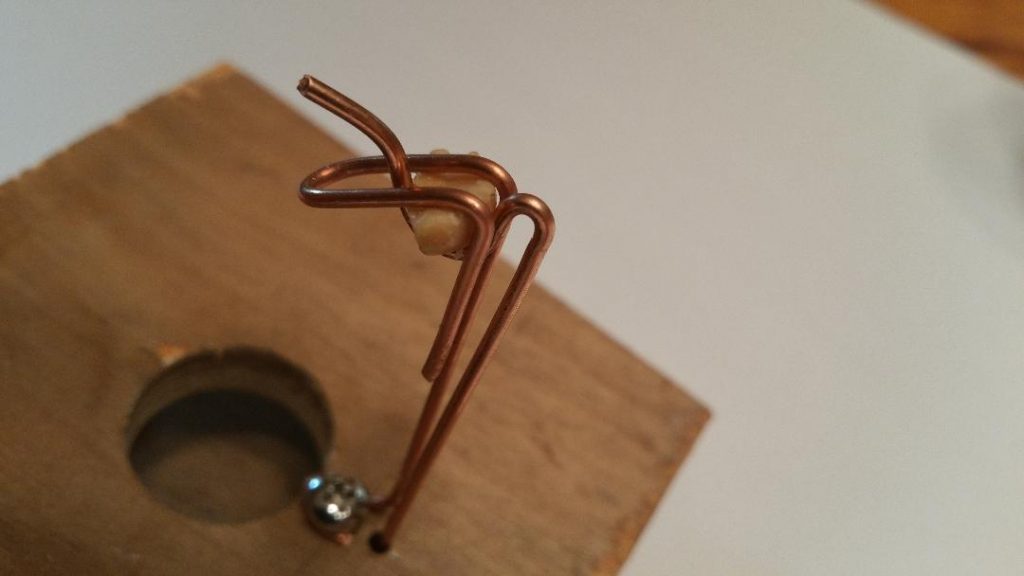
The bait hold and lid release mechanism can be made to different lengths for deeper containers. As long as the plunger wire has enough room to drop below the top of the base and the mouse can reach the bait it will work properly. Finally a way to potty train mice!
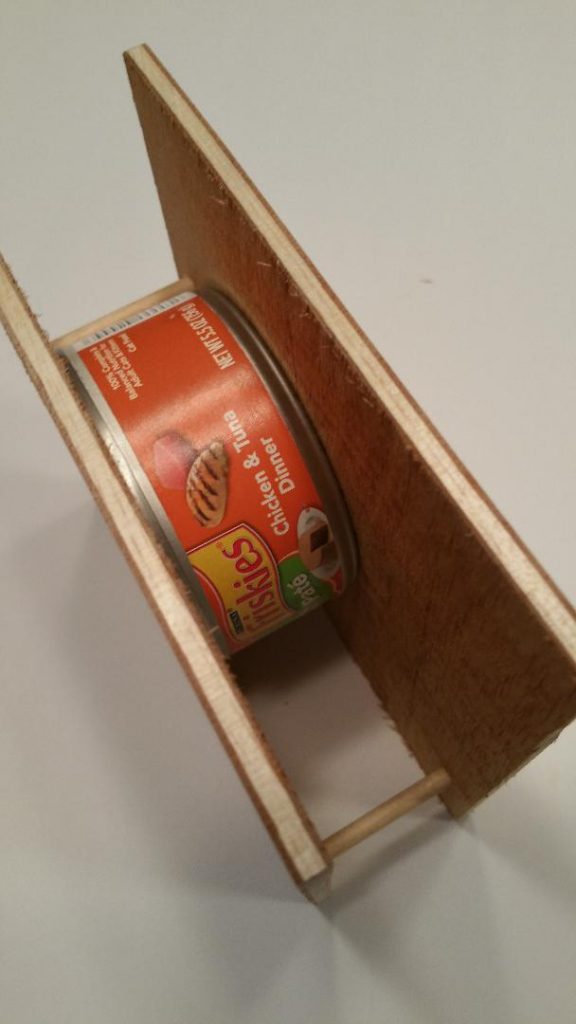
Sliding Can Cover Mouse Trap
Using a piece of 1/2″ plywood as a cover over a shallow can lets you use rubber bands to close the cover when the bait is eaten or displaced by the mouse. Make the cover the same width as the container’s diameter. Drill a shallow 3/8″ hole in the center of the plywood. Use a short, narrow piece of plywood as a stick against the hard bait to hold the can propped open. The single rubber band placed across the stick holds the stick and bait in place while you position the can and retraction rubber bands. I cut small notches in the plywood to keep the rubber bands centered over the can. The mouse enters the can through either gap, eats the bait in turn releasing the lodged stick which allow the stretched outer rubber bands to contract, closing the cover tightly over the can.


See-Saw Bowl Mouse Trap
I’m sure this simple trapping method goes back eons to cave painting time. But did our distant ancestors have paint stirrers and see-saws back then, hmm? I used a bowl, a wooden paint stirrer and hot glue to make this trap. The bait is lodged in the 3/8″ hole and against the see-saw end, then the bowl edge is set on the raised end. You know what happens next…

The ‘Cantilever First Down’ Bowl Mouse Trap
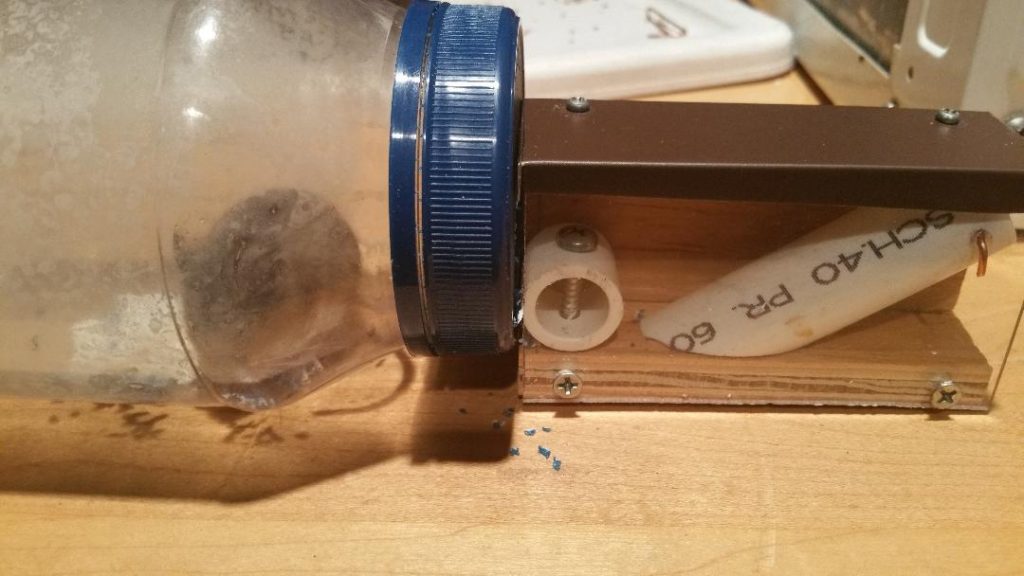
A supporting, extended arm holds the bowl up while the other arm holds the bait (it somewhat resembles a football referee signaling first down to me). I made this mechanism with a small section of 1″ PVC pipe and wire. Wood or metal will also work. Drill a 5/16″ hole in the middle of the pipe and make two notches on the top inline with the hole. Make a sharp, right angle with the wire and then a bend that aligns with the hole. Insert a partial peanut or other hard bait half way into the hole. Place the wire bend under the bait while aligning the straight portion of the wire in the notches. Place the bowl edge over the pipe and resting on the wire arm.
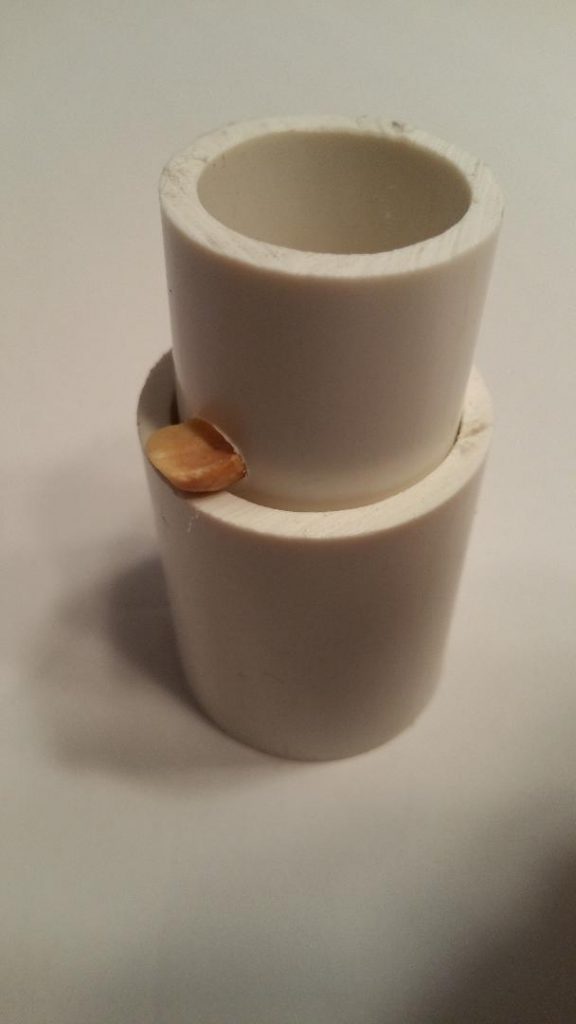
The ‘Hovering’ Mouse Trap
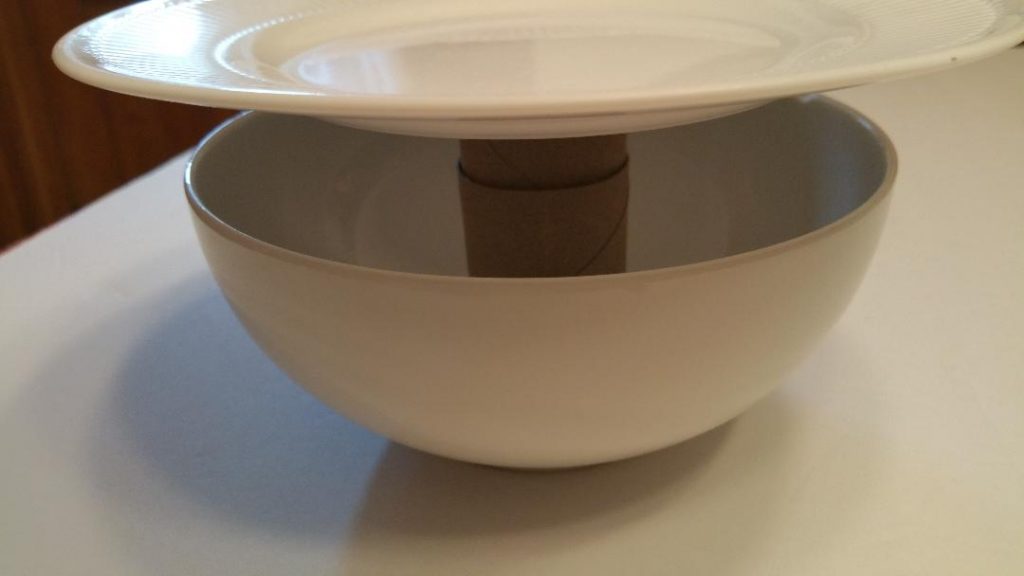
Is it magic? No, I’m just using a collapsing central supporting column made with pipe. I used a 2″ piece of 1″ PVC pipe and a 2″ piece of 1-1/4″ PVC pipe. Size the pipe lengths for your containers inner height and bowl edge access gap. Drill a 3/8″ hole centered in the 1″ piece. Put a peanut half in the hole so the two pieces are extended and place a bowl or other low profile container over it. When the mouse eats the bait the smaller piece of pipe slides down into the larger piece dropping the bowl over the mouse.
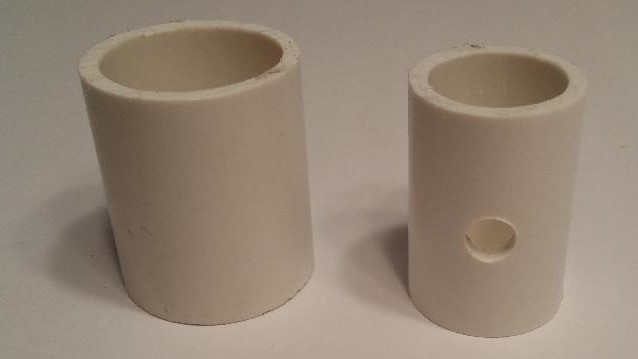
The ‘Hovering’ Mouse Trap V.2
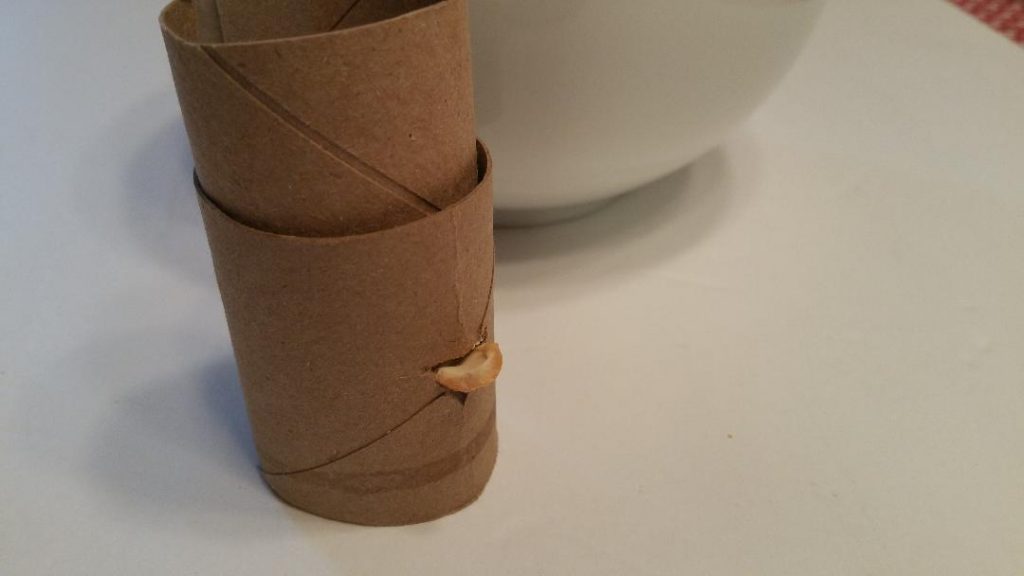
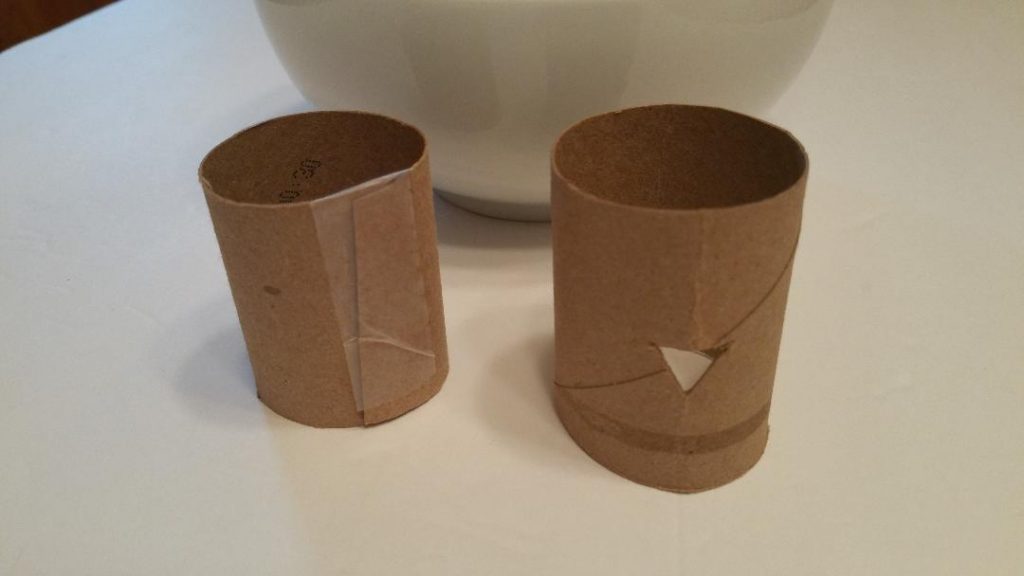
A recyclable version of the above Hovering Mouse Trap design using paper towel or toilet paper roll core tubes. Make the inside tube a smaller diameter by cutting it lengthwise and then tape the seam to hold it tightly together. Squeeze the outer tube flat and then using scissors cut an inverted triangular in the middle and then re-form it so it is tubular again. Size the length of the tubes so when they are collapsed together they are no taller than the depth of the bowl. Size the inside tube length to provide a sufficient entry gap when the bait is in place. About a 1/2″ to 3/4″ entry gap works well.
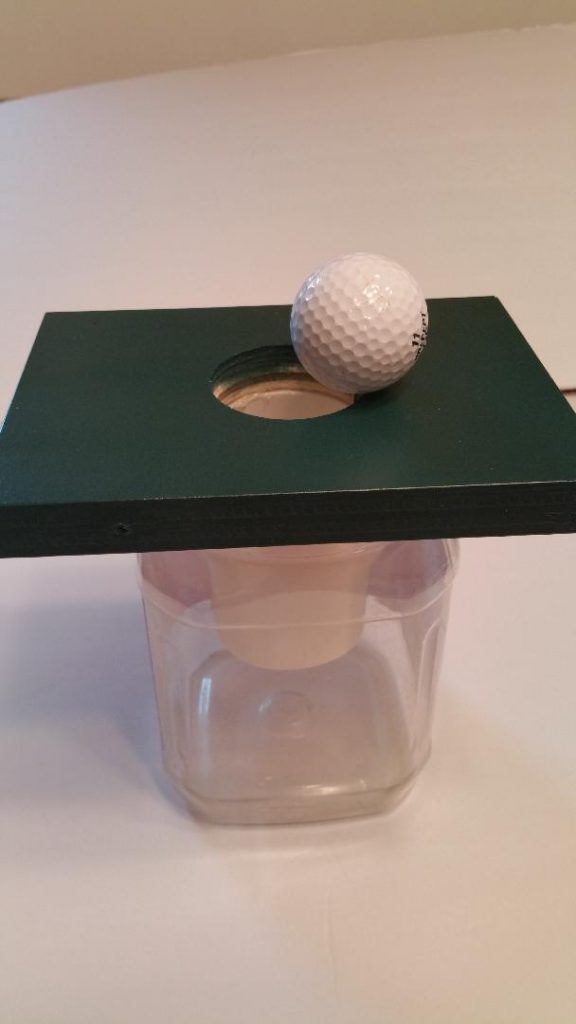
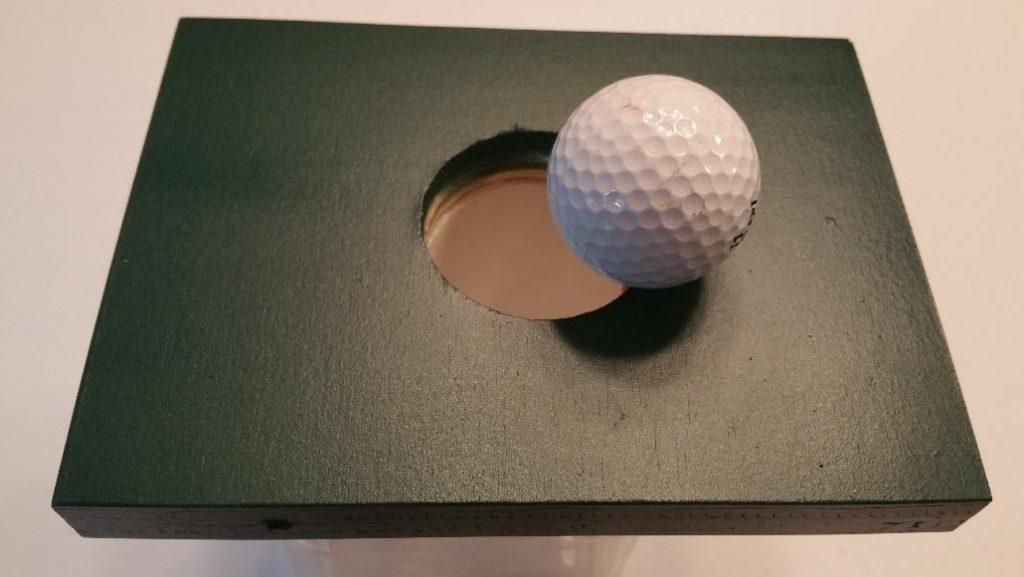
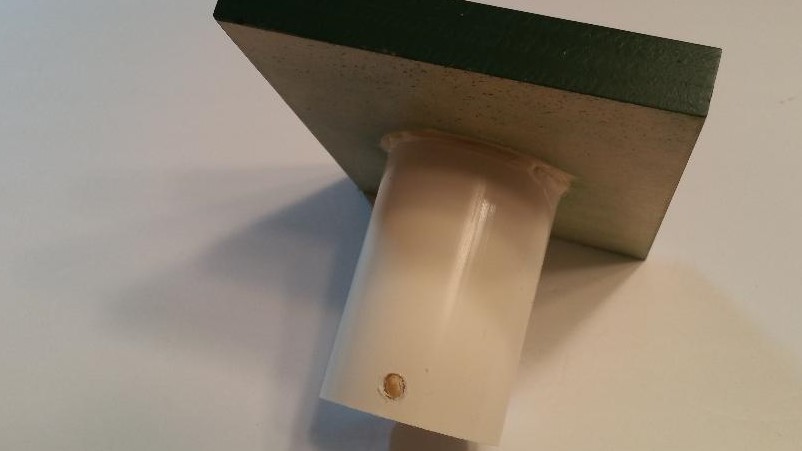
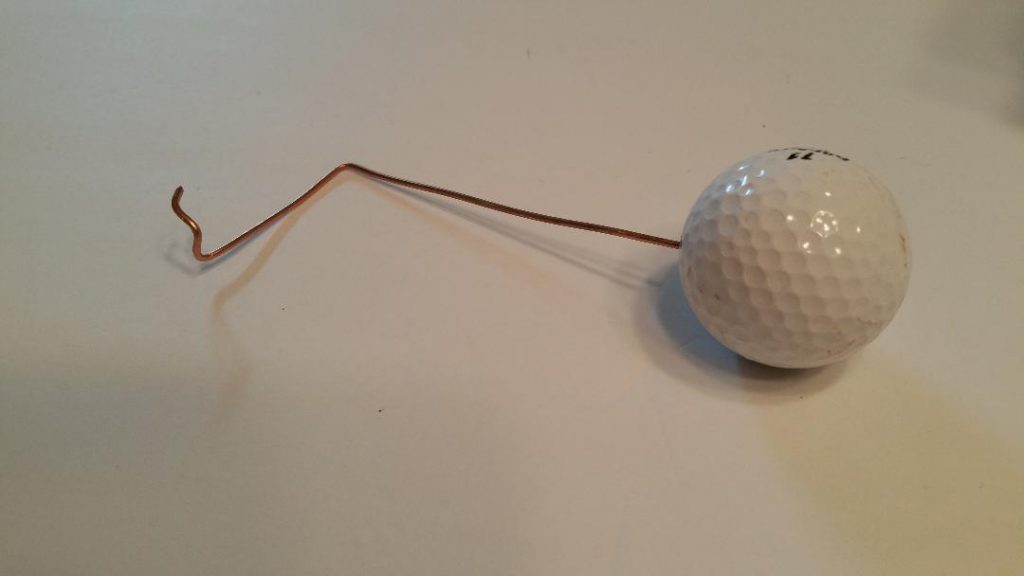
The ‘Precarious Putt’ Mouse Trap
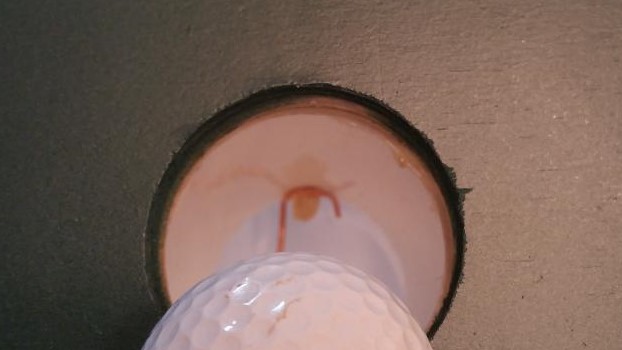
I don’t golf but I do find stray golf balls in my yard from time to time. So let’s put one of them to good use and catch a mouse! I made this mouse trap with 3/4″ plywood, a golf ball, 14 gauge copper wire, 2″ PVC pipe and a used plastic container. Drill a 2″ hole in the center of the plywood. Cut the pipe to 3-3/4″ long and then drill a 5/16″ hole close to the bottom of the pipe edge. Hot glue the pipe to the hole in the plywood. Drill a 1/16″ hole deep into the golf ball. Shape the wire as shown below and force the long end of the wire into the hole of the golf ball. Adjust the length of the wire by moving the wire in or out of the golf ball until the golf ball rests on the edge of the hole and the hook rests on the bait. When the mouse enters the trap and eats the bait the golf ball drops into the pipe preventing the mouse’s exit. The plywood is heavy enough so that the trap can just sit over the container opening. As long as the hook rests on the bait the golf ball can move from side to side without falling in the hole.
This would make a nice gift for the golfer that has everything or put one in the club house as a conversation piece. 🙂 Good miniature mouse golfing folks!
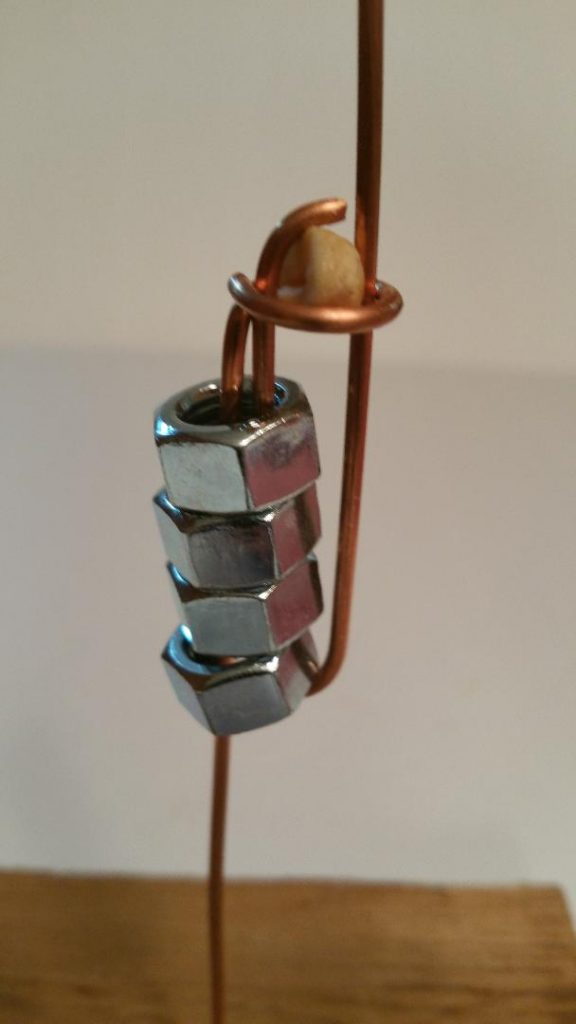
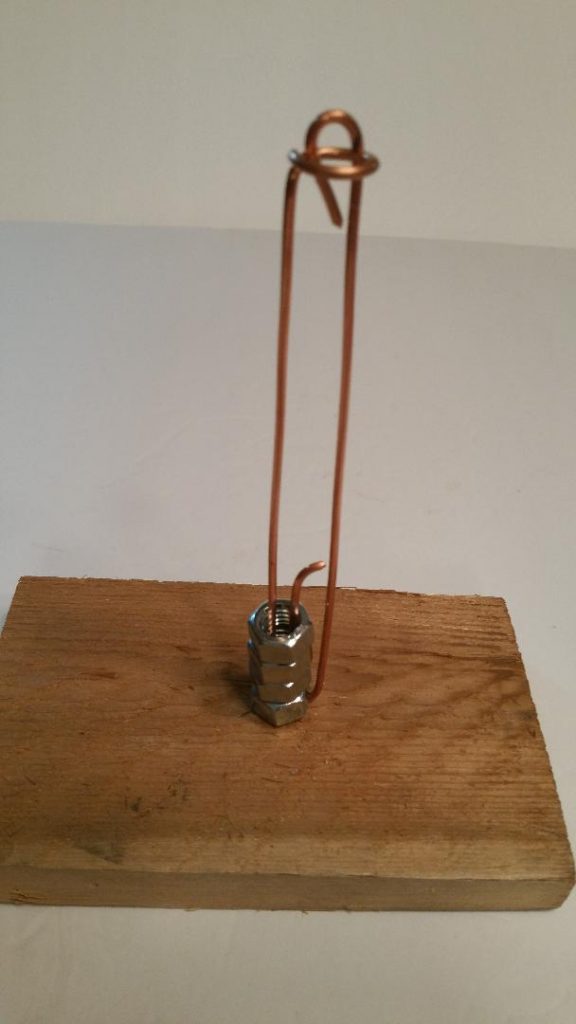
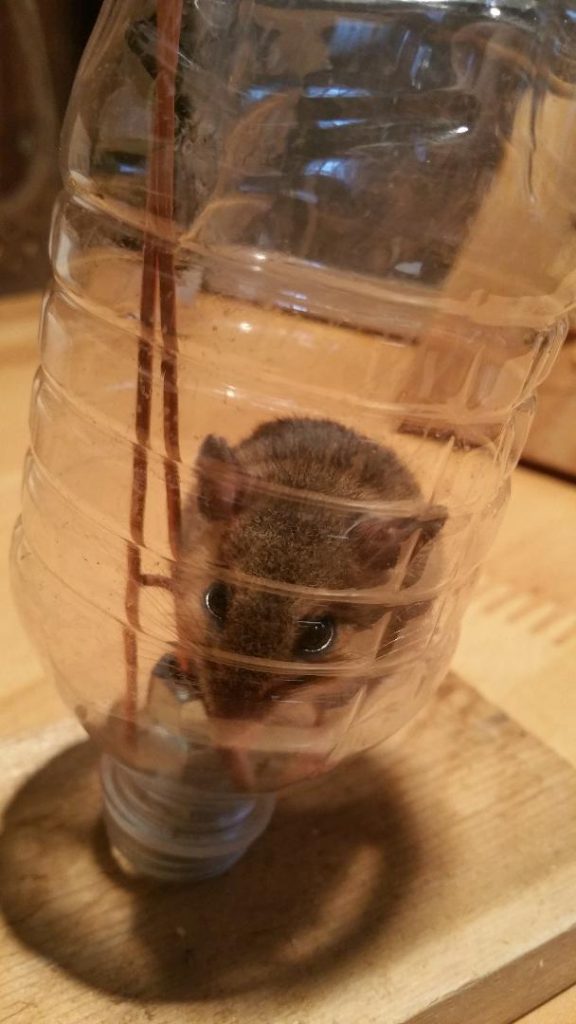
The ‘Floating Water Bottle’ Mouse Trap
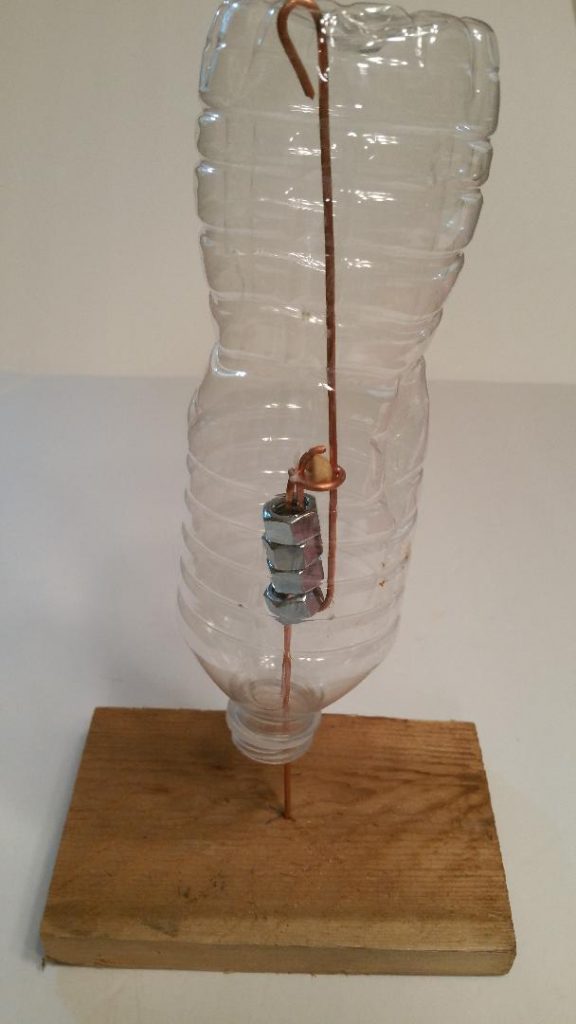
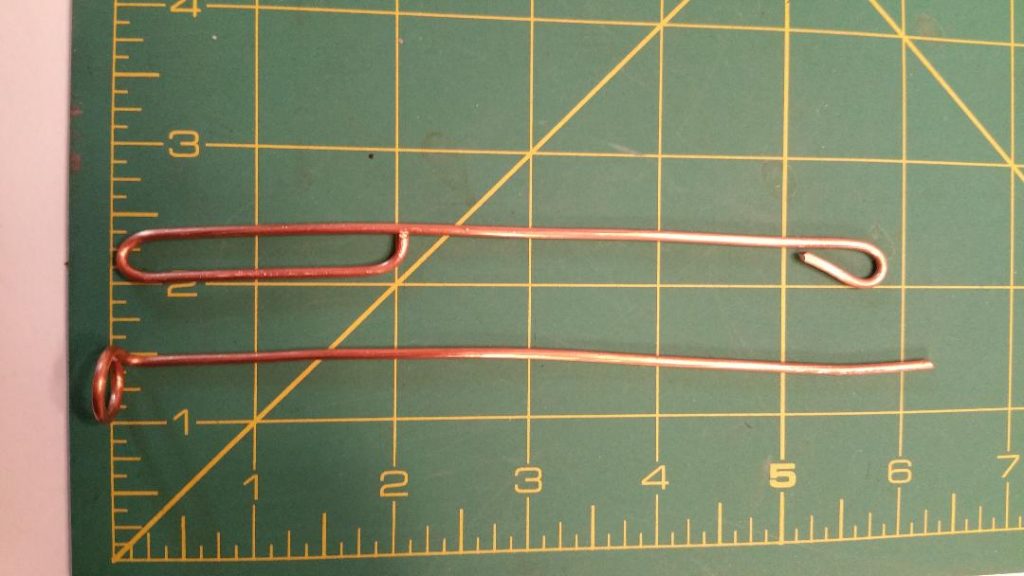
This trap design requires the mouse to climb the vertical wire within the water bottle to get to the bait. When the bait is consumed the elongated loop and metal nuts drop toward the bottom allowing the bottle to drop and simultaneously block the mouse’s exit with the metal nuts. The material used is a water bottle, 12 gauge copper electrical wire, four 3/8″ metal nuts and a piece of wood.
Drill a few small holes on the bottom (flat) of the water bottle for air exchange. Form a 3/8″ ID right angle loop on one end of a piece of wire. Form a narrower elongated loop shaped wire and slip the four nuts onto the elongated loop. Place the straight end of the right angle loop piece of wire through the nuts and into a 1/16″ hole in the wood. Raise the elongated loop wire until the top of the loop passes through the fixed right angled loop and then place a piece of bait between the two loops. Place the water bottle over the extended wire mechanism. The trap is now set.

The ‘High Strung’ Mouse Trap
This design method blocks access to the bait causing the mouse to chew through the obstruction to get to it in turn triggering the trap. A shallow cavity holds the bait (use hard bait or soft bait like peanut butter) and a taut line of string, dental floss, rubber band or fishing line spans the bait cavity opening blocking easy access to the bait while also propping the bowl end up. The first trap example shown uses a cut off water bottle top as the bait cavity, a bowl and rubber band. Place the rubber band around and across the bowl’s rim. Put the bait under the water bottle top and rest the inverted bowl’s taut rubber band across the exact center of the water bottle’s opening. The water bottle should be positioned toward the inside, propped edge of the bowl. The mouse enters under the bowl and tries to get into the bait cavity. It chews the rubber band open which causes the bowl drop over the mouse.
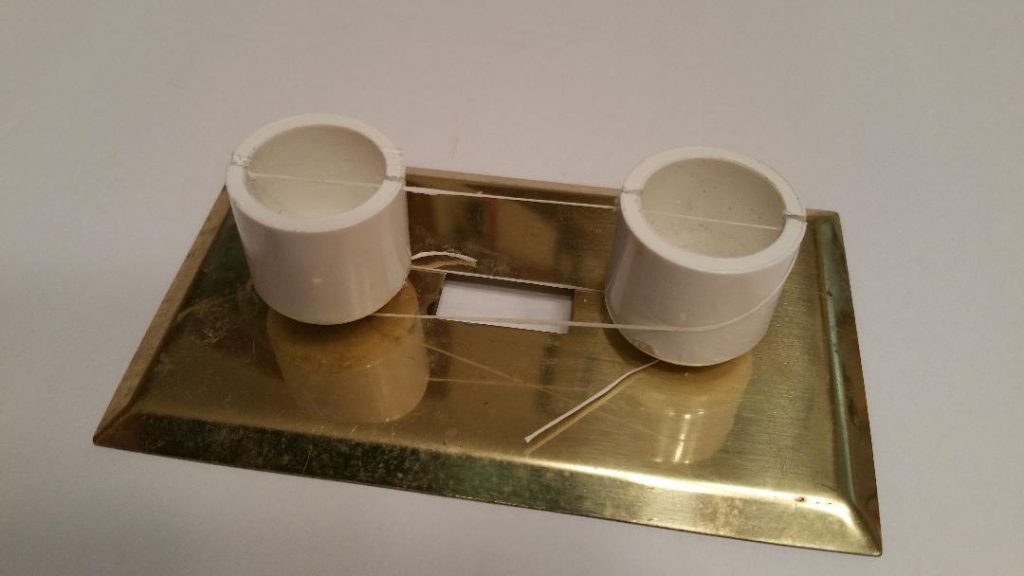
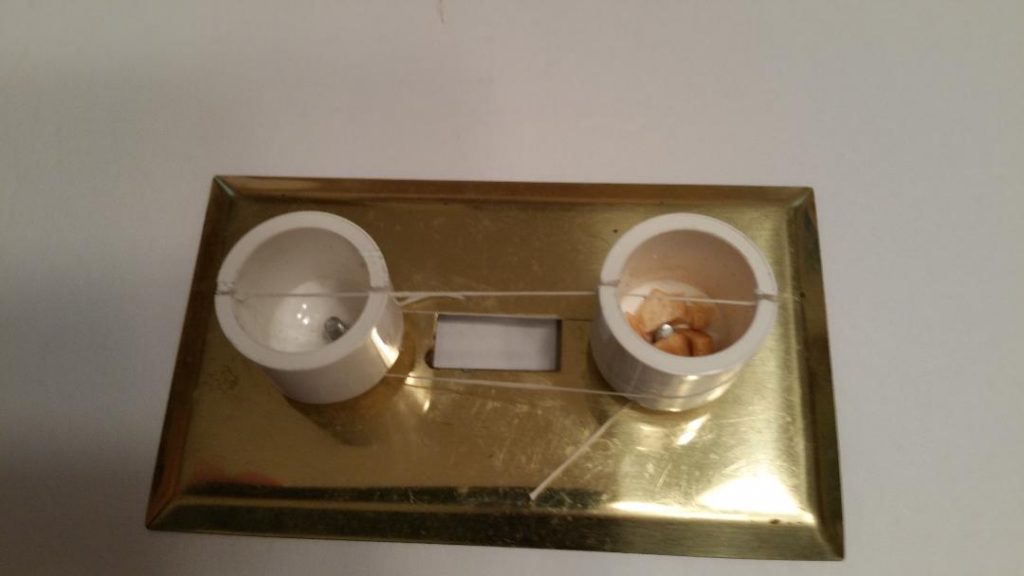
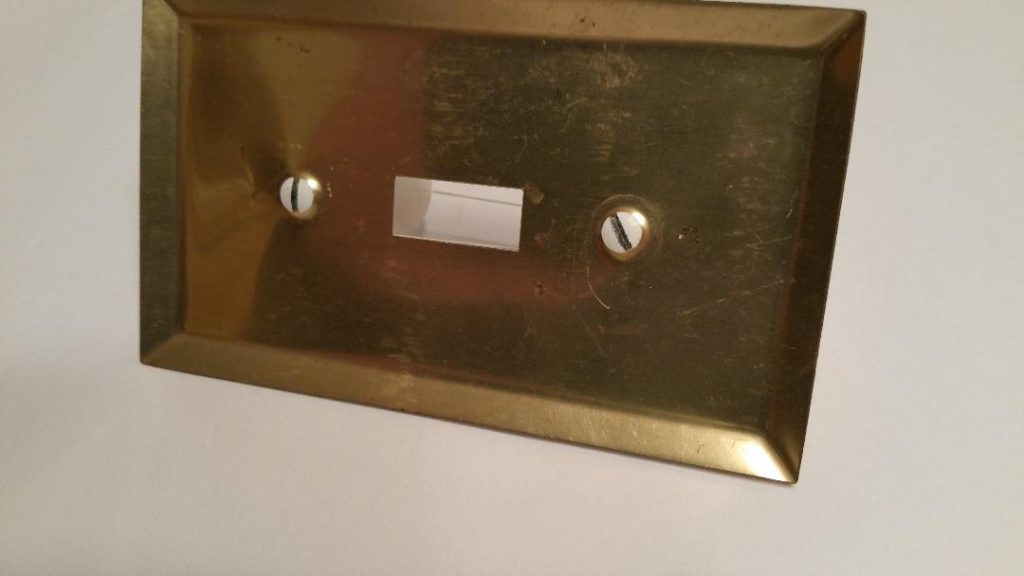
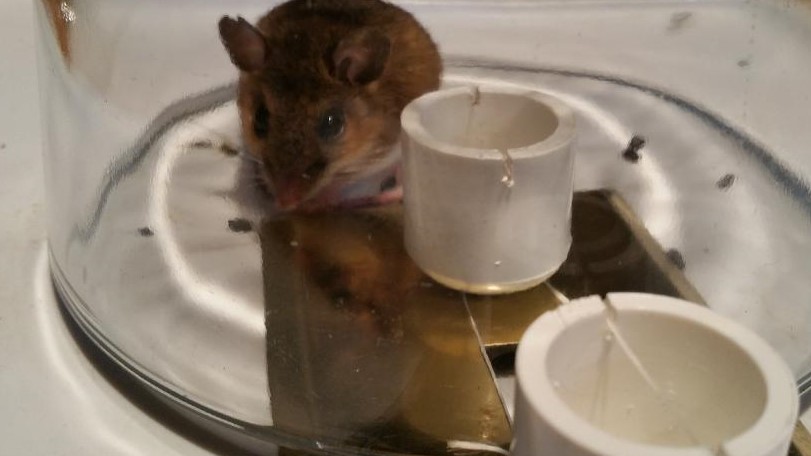
This next variation of the High Strung Mouse Trap is made using an old light switch cover plate and 1/2″ PVC pipe caps screwed to the cover plate using the existing cover plate mounting holes. Drill a 7/64″ hole in the top center of each cap. Cut two shallow slots on each cap’s outer rim and mount them to the cover plate with cover plate screws. You can span the caps with a single rubber band or use string, dental floss or fishing line. Wrap the line around the base of the caps to secure. When using a rubber band wrap it over both caps and around the bottom of the cover plate. A variety of other parts and materials can also be used to create this same trapping method.
Put a small amount of bait in one cap and place an inverted bowl over the baited cap with its rim close the other cap.
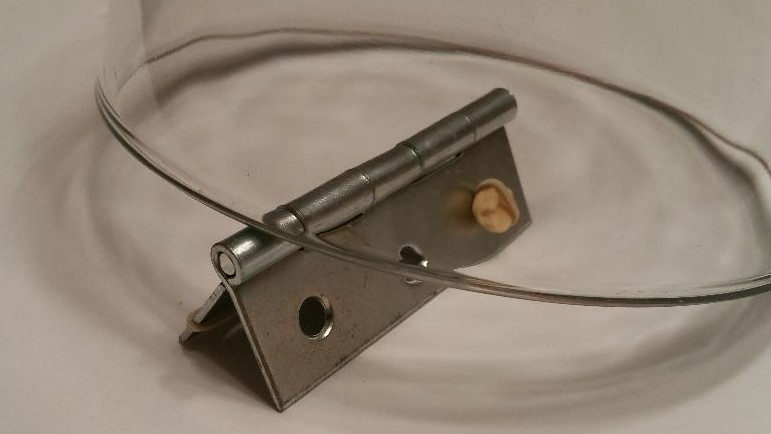
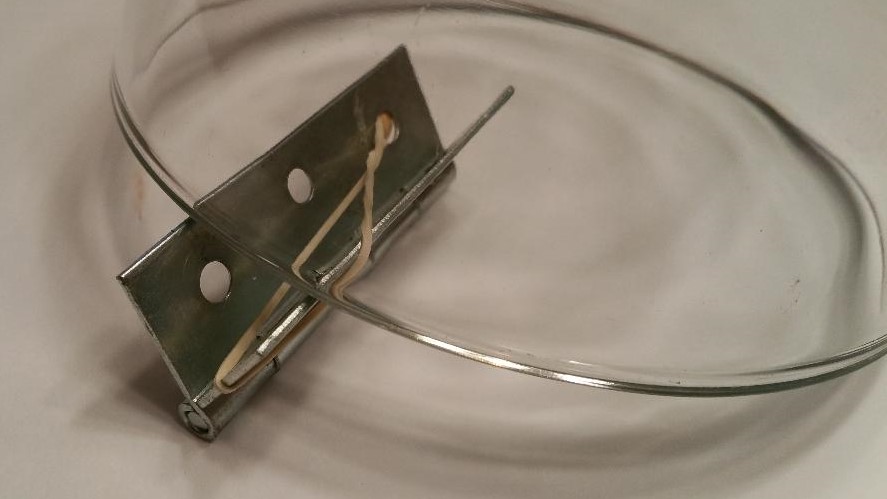
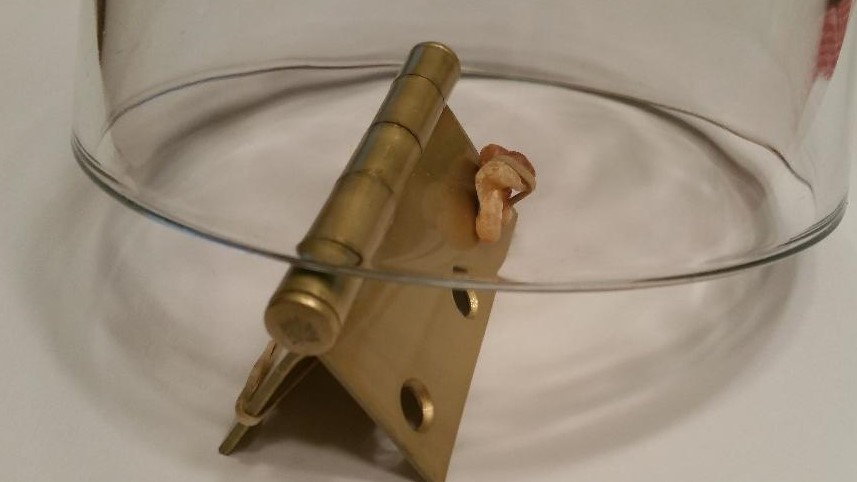
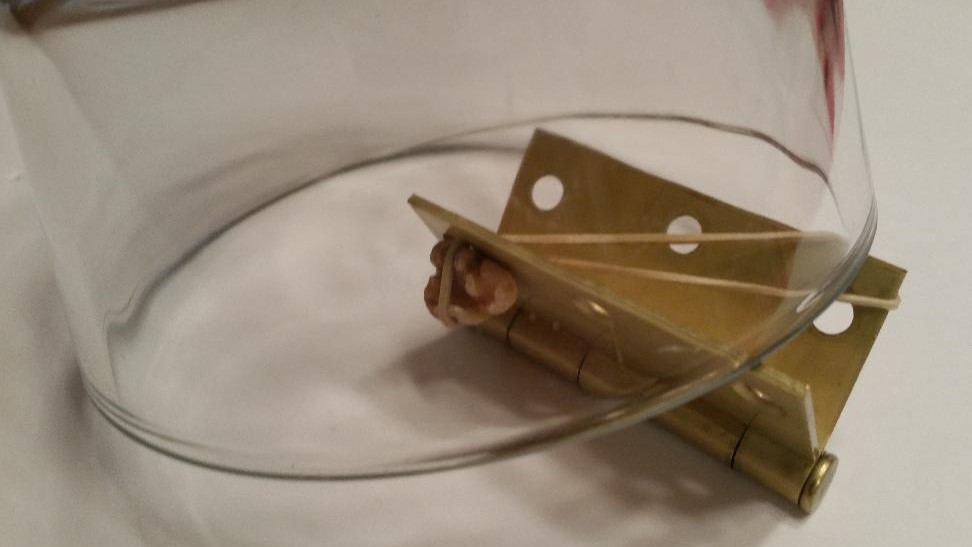
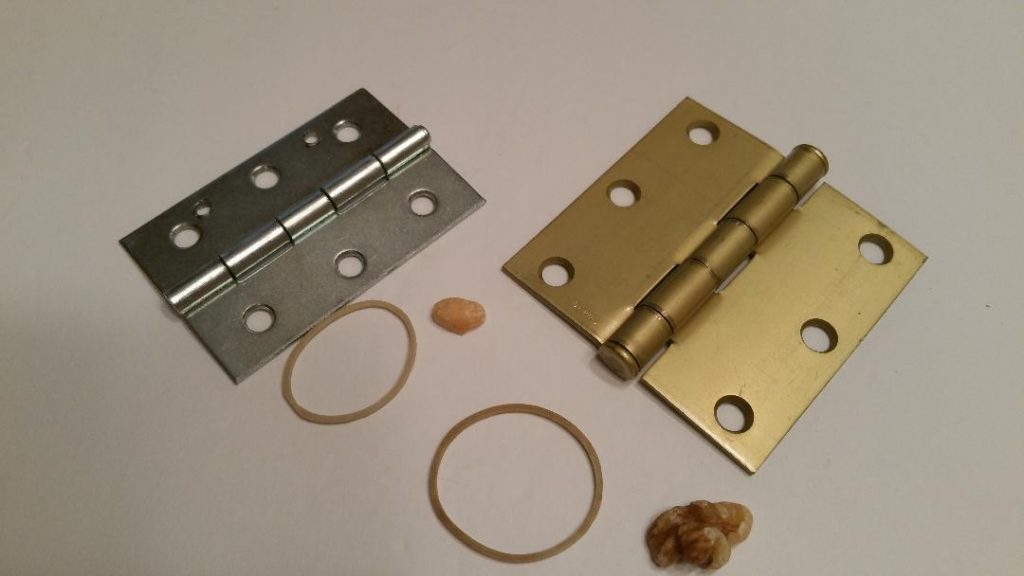
The ‘Unhinged’ Mouse Trap
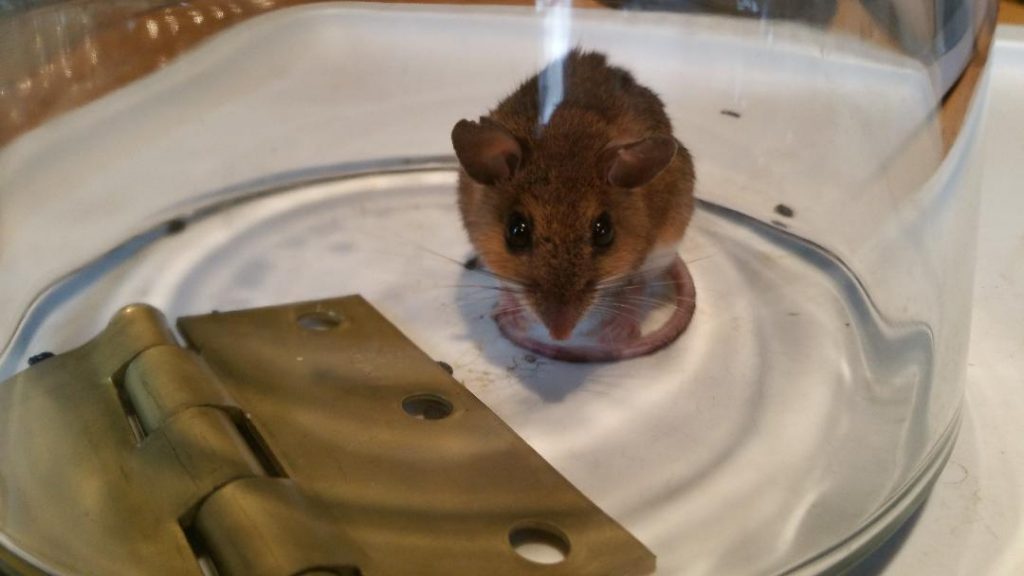
If you have a door or cabinet hinge you can make a simple mouse trap with it. The hinge must work freely without binding. A small rubber band secures the bait through a screw hole and holds the hinge open and against its opposite range of motion. If the surface beneath the trap is not smooth place the the hinge upside down with the hinge wings resting against the rim of the bowl.
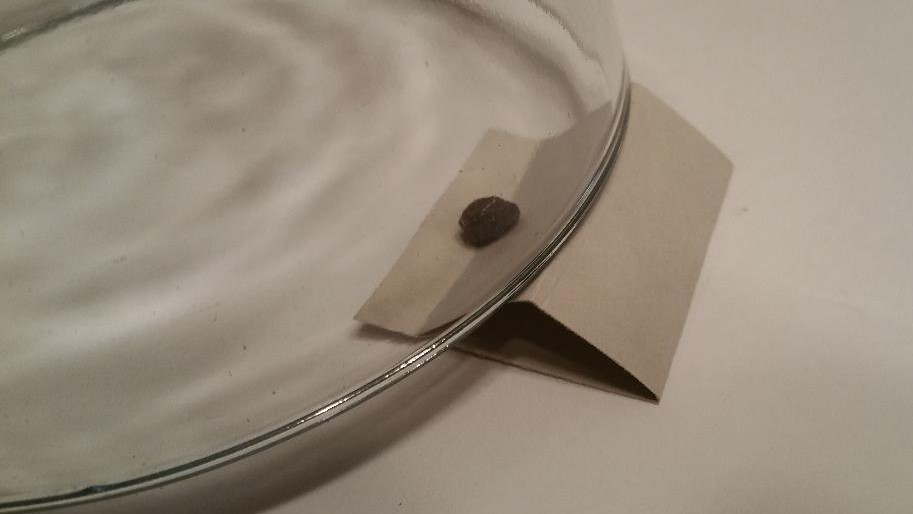
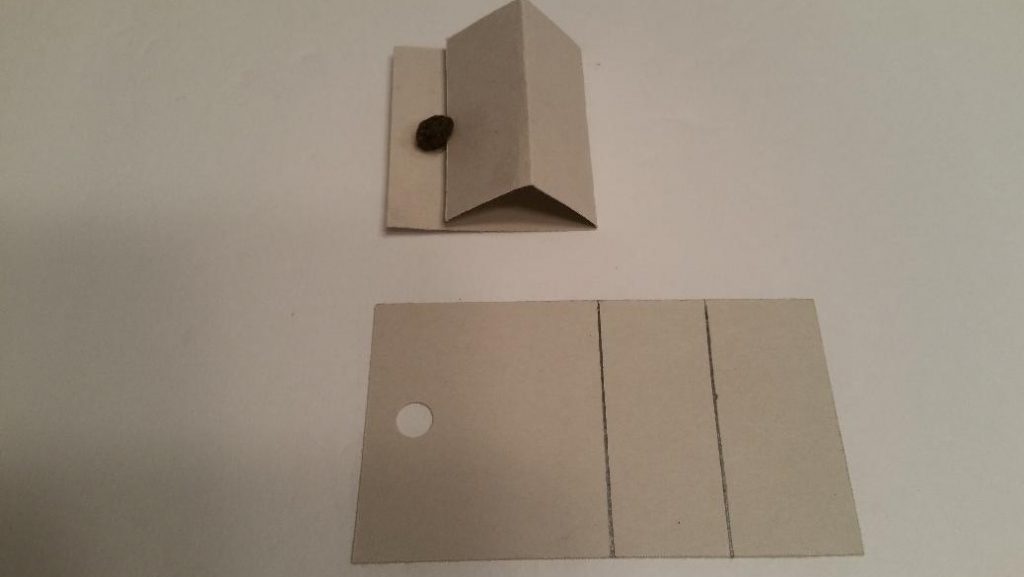
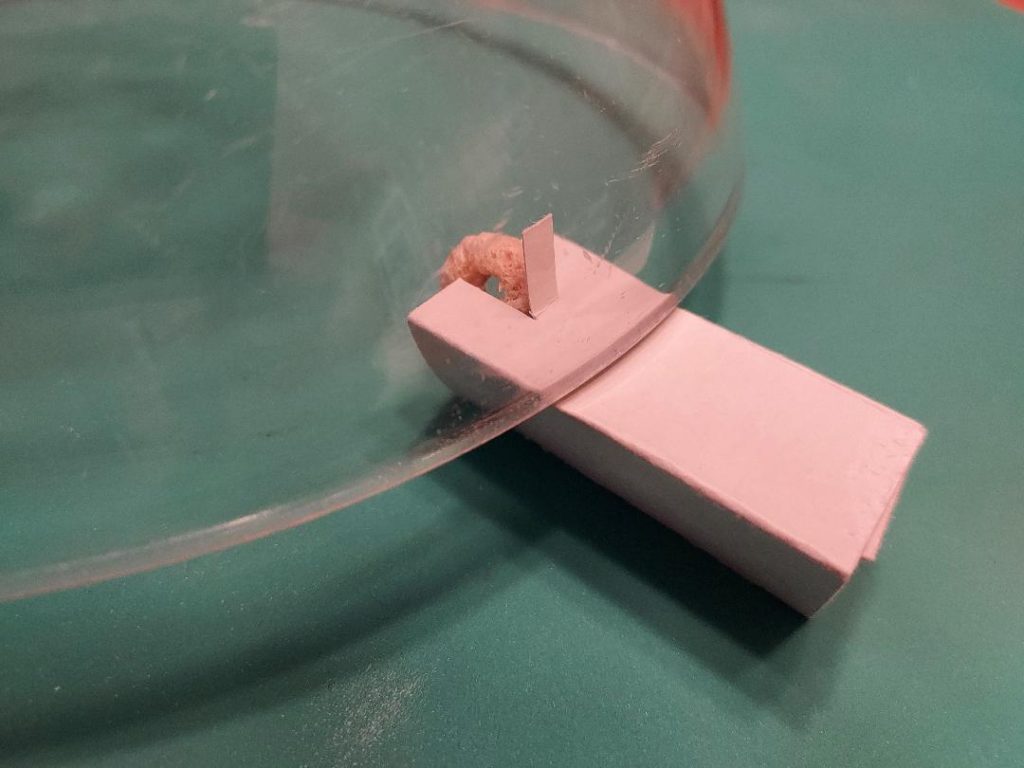
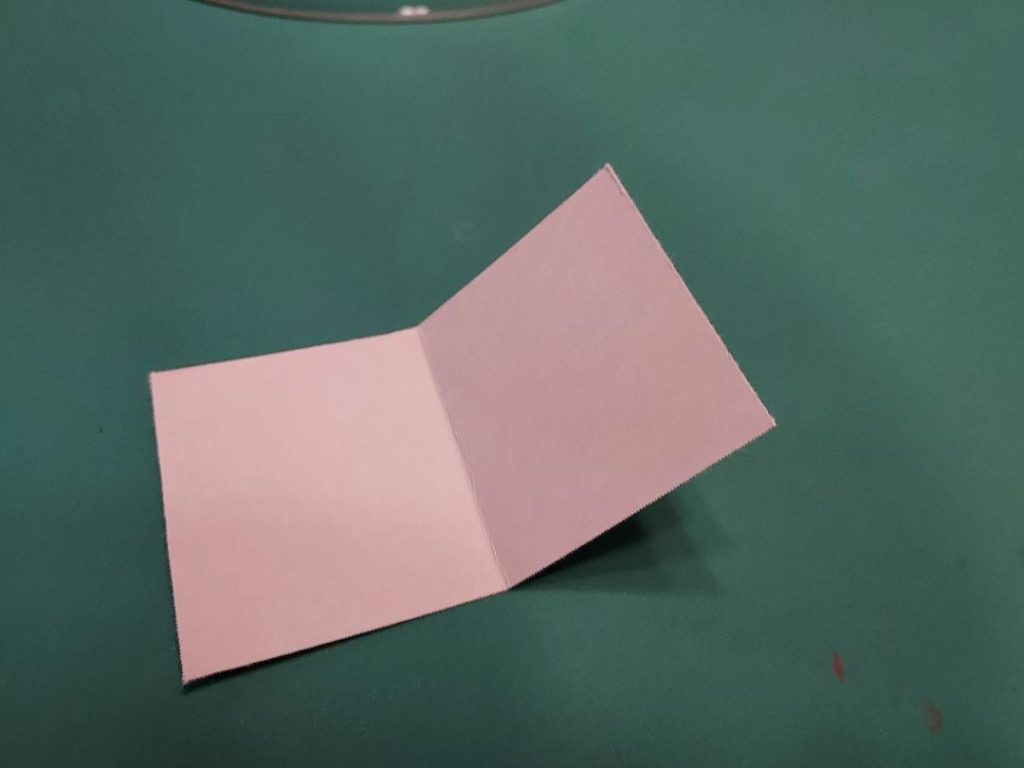
The ‘Collapsing Roof’ Mouse Trap
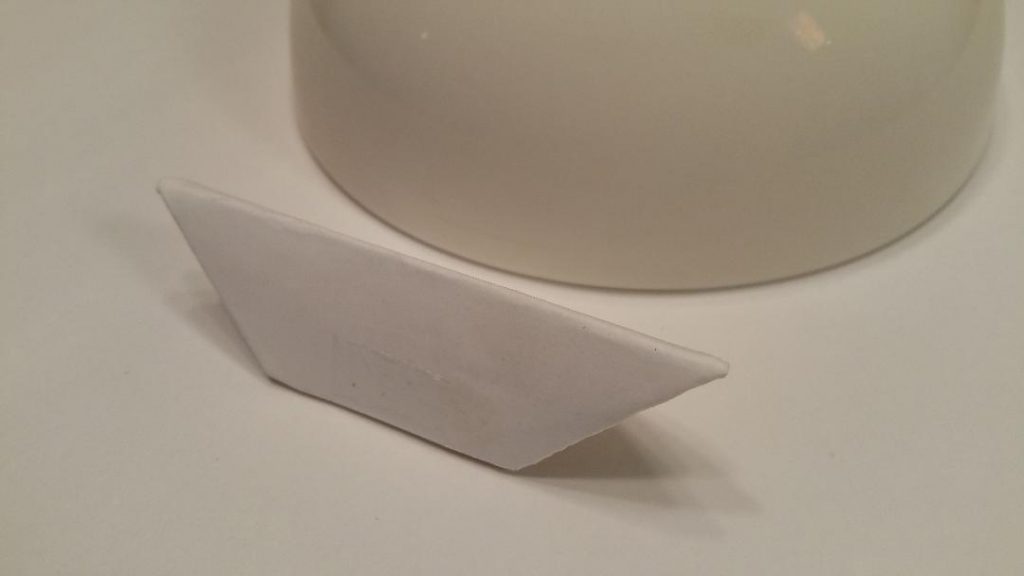
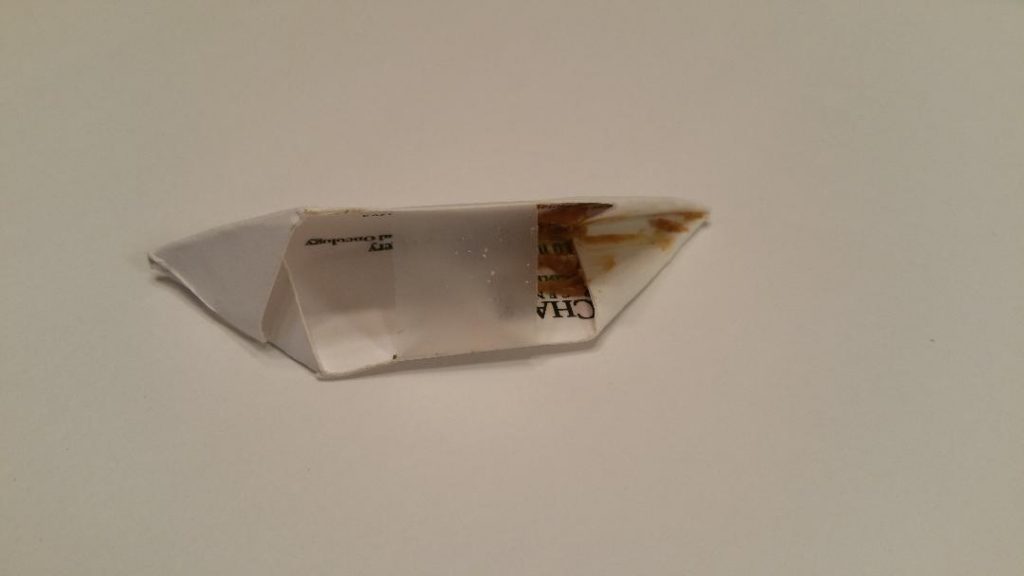
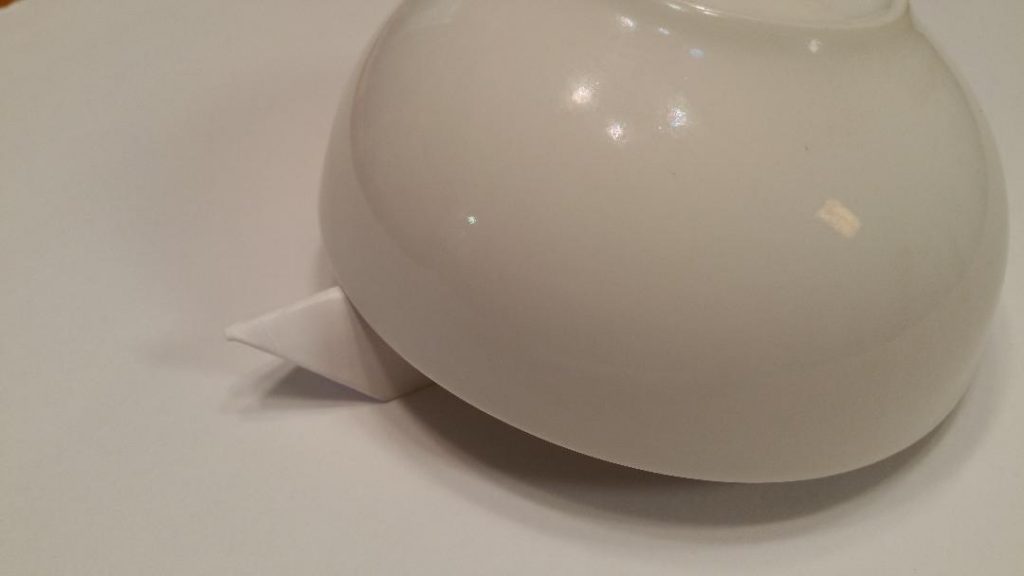
Use a business card or stiff piece of cardboard about the size of a business card and a bowl to make this one. Punch a hole in the center of one side of the card. I used a three hole paper punch to make the hole. Fold the card in half and then fold one half again to make the triangular roof. Insert the bait in the hole firmly. Lodge the lower roof edge against the bait and position the elevated bowl edge on the ridge of the roof. The mouse eats the bait which allows the roof to collapse flat and drop the bowl over the mouse.
Now you can carry a wallet sized mouse trap mechanism everywhere you go!
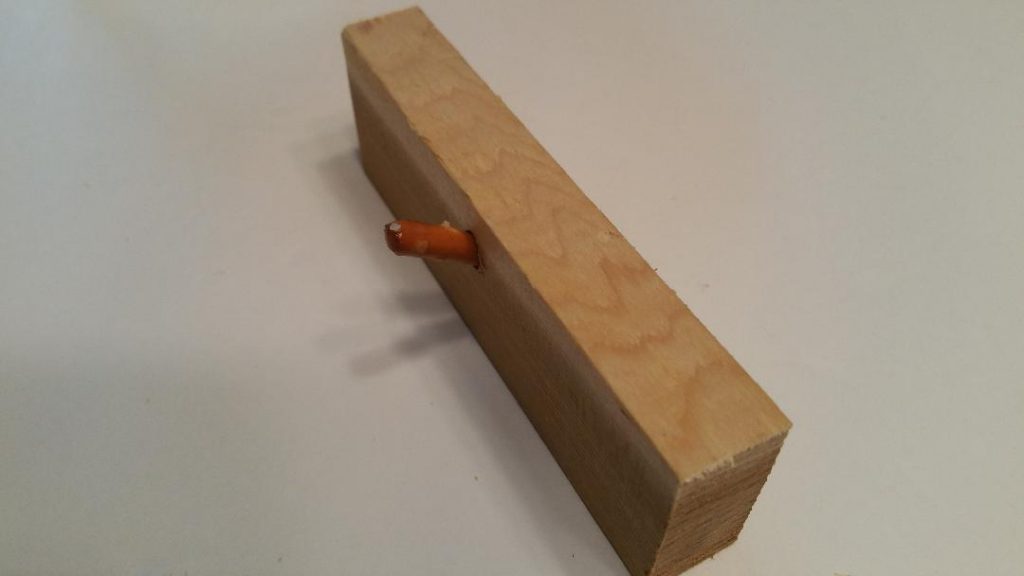
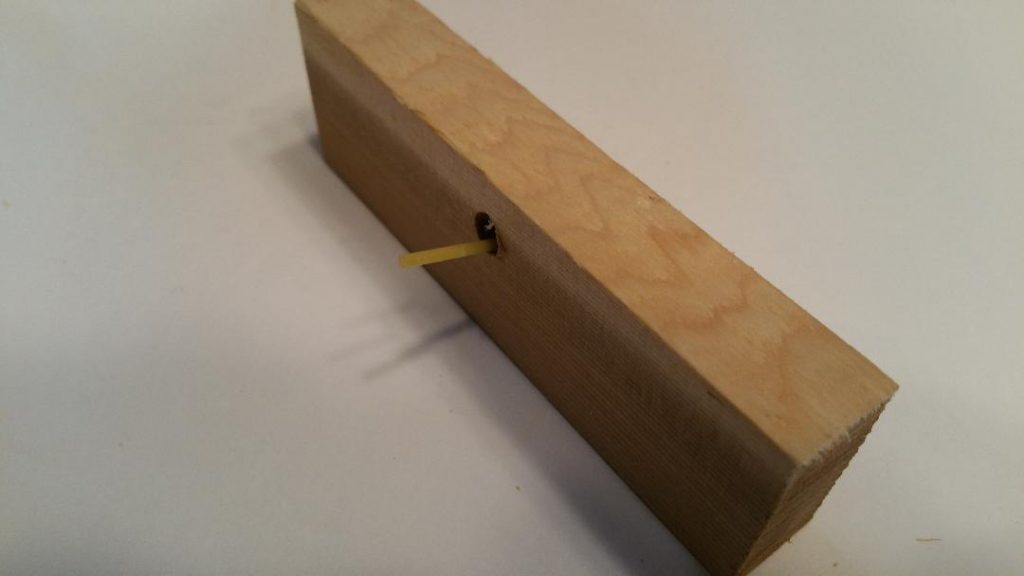
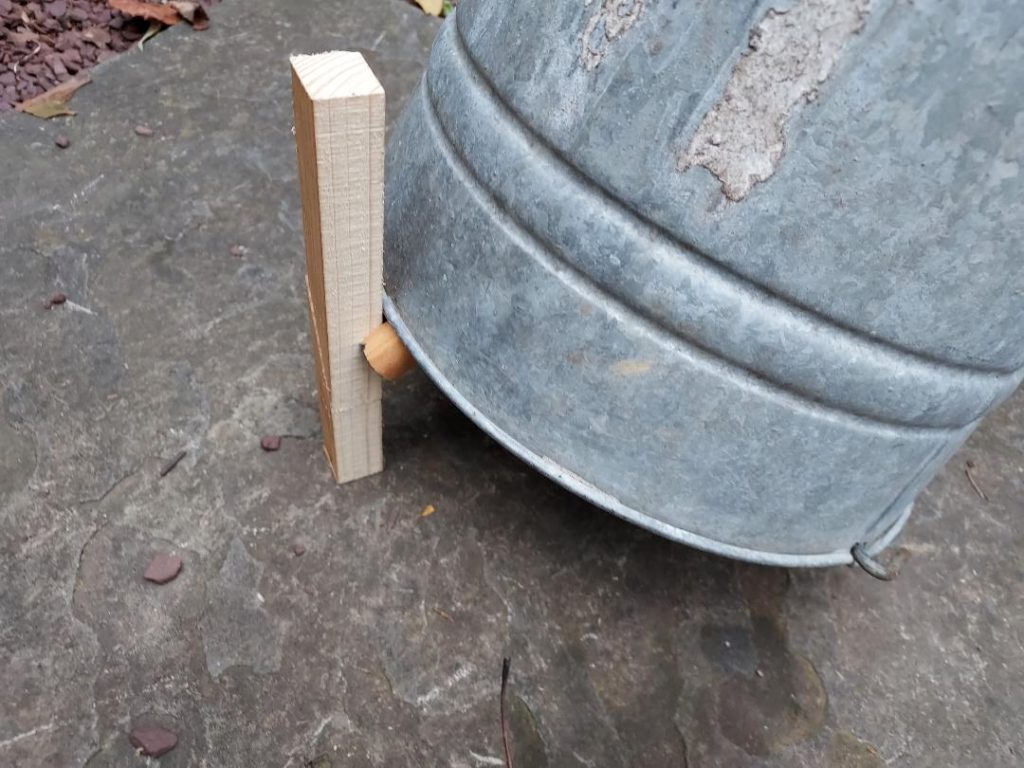
The ‘Pocket Hole’ Mouse Trap
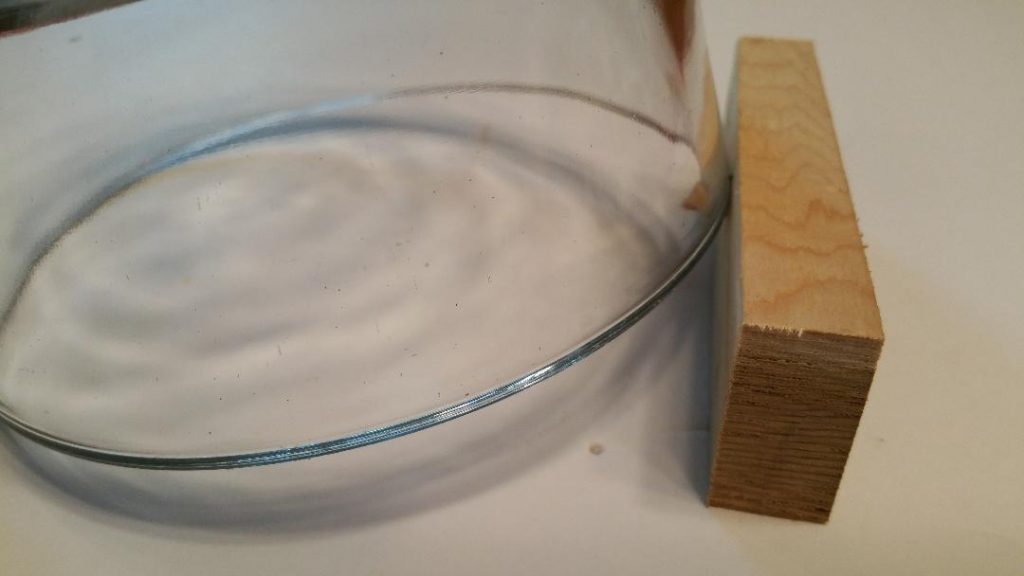
Use a bowl and a piece of wood to make this one. Drill an angled, blind hole in the center of a piece of scrap wood so the bait holds the bowl edge just high enough for the mouse to get under the bowl. Use a long piece of wood to deter the mouse from easily reaching the bait from the sides. Use any structurally strong hard bait such as pretzel sticks, pasta or nuts. A glass bowl is used here to show how it works, however, a square or rectangular container would be better suited for this trap design.
‘Bird of Prey’ Mouse Trap
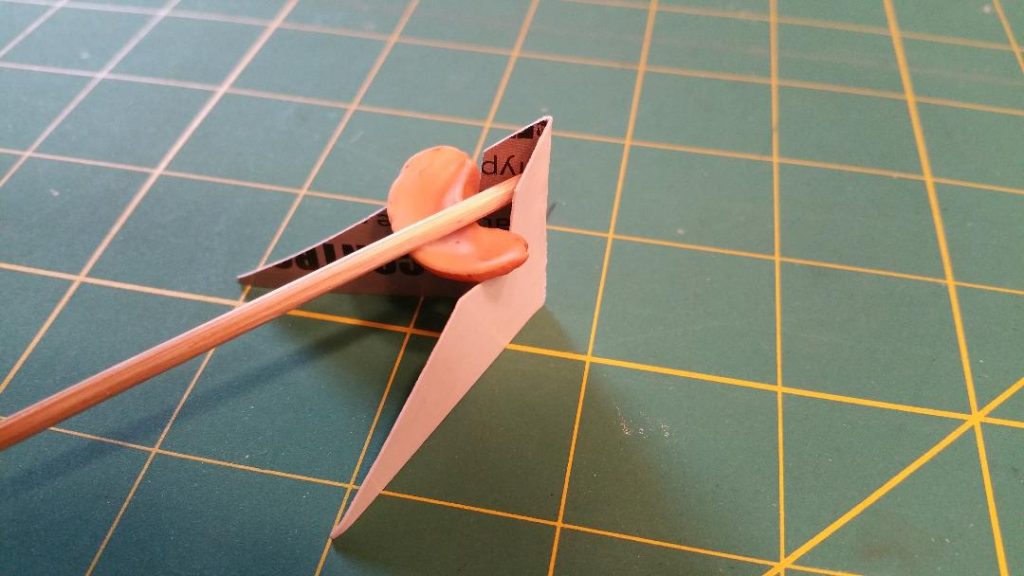
Easily made from a folded business card or cardboard stock, skewer and a bowl. This avian trap design holds the bait and elevates a skewer to prop the end of a bowl up.
The ‘Space Probe’ Mouse Trap
This isn’t my first exploration of the unknown frontier of mouse trap design. Make this trap mechanism from a folded business card using scissors. The narrow strip of interlocking card paper holds the probe together under the weight of the bowl and obstructs the mouse’s access to the bait placed behind it. As an alternative you can use a thin strip of tape instead. To get to the bait the mouse will chew the strip open which causes the probe to flatten and drop the bowl over the mouse.
The ‘Fishing Heron’ Mouse Trap
The ‘Telescopic’ Mouse Trap
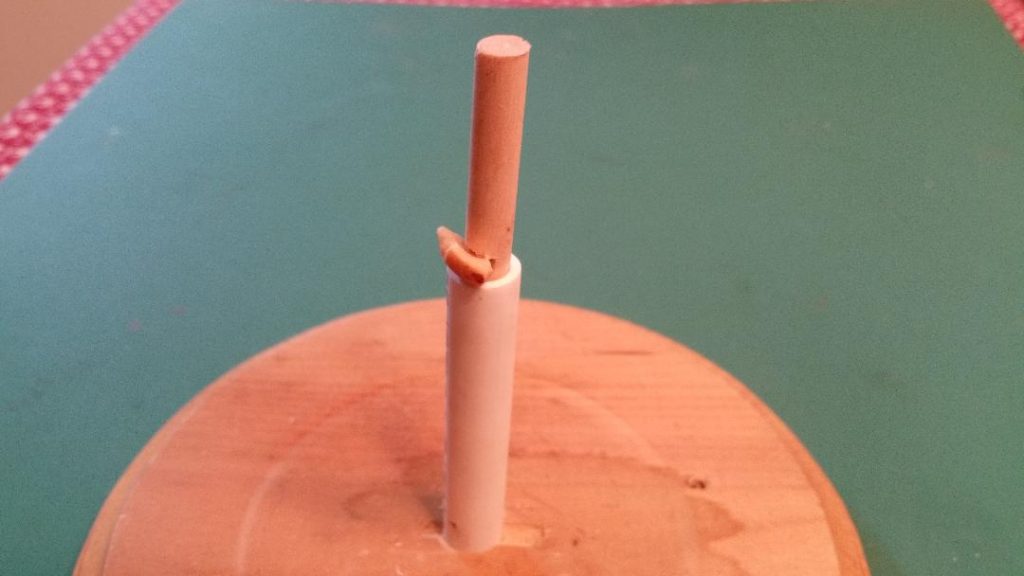
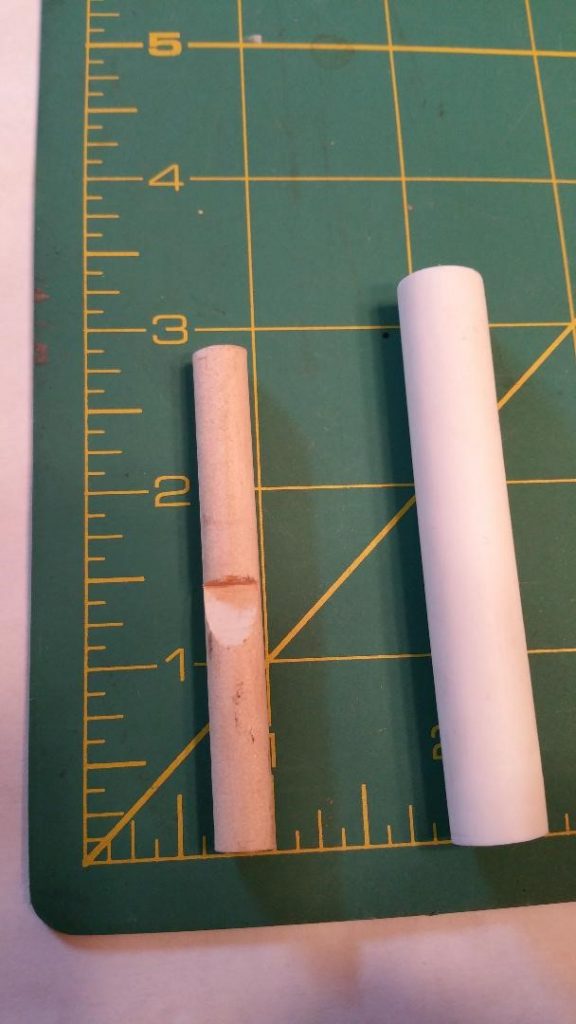
The ‘Wee Bit’ Mouse Trap
A simple, small trap mechanism that uses a wee bit of nut or cookie pieces to prop up a small jar or mug. It is made using 3/8″ I.D. PEX pipe and a loose fitting dowel or pencil. The pipe O.D. fits into a 1/2″ hole.
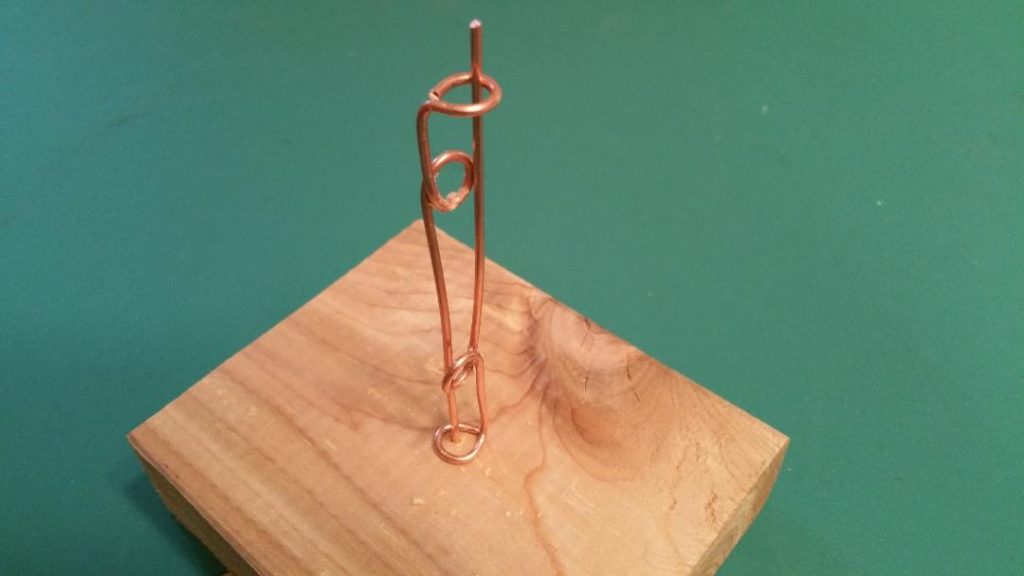
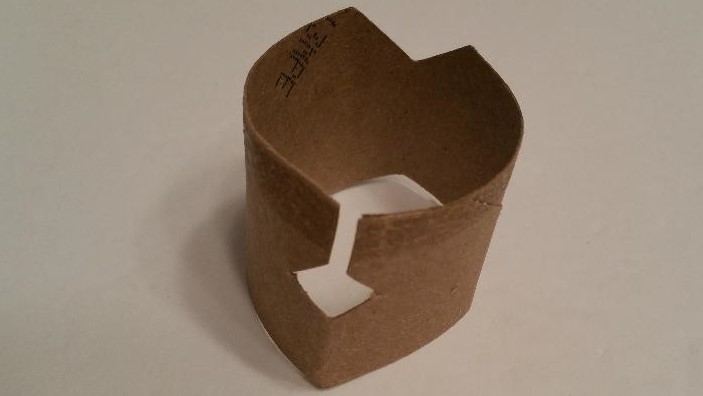
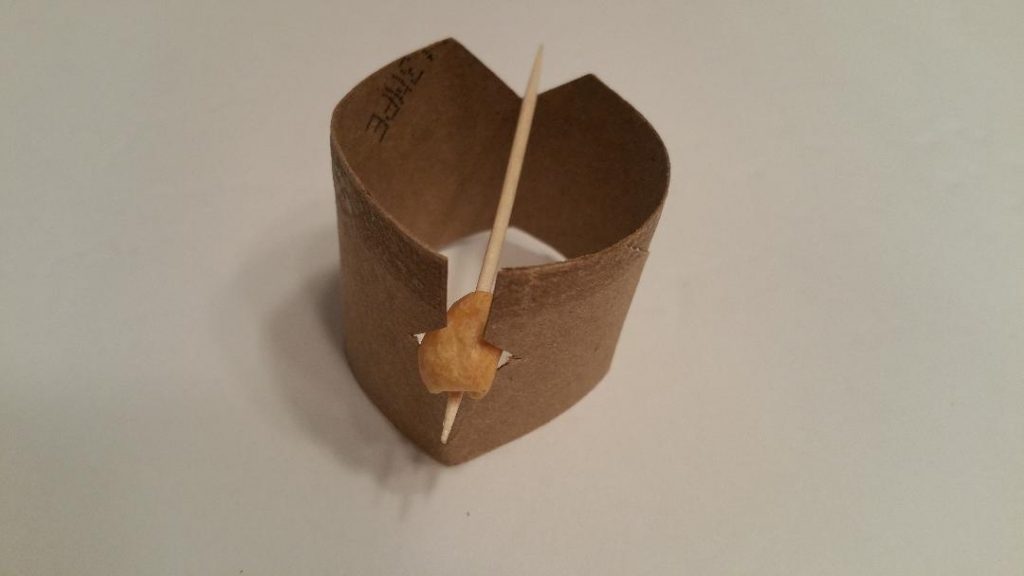
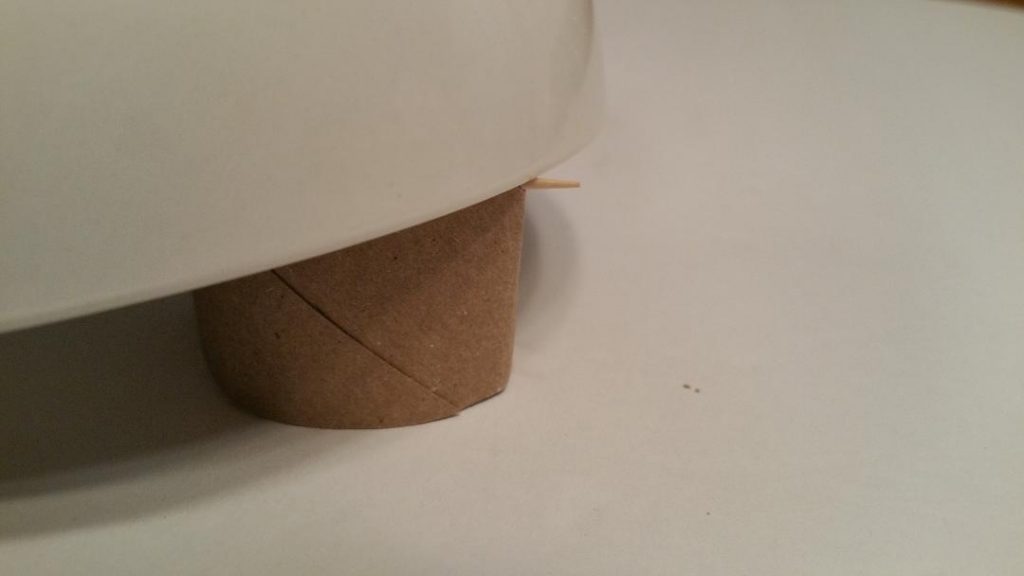
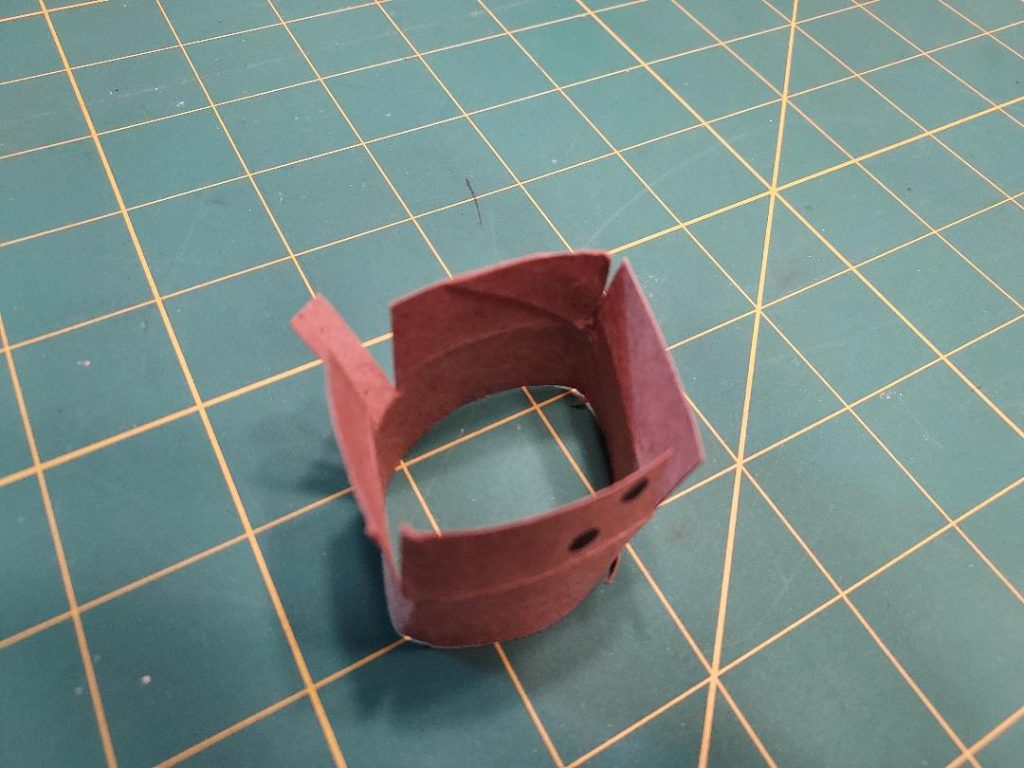
The ‘Embrasure’ Mouse Trap
A paper tube and toothpick make up my medieval archer’s tower mouse trap design.
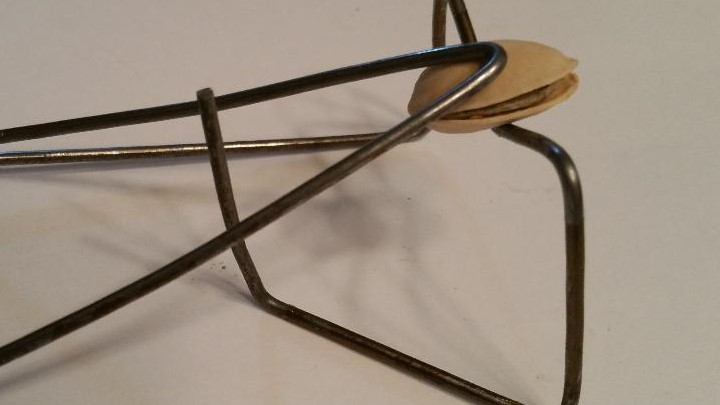
The ‘Targe and Pike’ Mouse Trap
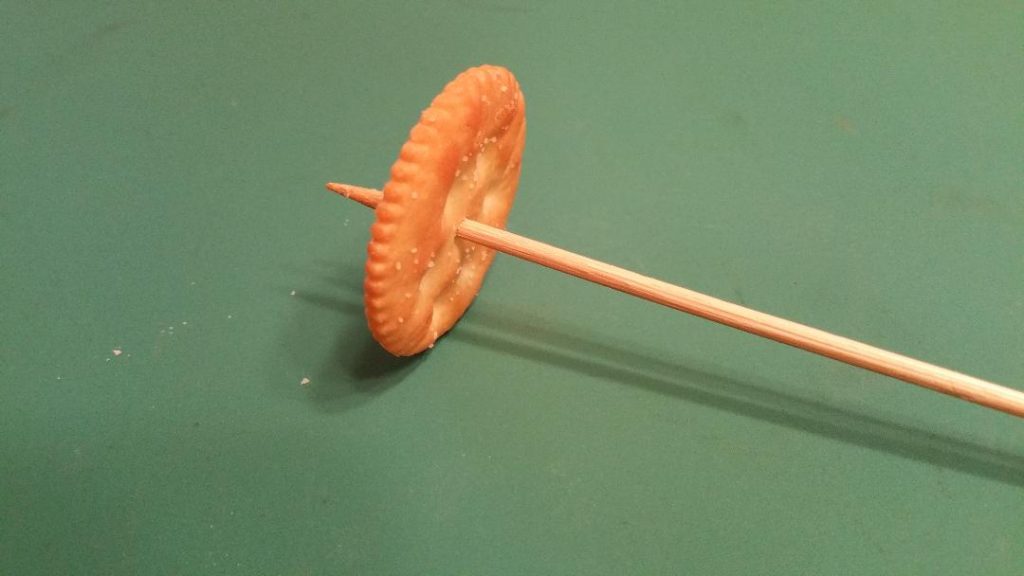
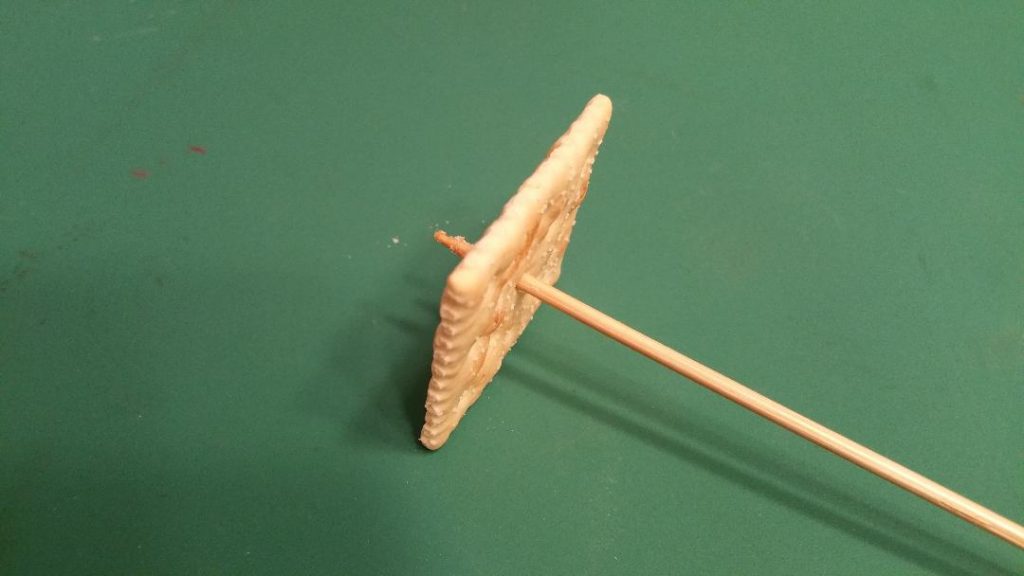
A far stretch of imagination, but you get the idea! Carefully drill a wooden skewer point through the center perforation of cracker and position a bowl over it allowing for an access gap for the mouse. As the mouse eats away at the treat the structural integrity of the cracker crumbles.
The ‘Leaning Edge’ Mouse Trap
I made these two similar designs using stiff coat hanger wire and aluminum sheet metal. The key to the design is to place the moving leaning edge as close as possible, but not touching to the fixed saddle where the bait is placed. In addition, make sure there enough clearance below the moving leaning edge and the fixed saddle end so it does not bind when it drops down flat. The moving, leaning edge holds the bait in place and keeps the container propped up. The lodged bait prevents the leaning edge from dropping down. The Leaning Edge Mouse Trap mechanism will last indefinitely so make a few for the workshop or cabin. Try making a larger version for larger rodents.
Cheers!
The ‘Slipped Disk’ Mouse Trap
A small rubber band and two caps or lids make a simple mouse trap mechanism. Just drill a hole in the center of each disk. Instead of a rubber band, dental floss or string can be used. Cut a deep slot at the rim of the outside cap to tightly hold the string in place. The center connecting rubber band or string holds the container up. When the mouse eats the bait the two disks separate allowing the container to drop over the mouse.
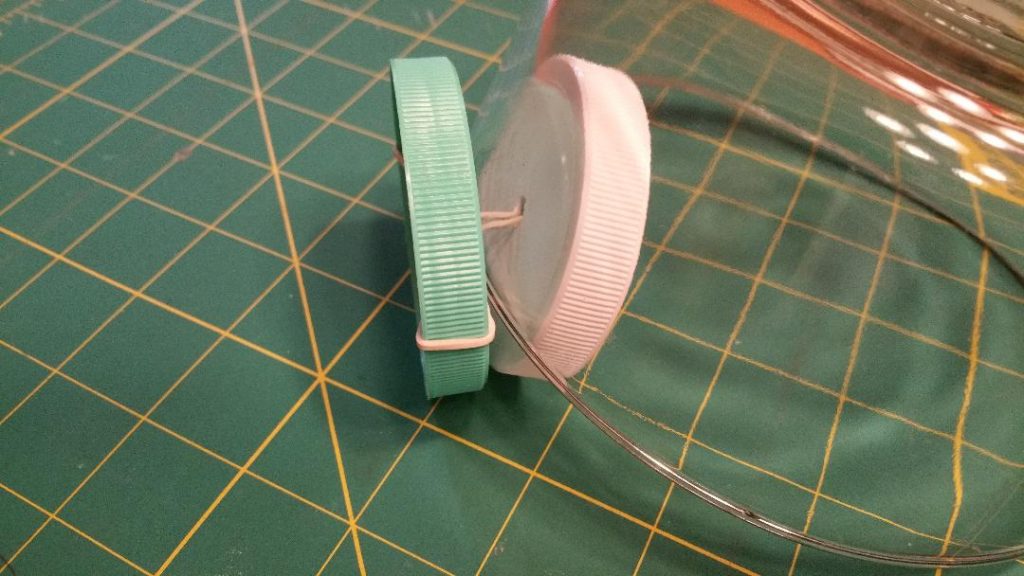
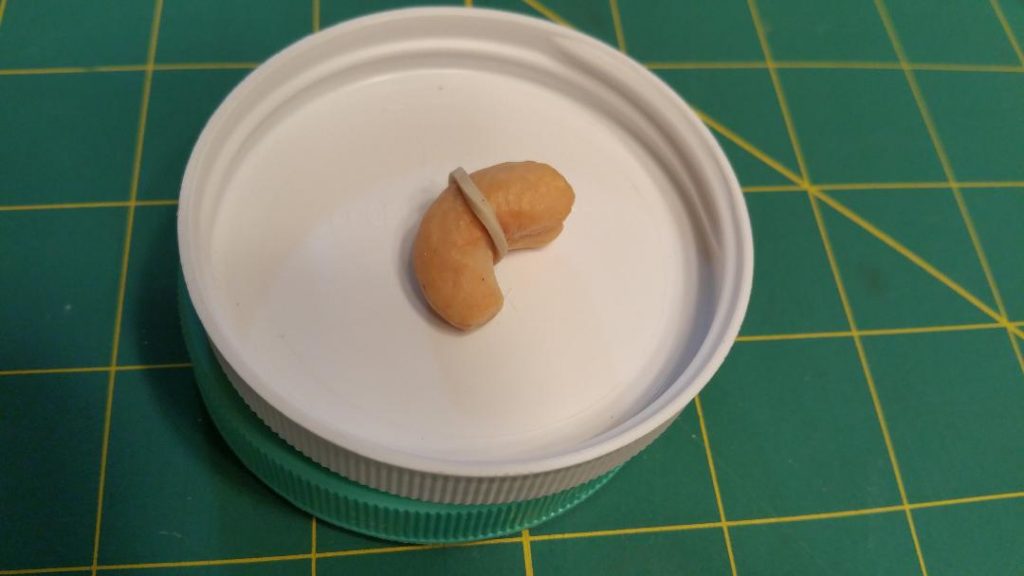
Bait held securely in place. 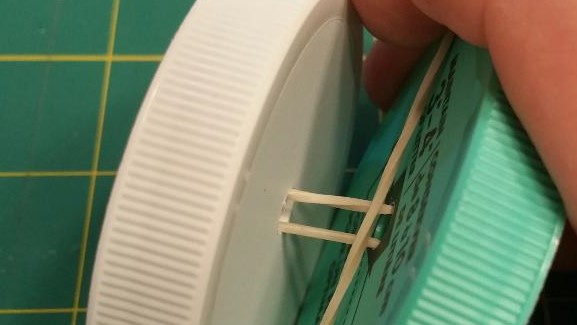
‘Gracie’s 3-2-1’ Mouse Trap
This is my unique, multipurpose mouse trap mechanism that can be used to prop a bowl or other containers and uses hard or soft bait. It is also disposable and costs nothing to make! Use a business card or cereal box cardboard to make it. The hard bait holds the triangular tube together until the bait is eaten or removed by the mouse allowing the triangular tube to collapse flat, dropping the bowl or container lid over the mouse.
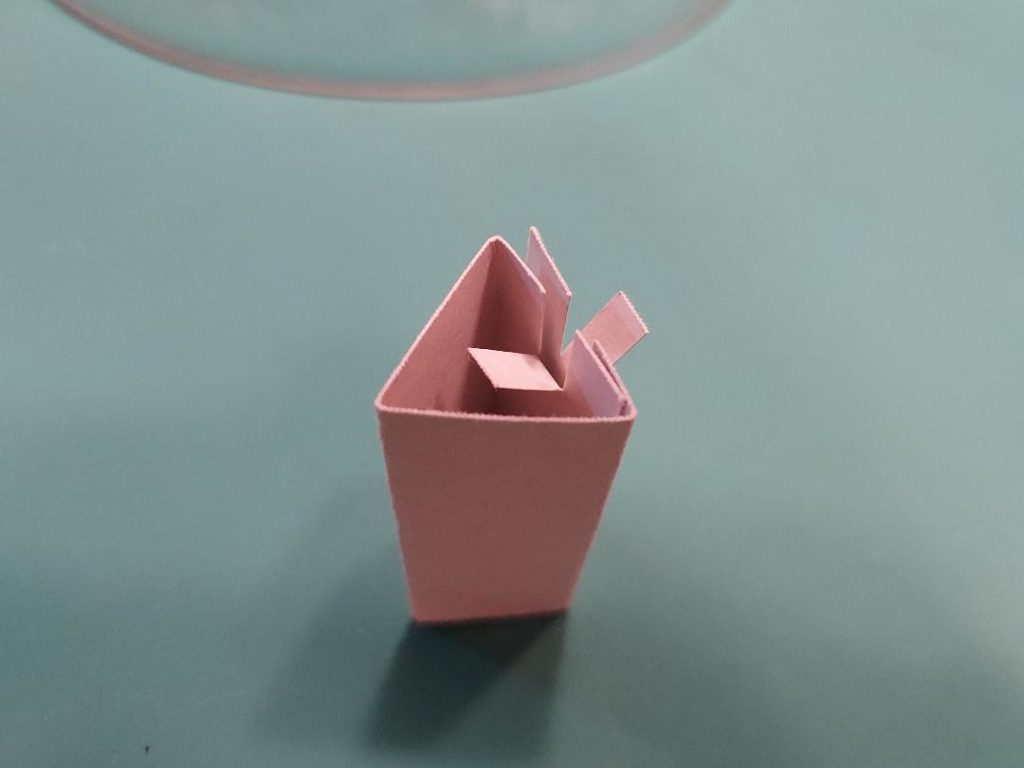
Make THREE evenly spaced folds. Cut TWO parallel slits the thickness of the hard bait being used. Pick ONE baiting method and fold the tabs accordingly. Spread the upper and lower tabs apart for hard bait use. Fold both tabs inward when using soft bait. The mouse will chew through the tab at the fold breaking it open.
Fold in center 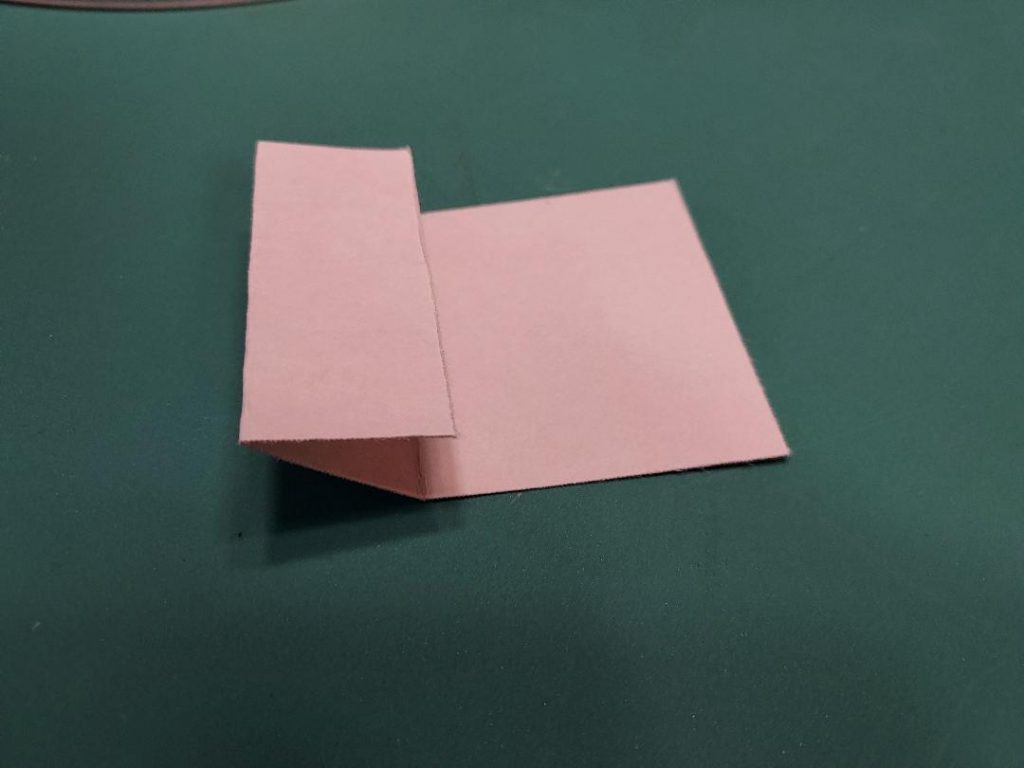
Evenly fold left half 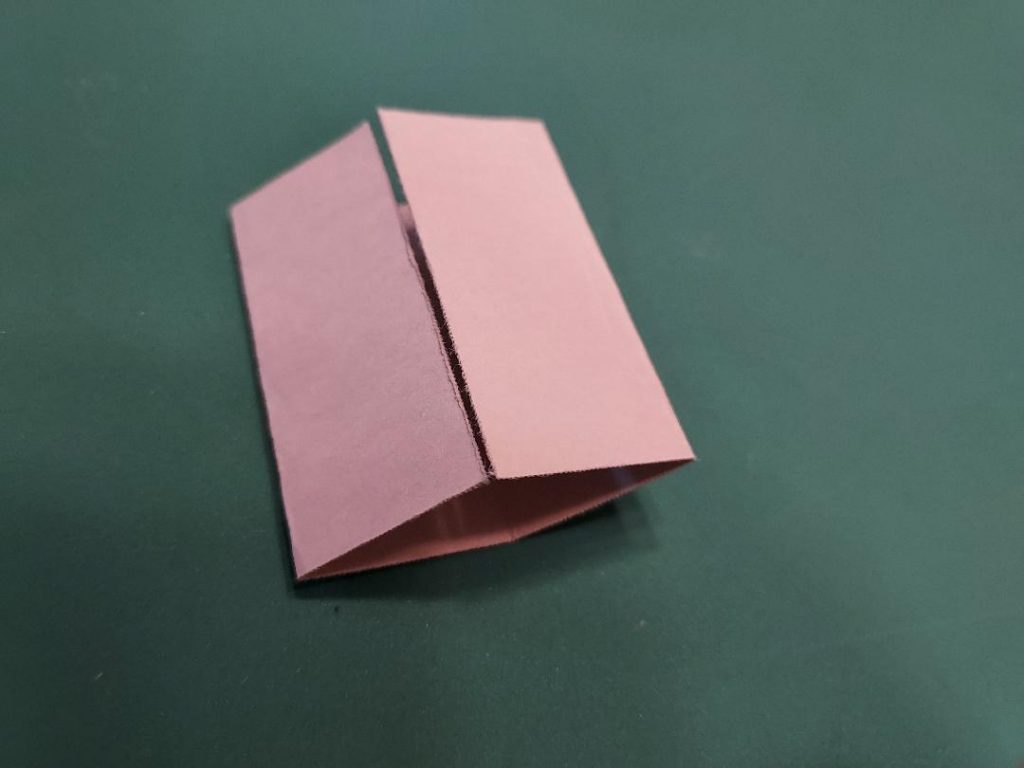
Evenly fold right half. 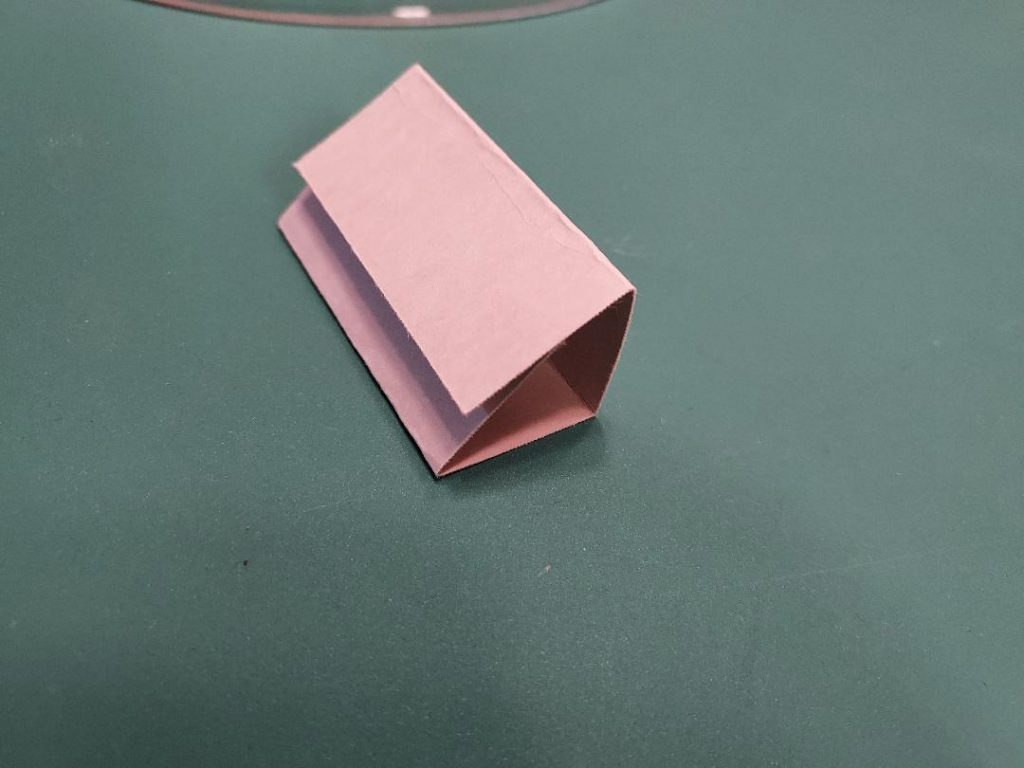
Folded 
Cut two slits and fold tabs 
Hard bait inserted
Here are some other examples using different bait:
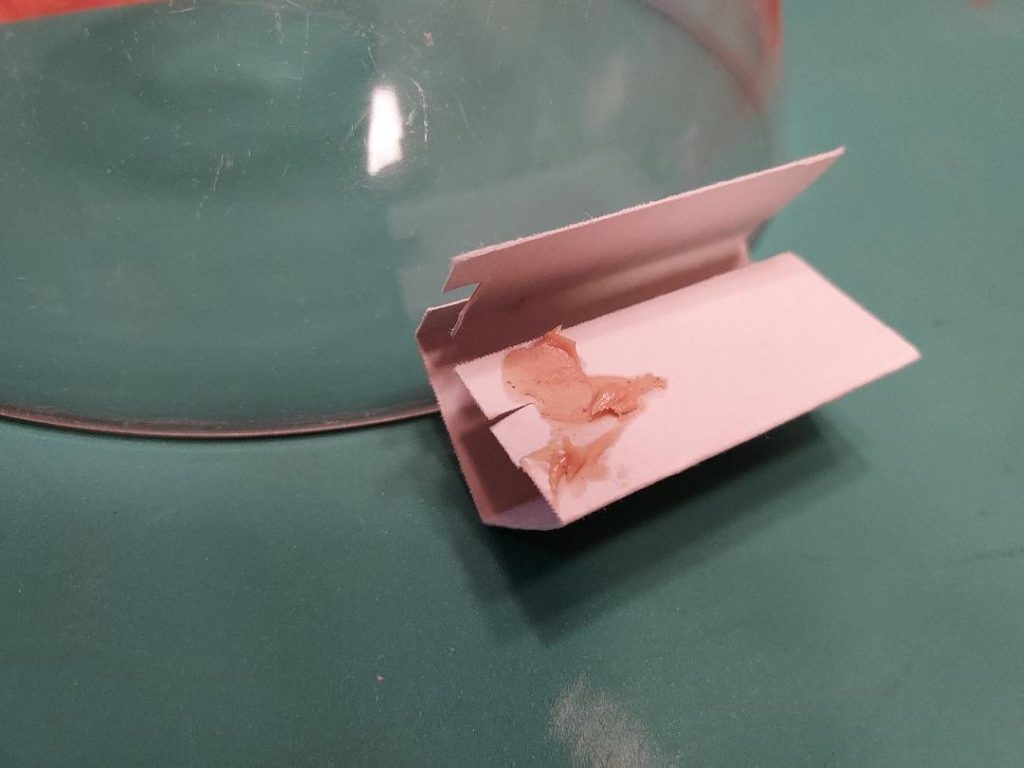
Peanut butter placed under top fold 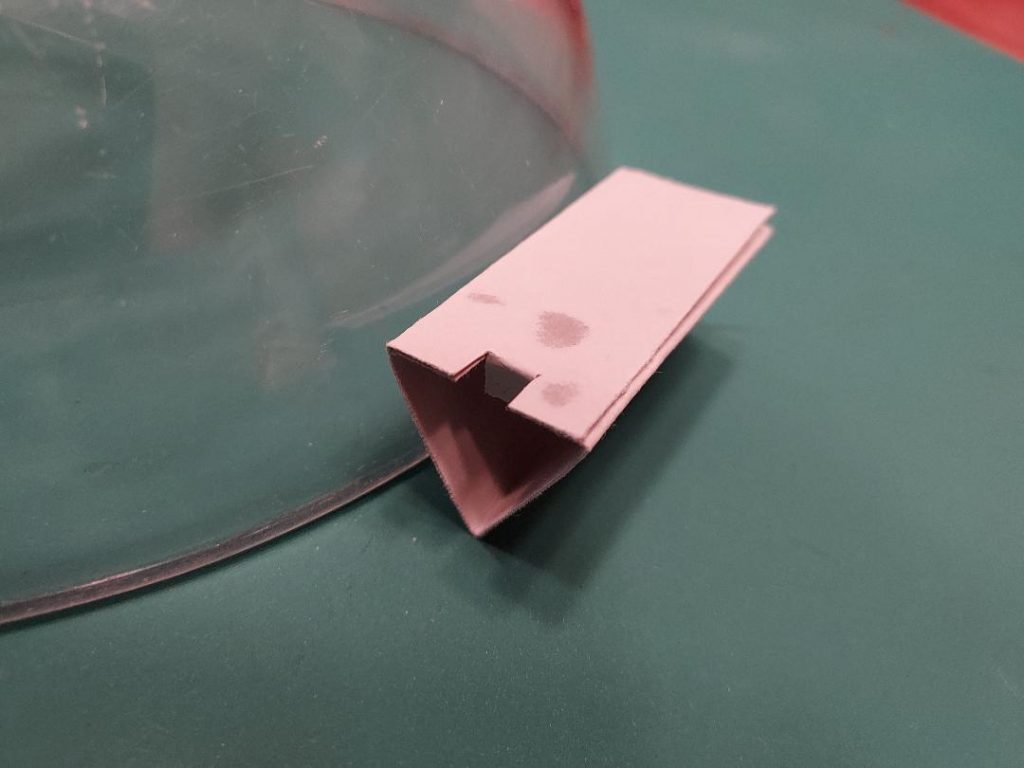
Both tabs folded down 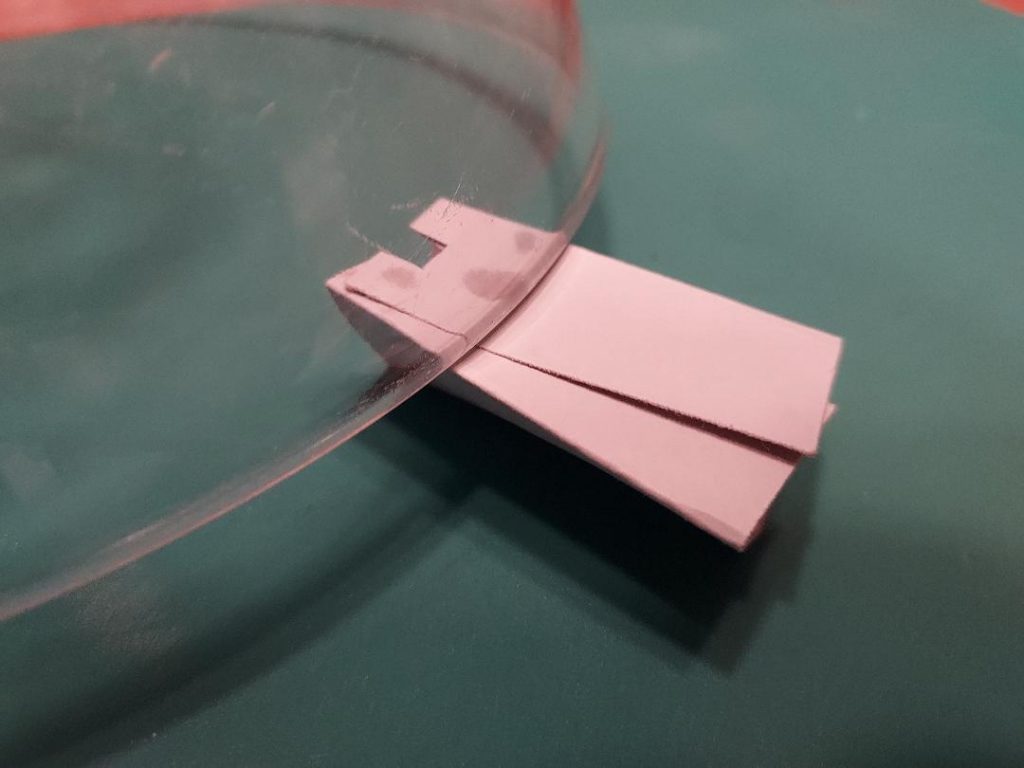
Bowl placed over the triangular tube 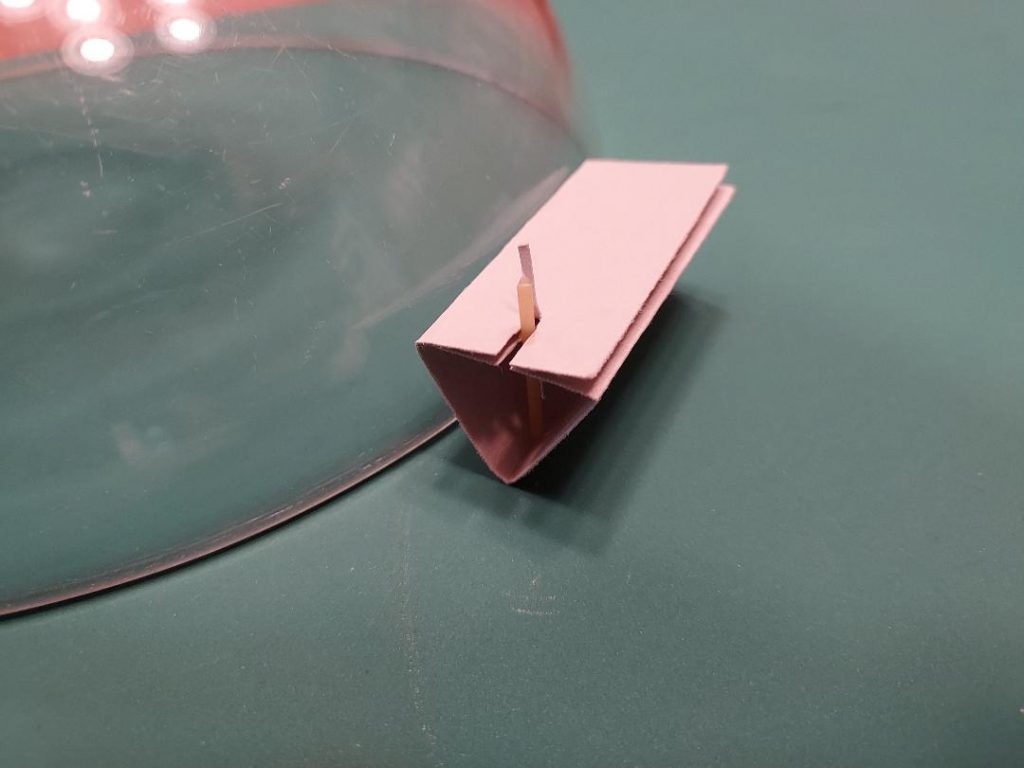
Spaghetti 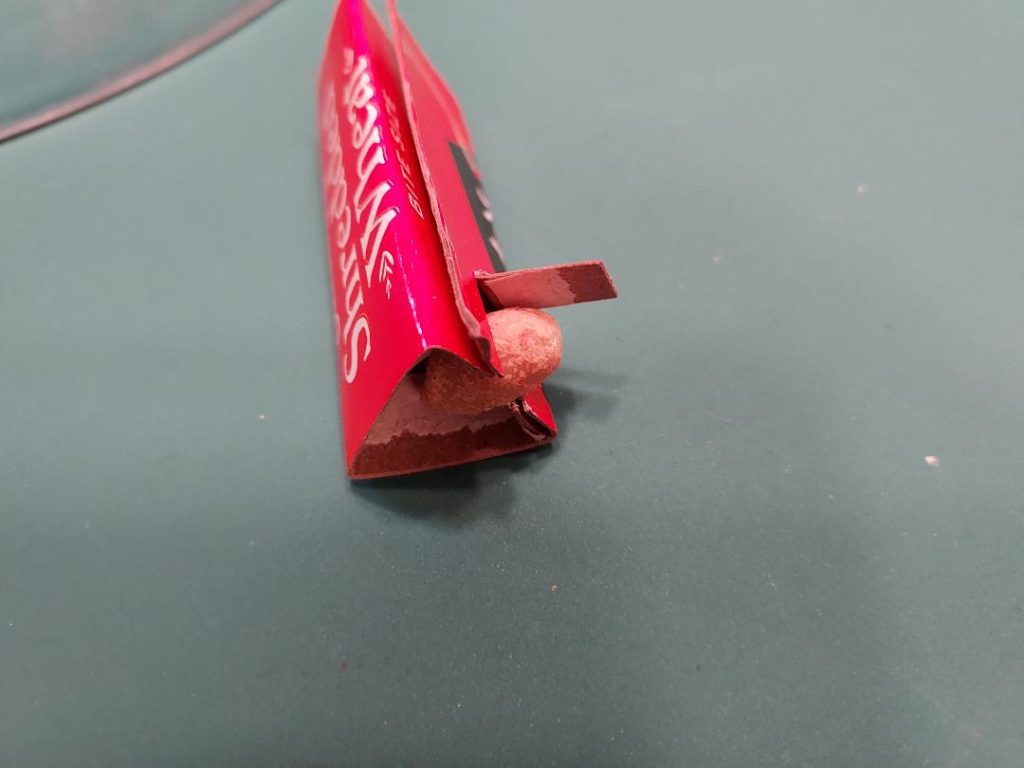
Cereal box cardboard version 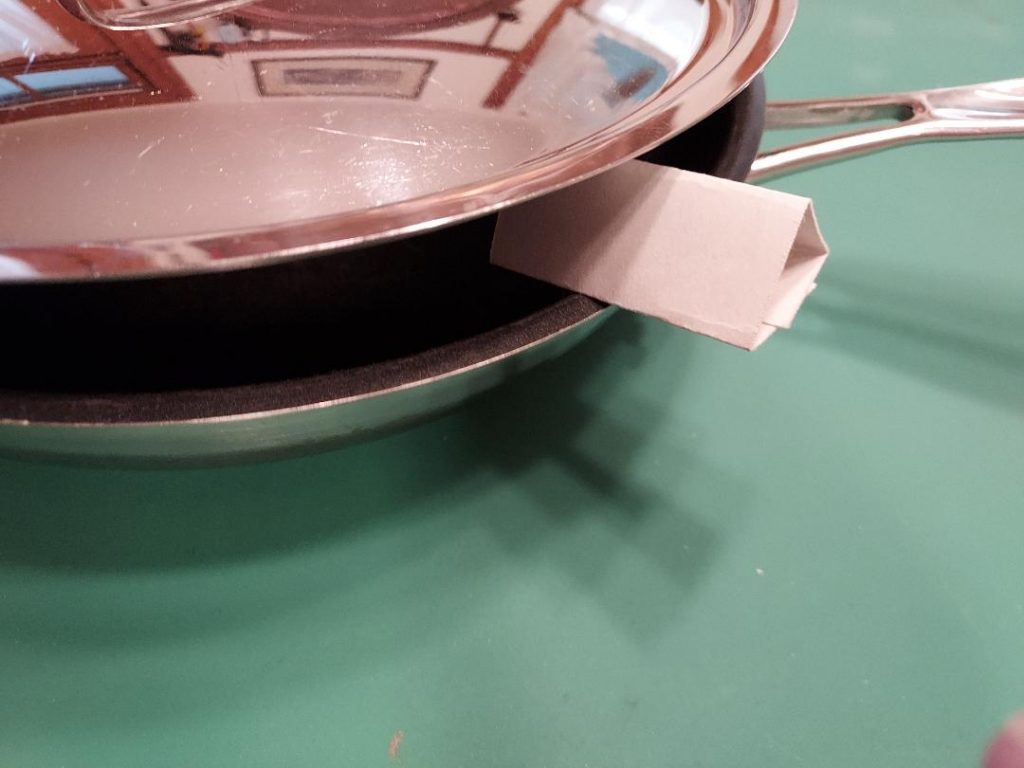
Propping a pan’s lid
Another version that uses a punched hole instead of tabs:
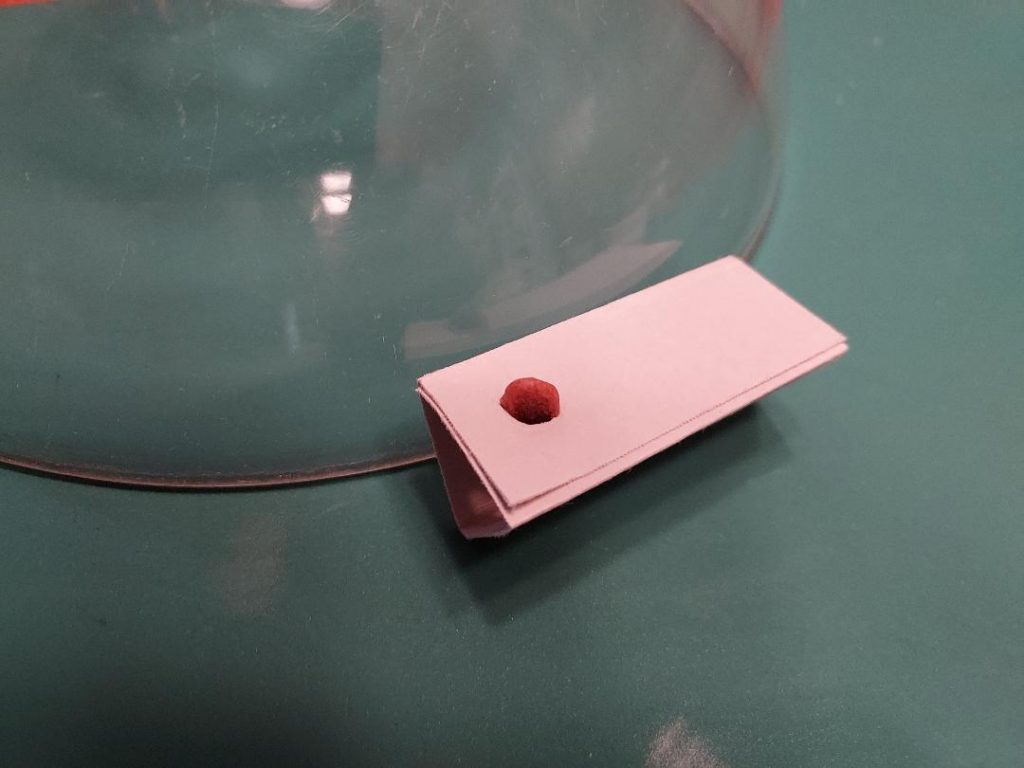
Cat food kibble placed through holes 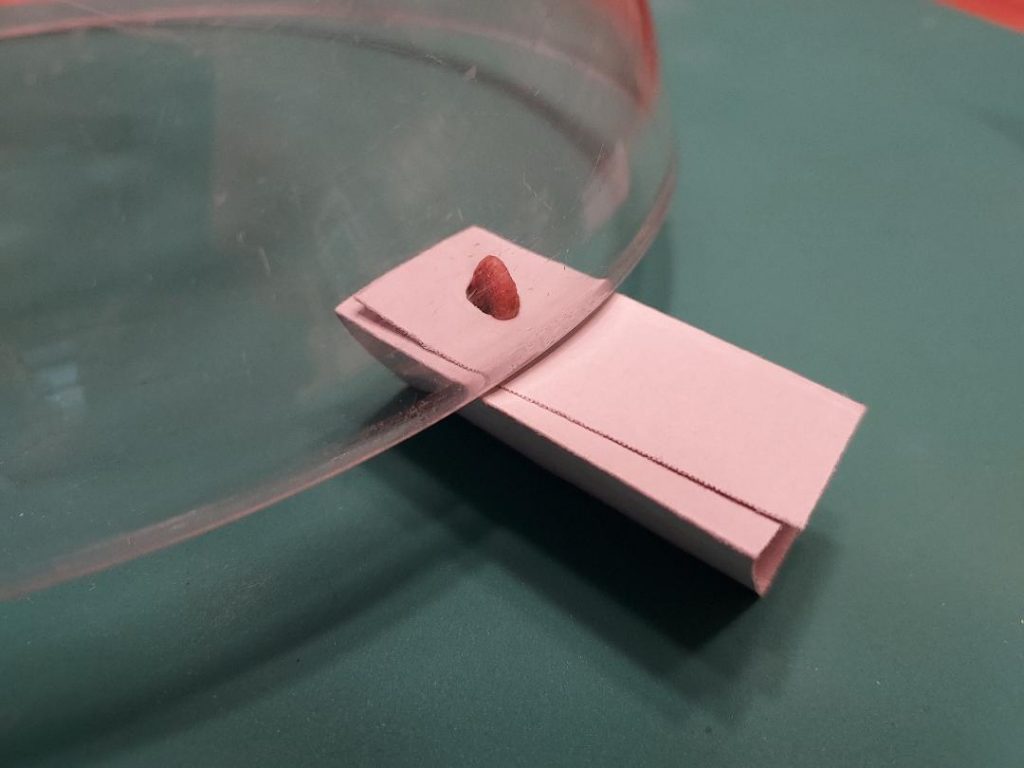
Positioned under bowl
The ‘Bench Press’ Trap
Simply made from a container and two pieces of stiff wire this trap mechanism can be scaled to catch mice up to elephants! Elephants do eat peanuts, don’t they? This design has significant container holding strength given its size.

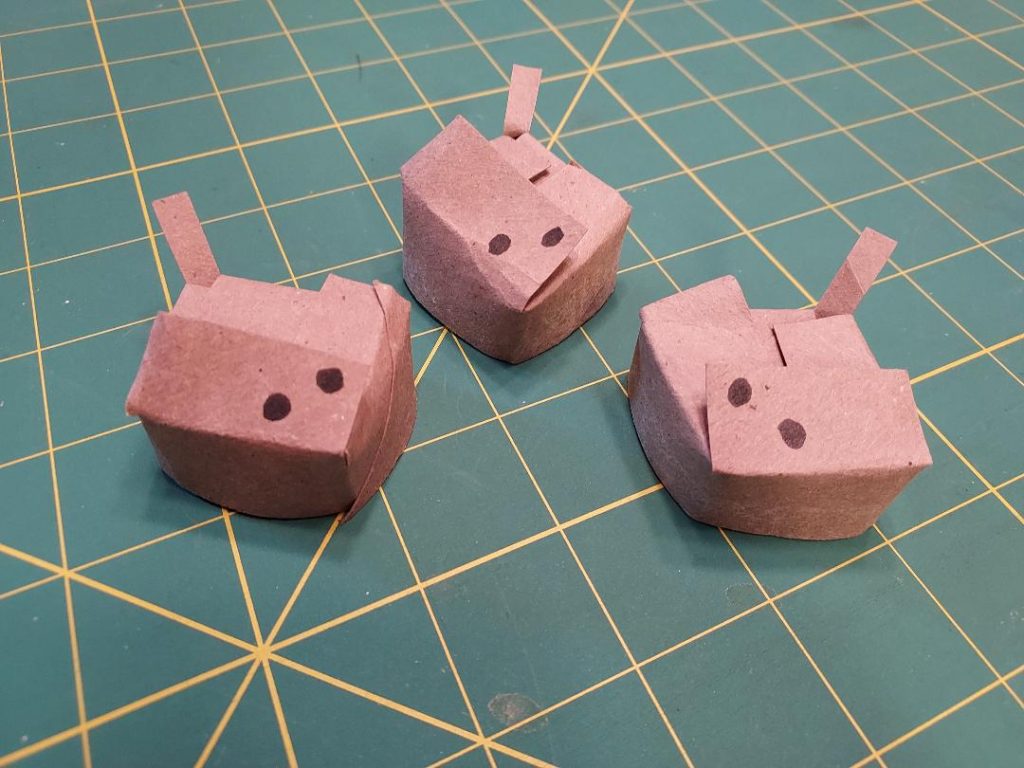
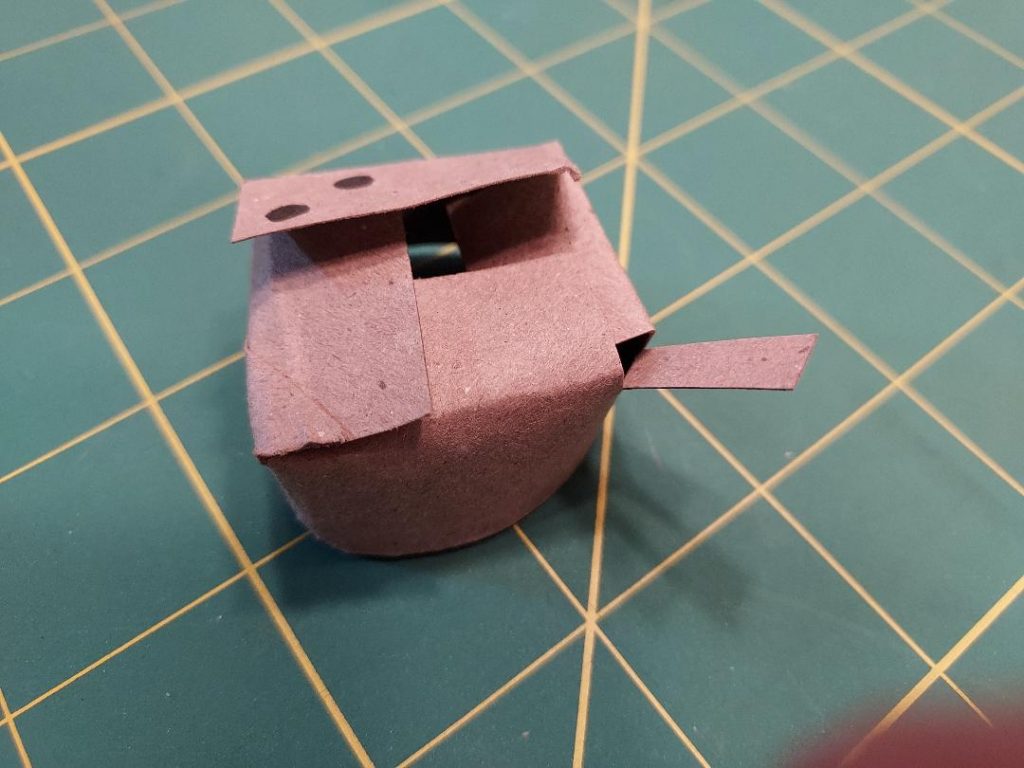
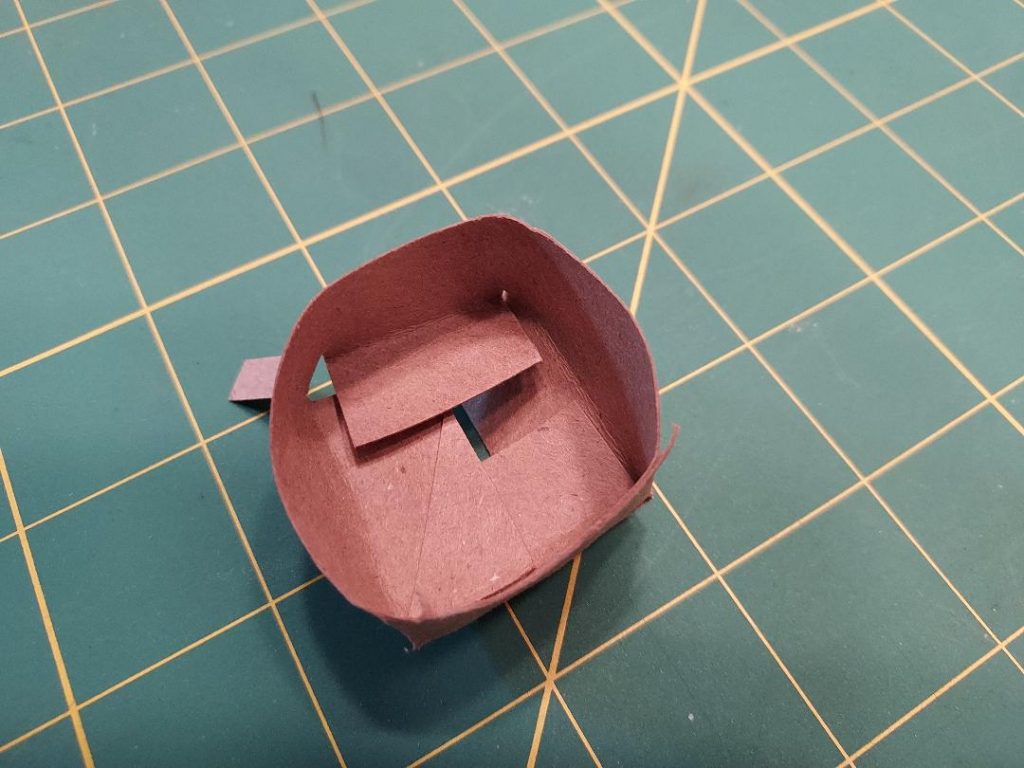
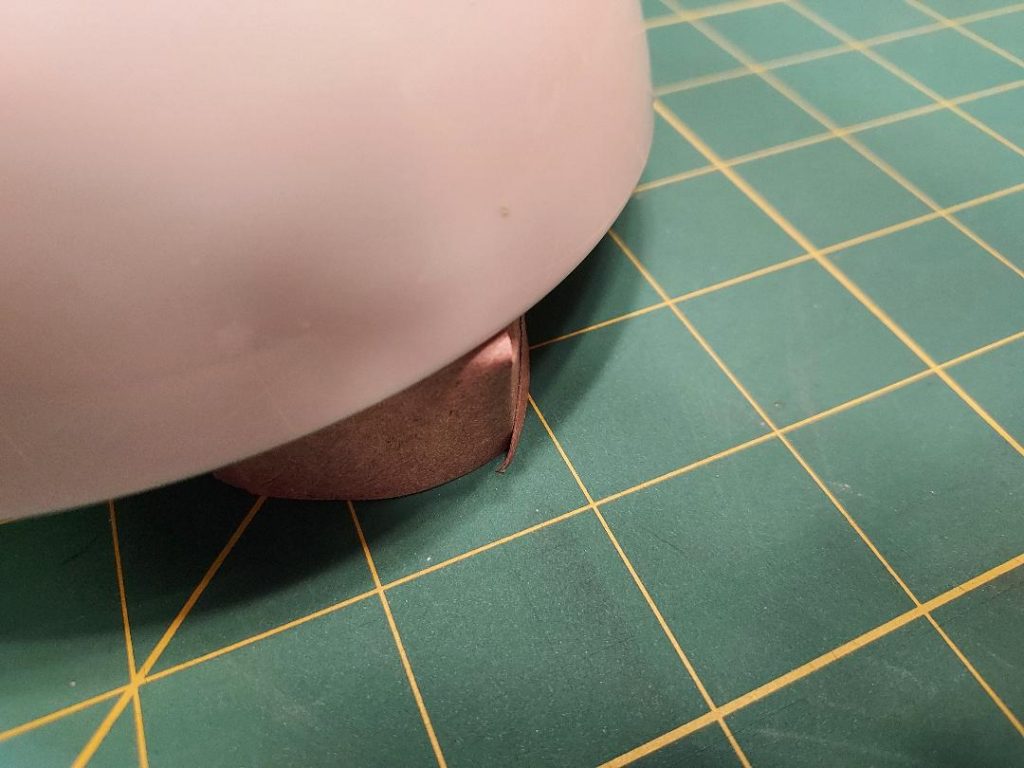
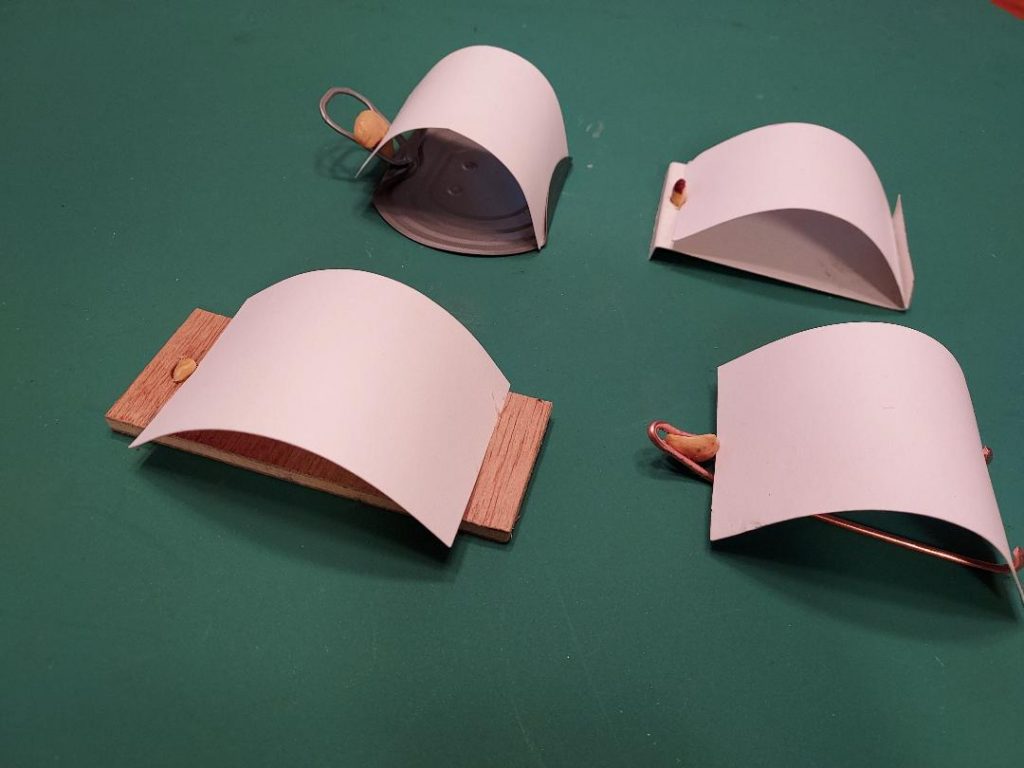
The ‘Three Blind Mice’ Mouse Trap
Make three bowl prop mechanisms from a single toilet paper tube. Place hard or soft bait under the paper mouse. Place the bowl’s lip on the very tip of the paper mouse nose. The real mouse will move the paper obstruction to get to the bait upsetting the resting bowl.
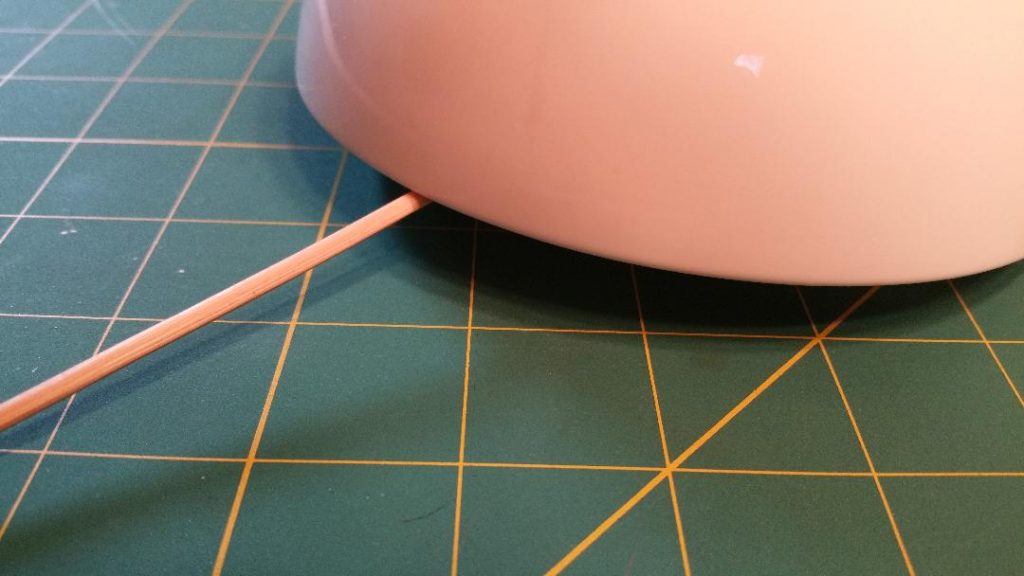
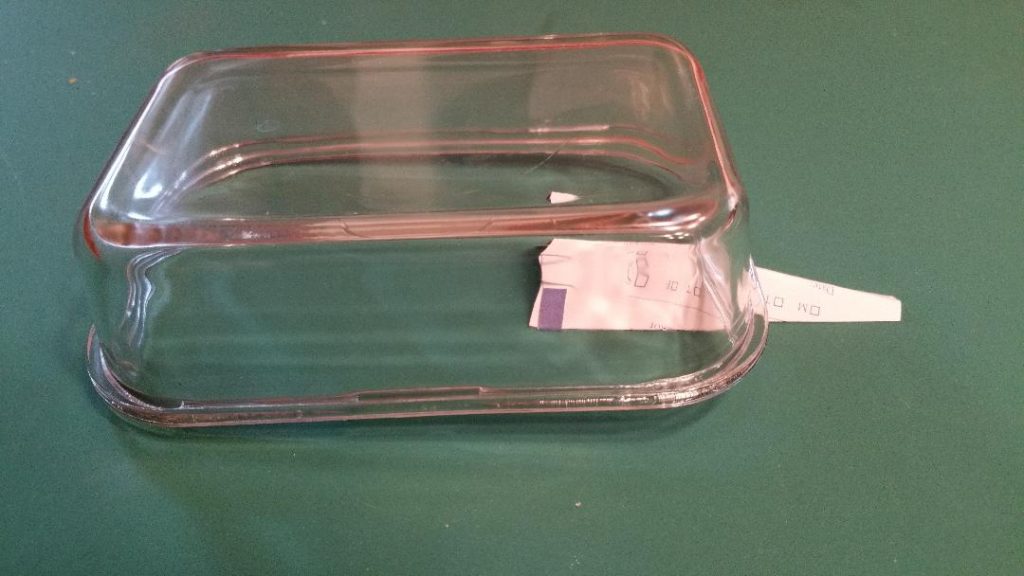
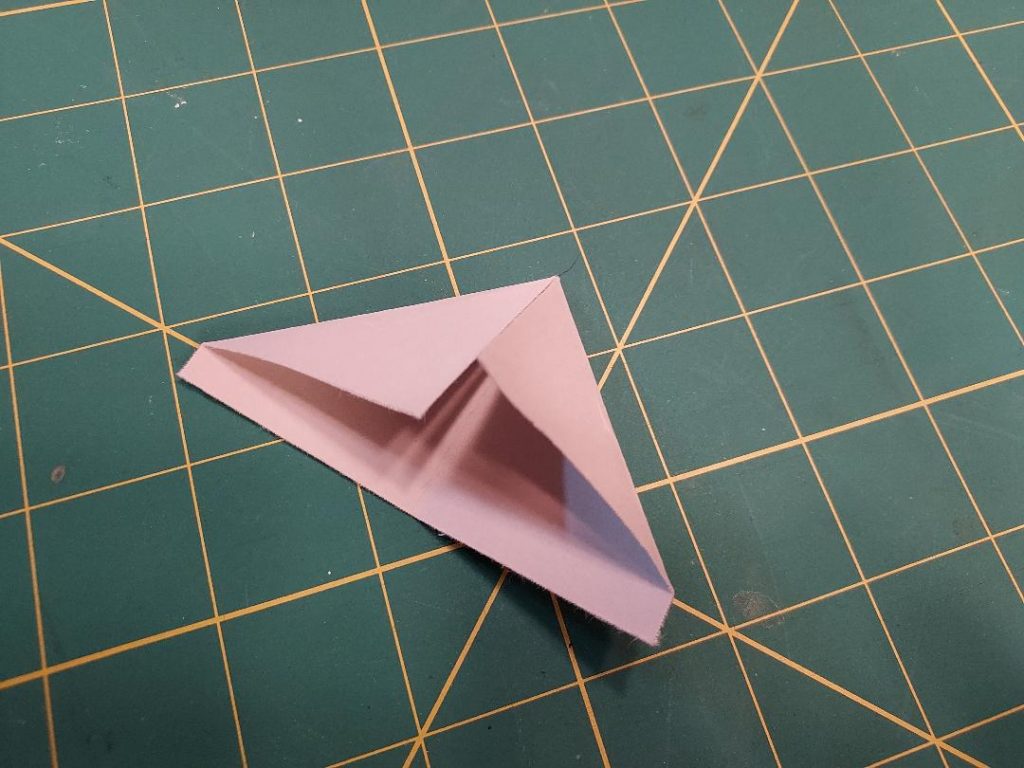
The ‘Slippery Slope’ Mouse Trap
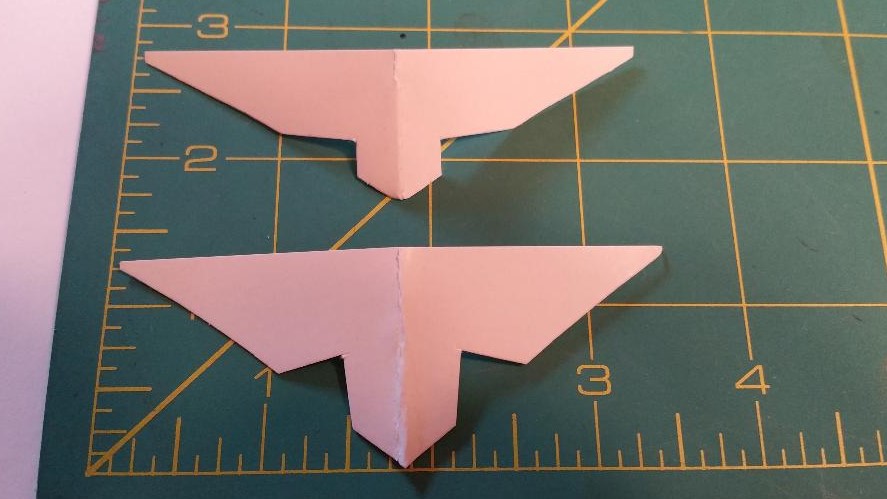
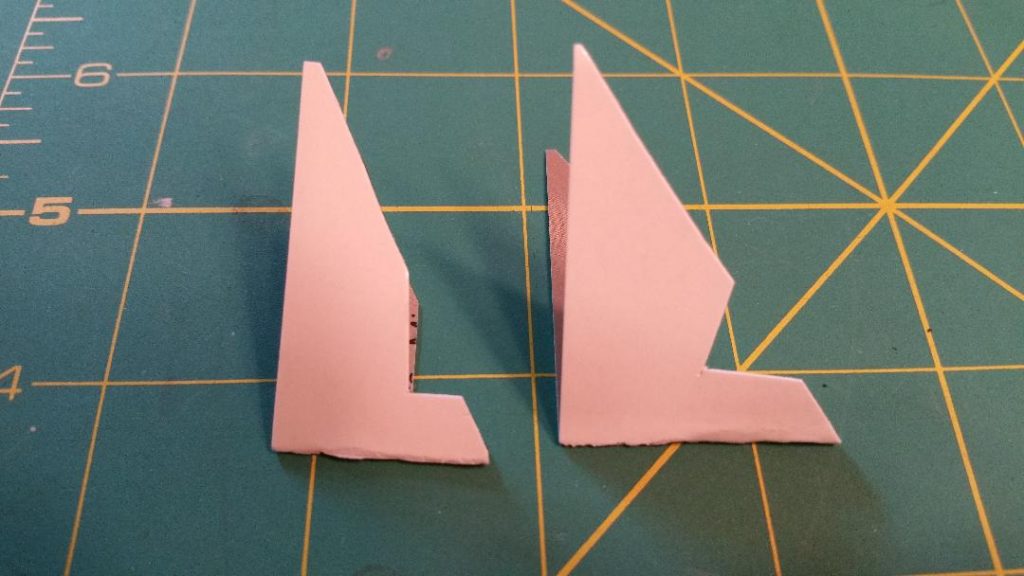
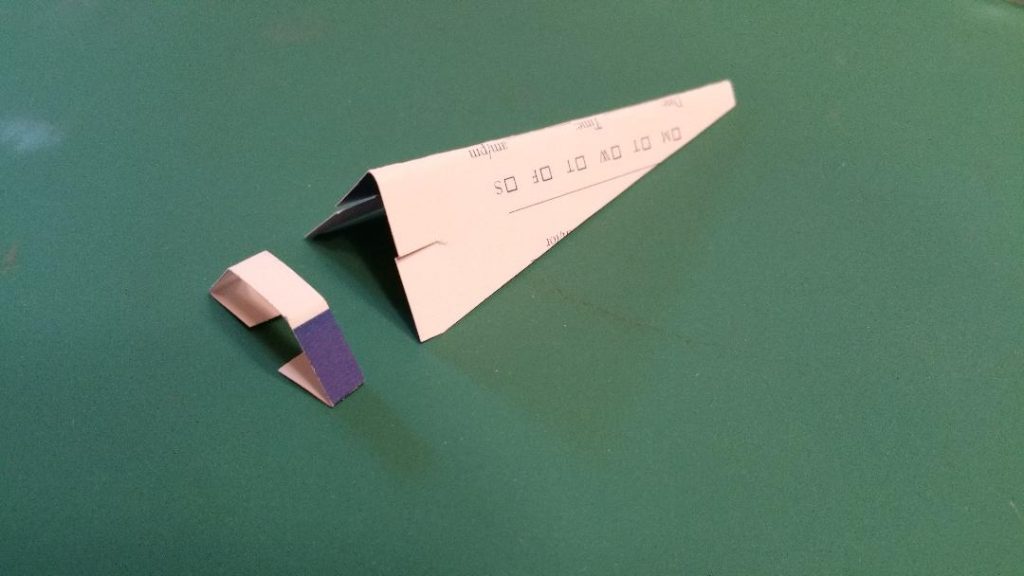
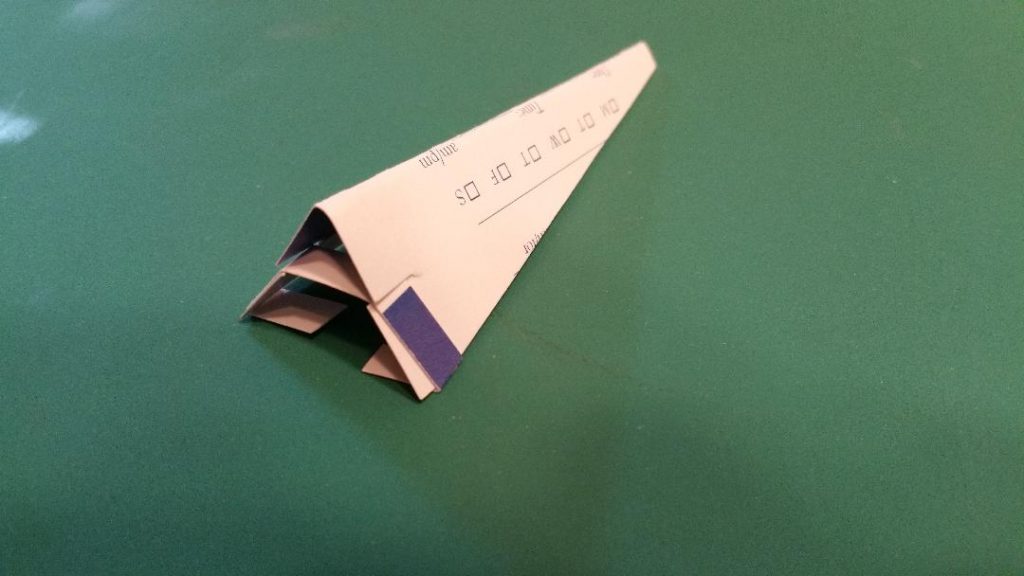
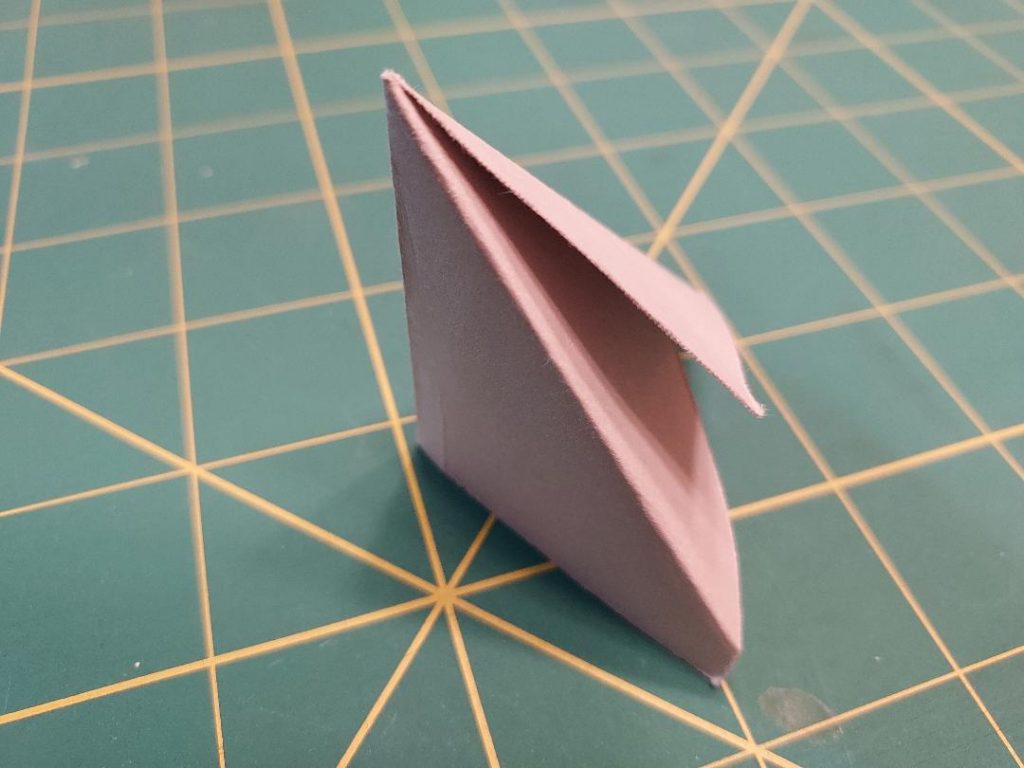
This design props a bowl edge up by resting on the bait. When the bait is eaten or removed by the mouse the bowl slides down the angled paper slope. Use a business card to make it. Fold the card in half then fold over two corners as if you are making a paper airplane. Now hold it together in a triangular shape and use a paper punch to make the hole to hold the bait.
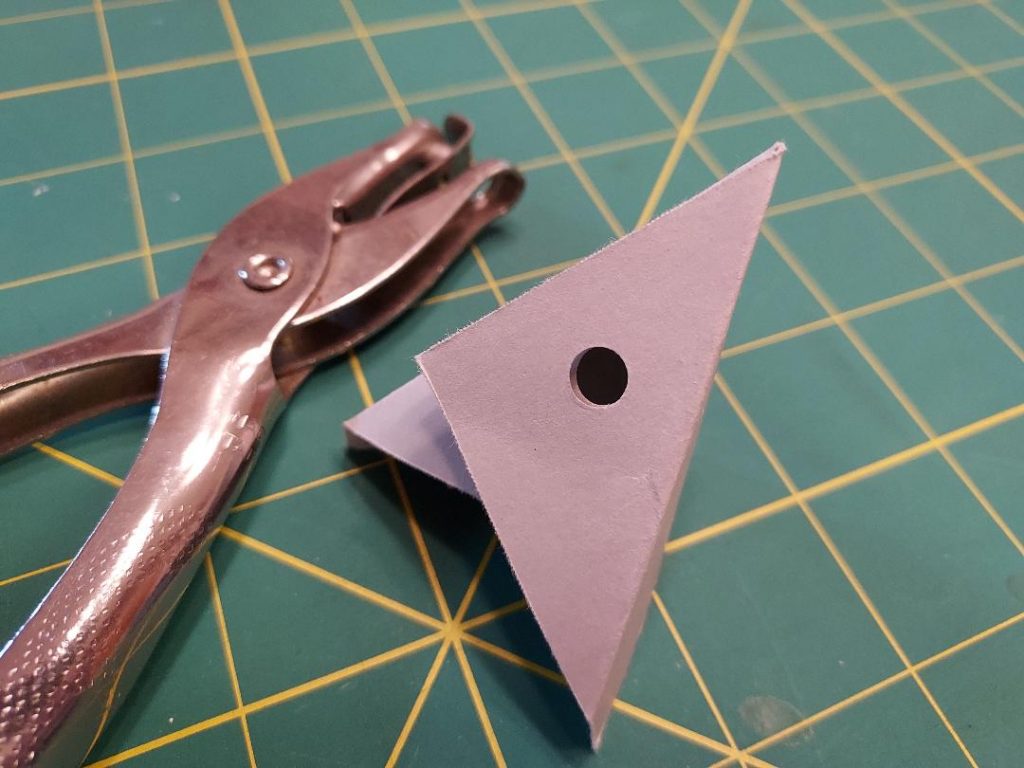
Punch the hole through both wings simultaneously. 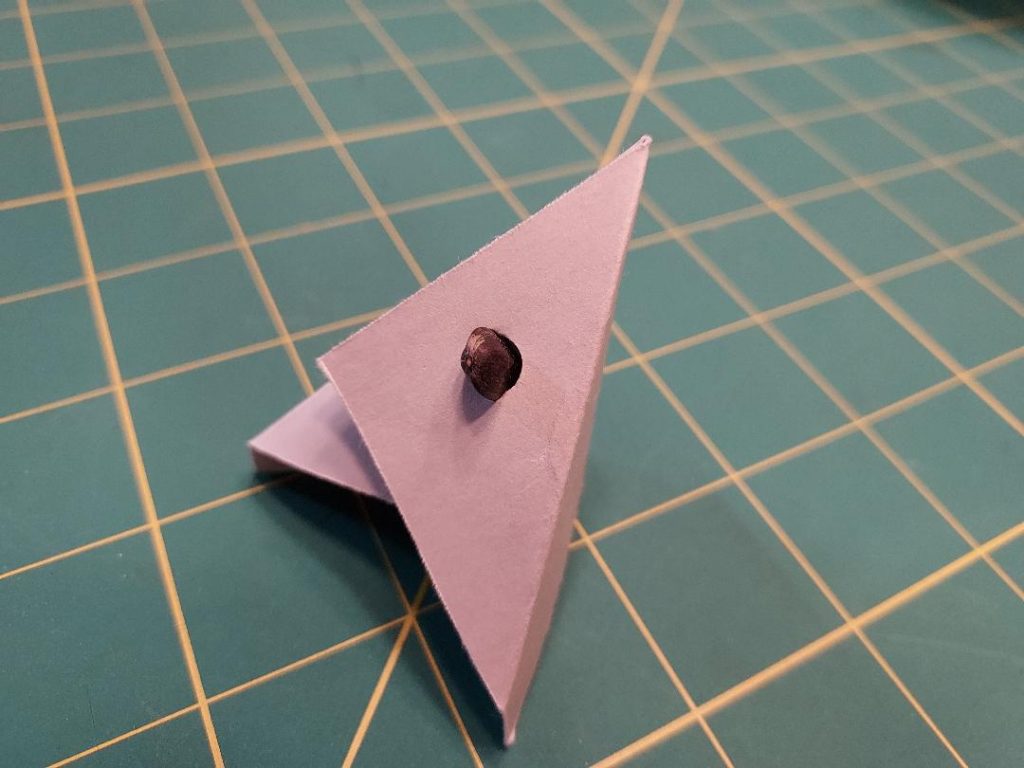
Using a sunflower seed as bait. 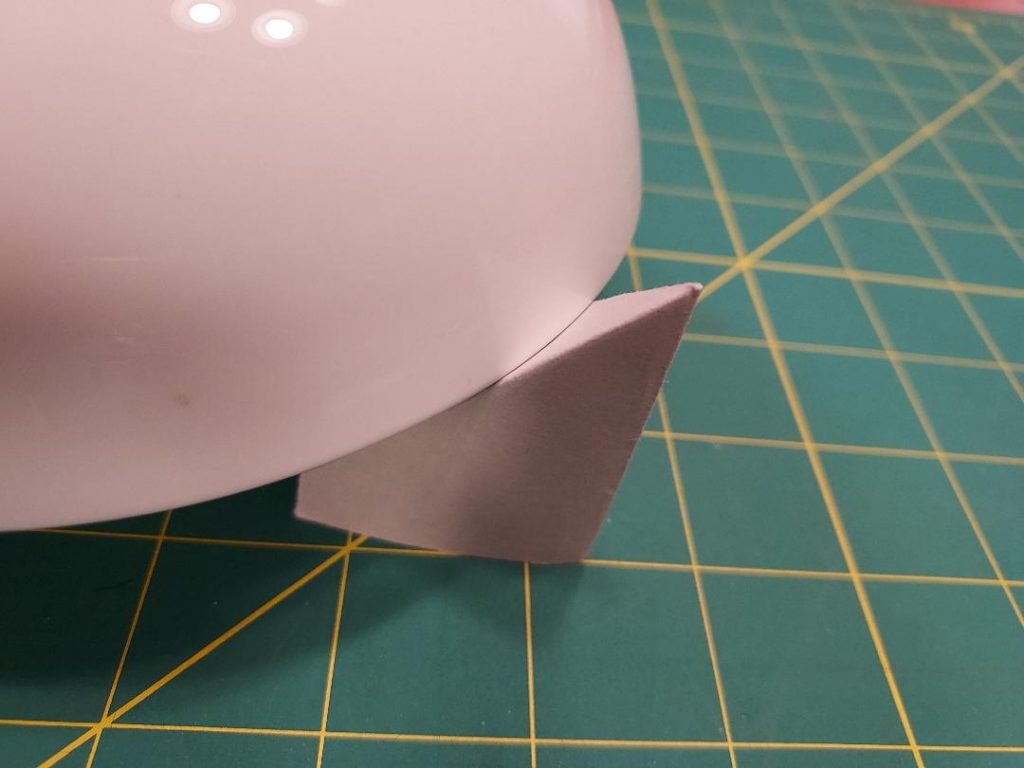
Set the bowl’s lip over the bait.
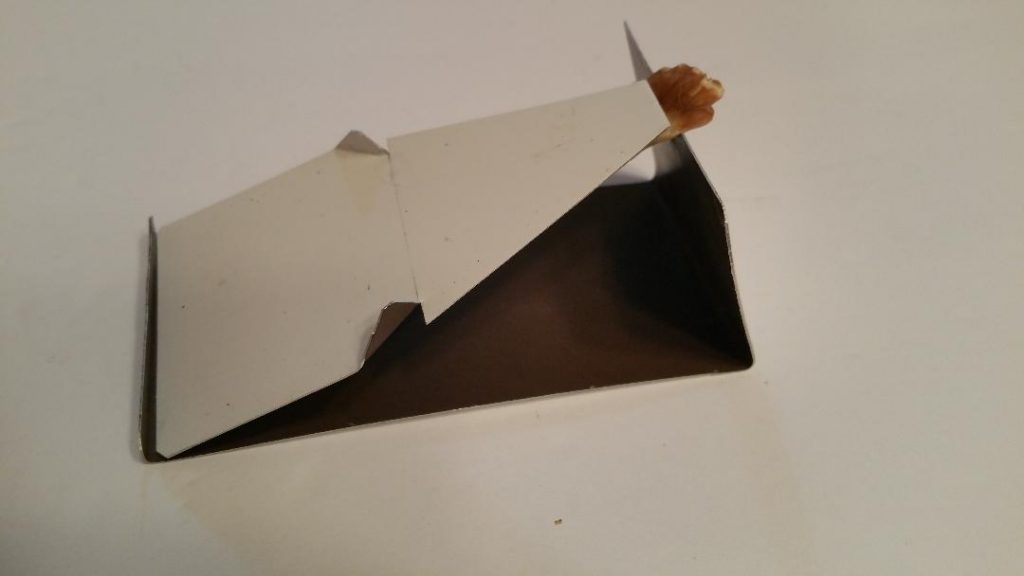
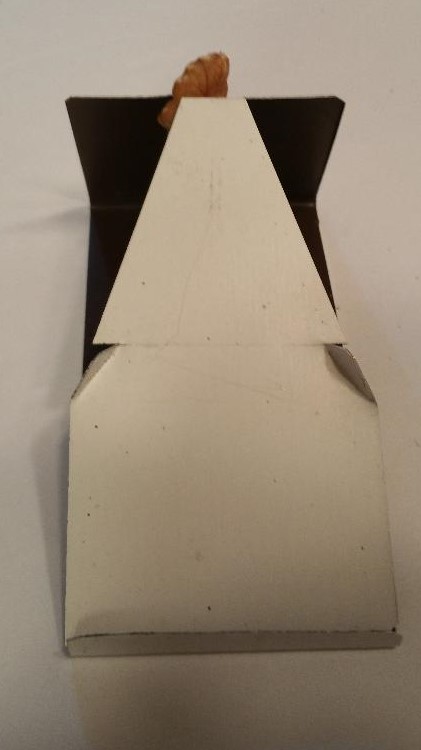
The ‘Origami Blue Whale’ Mouse Trap
A business card, one cut using scissors and a few folds makes my whale of a mouse trap mechanism for use with both hard and soft baits. The bait is placed underneath the whale closest to the tail end. The mouse will either chew open the folded locking tab that holds the whale together or move the whale around to get to the hidden bait, only to be swallowed by the bowl.
Ready to swallow a mouse. 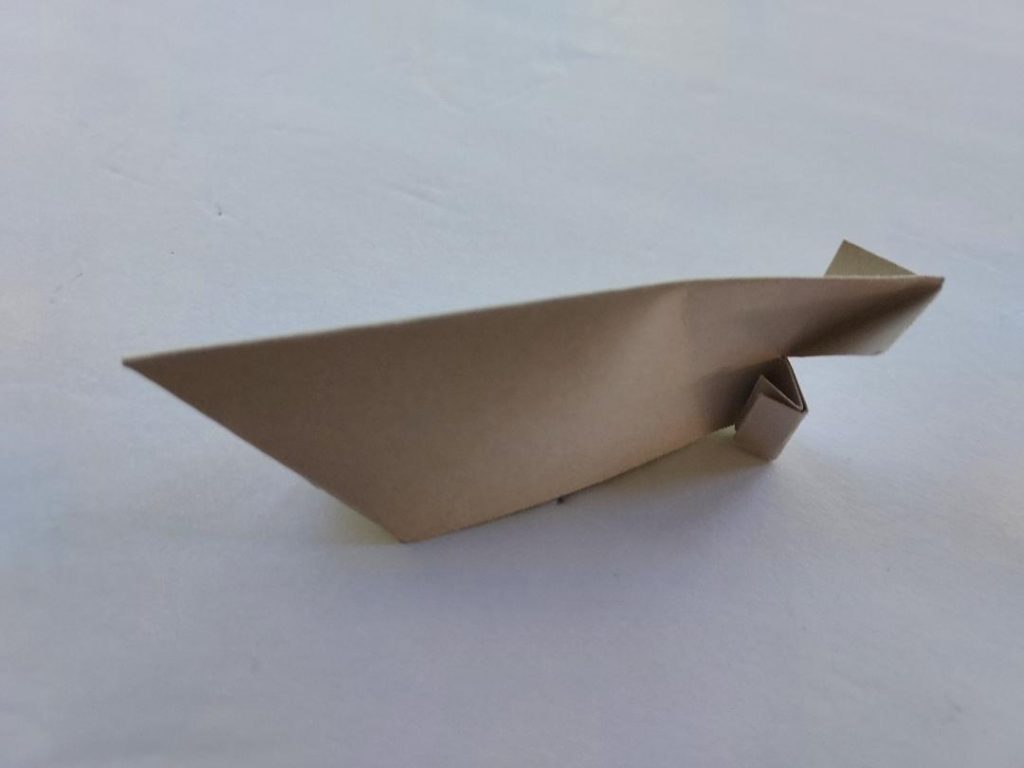
Double folded locking tab. 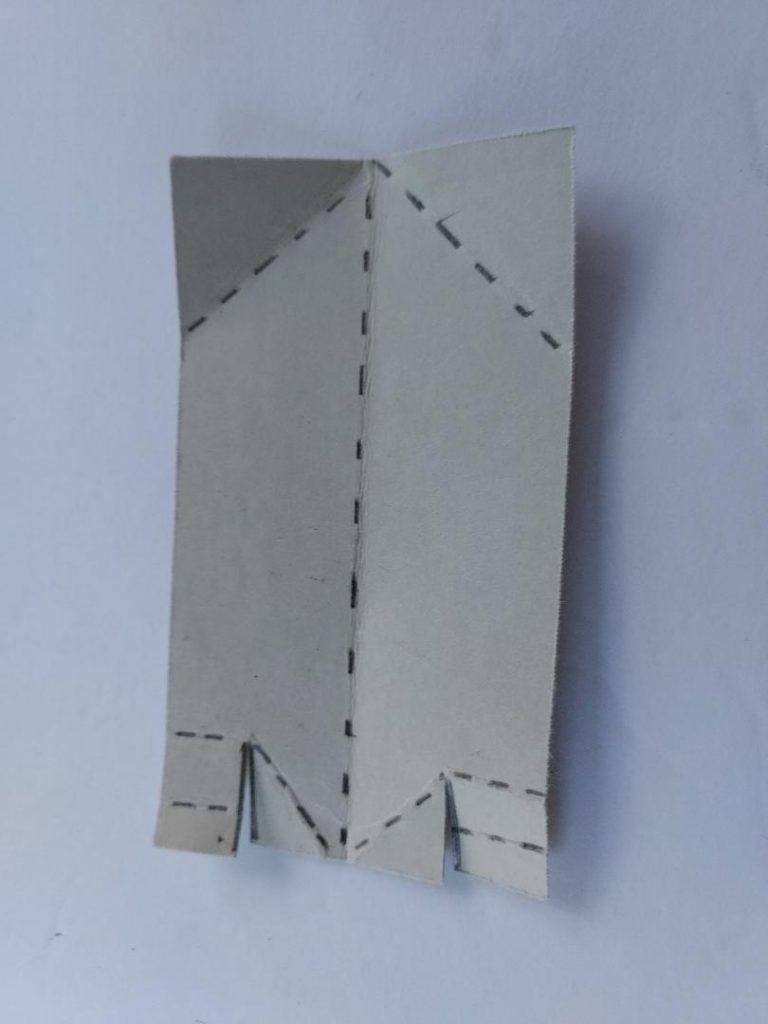
Dashed fold lines. 
The ‘Locked Wedges’ Multi Purpose Trap
Here is my multi purpose trap mechanism design that can be used to catch mice or larger rodents. Two wooden wedges are used to prop up a large container and are held together by a moving trip lever. The trip lever’s fulcrum point rests against the two locked wedges. When a small amount of downward pressure is applied to the baited end of the trip lever the two wedges separate and fall apart. The container edge can either rest in the crotch of the mechanism as shown below or on the top of the stacked wedges.
The ‘Inverted Triangle’ Mouse Trap
This design uses a pivoting triangle and 14 gauge copper electrical wire. It is a variation of the Leading Edge mouse trap design.
The ‘Garbage Truck’ Mouse Trap
Only 1-3/4 inches tall and wide this design is a container lifting powerhouse and uses a variety of different hard bait. The wire used is 14 gauge copper electrical wire. When the mouse eats the bait the wire arm clenching the bait swings over the cab dropping the lift arm supporting the container.
Tripped position. 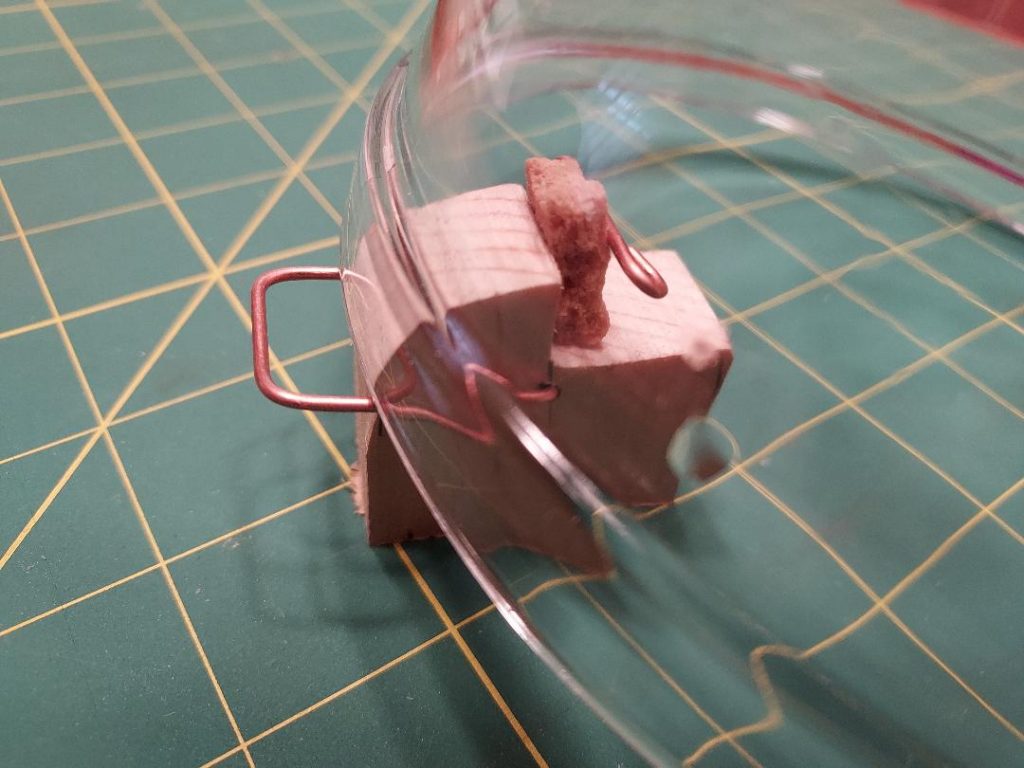
Make a fleet!
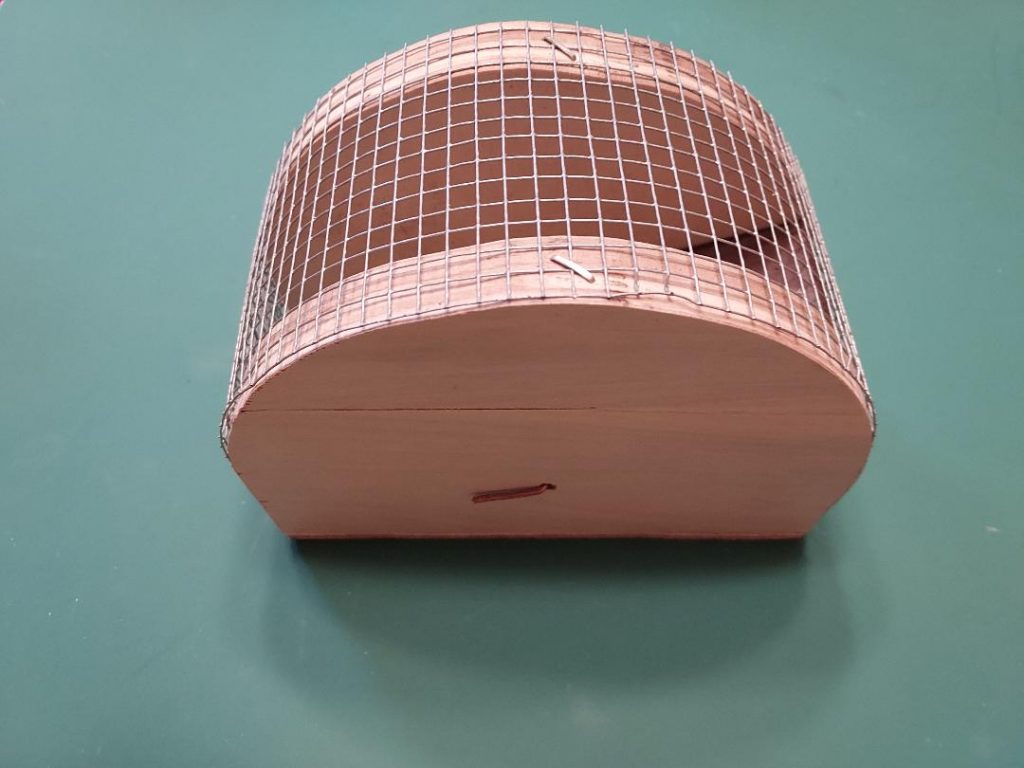
The ‘Mailbox’ Mouse Trap
I used the back of a mailbox as a template for the wood side dimensions and aluminum flashing to make the pivoting ramp mailbox chute action. The pivoting ramp is balanced, however, with the addition of a stiff wire leg hanging from one end of the ramp, the chute entrance side of the ramp remains open. When the mouse enters the chute opening and crosses the balance point of the ramp to get to the bait, the opposing ramp end drops permitting the wire leg at the entrance to become suspended vertically. The wire leg prevents the ramp from dropping again keeping the entrance chute blocked.
Chute entrance. The hanging wire leg is folded under the ramp. Trap is set. 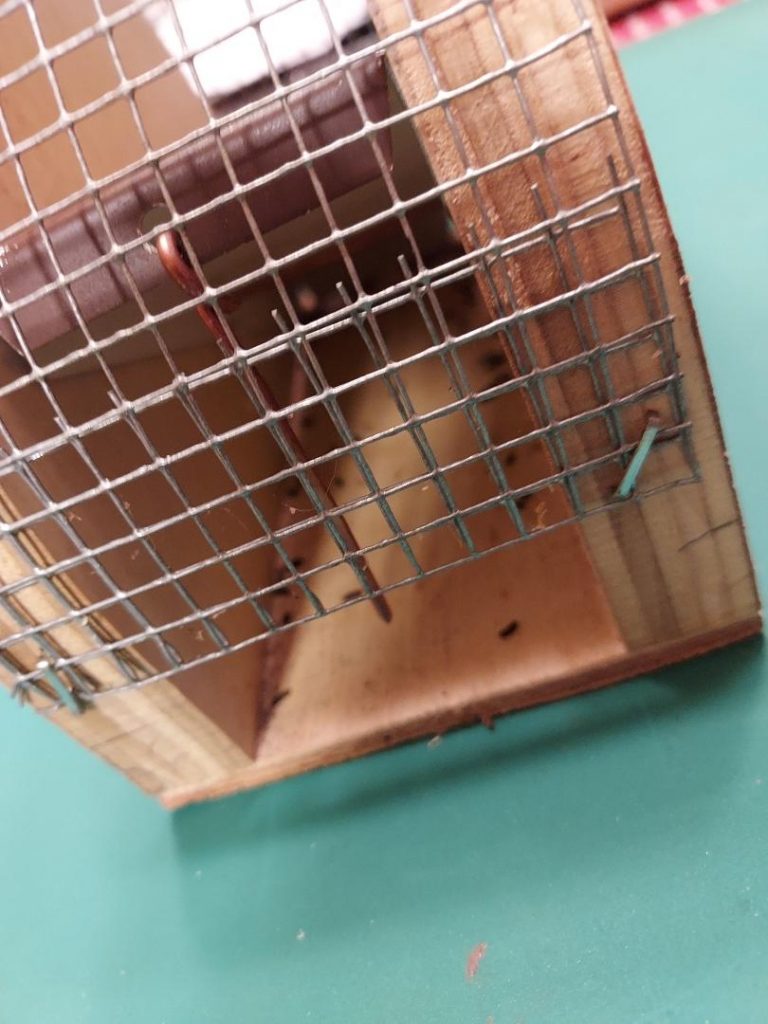
Look closely to see the hanging wire leg. Trap is tripped. 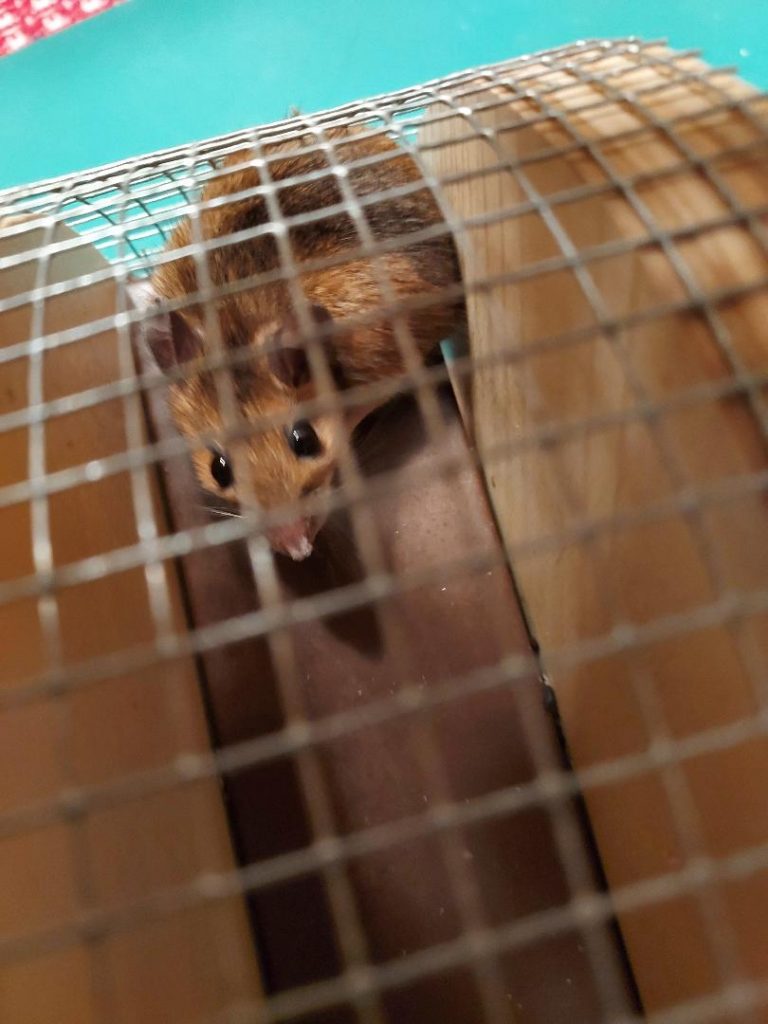
“You’ve got mouse mail!“
The ‘Moon Bridge’ Mouse Trap
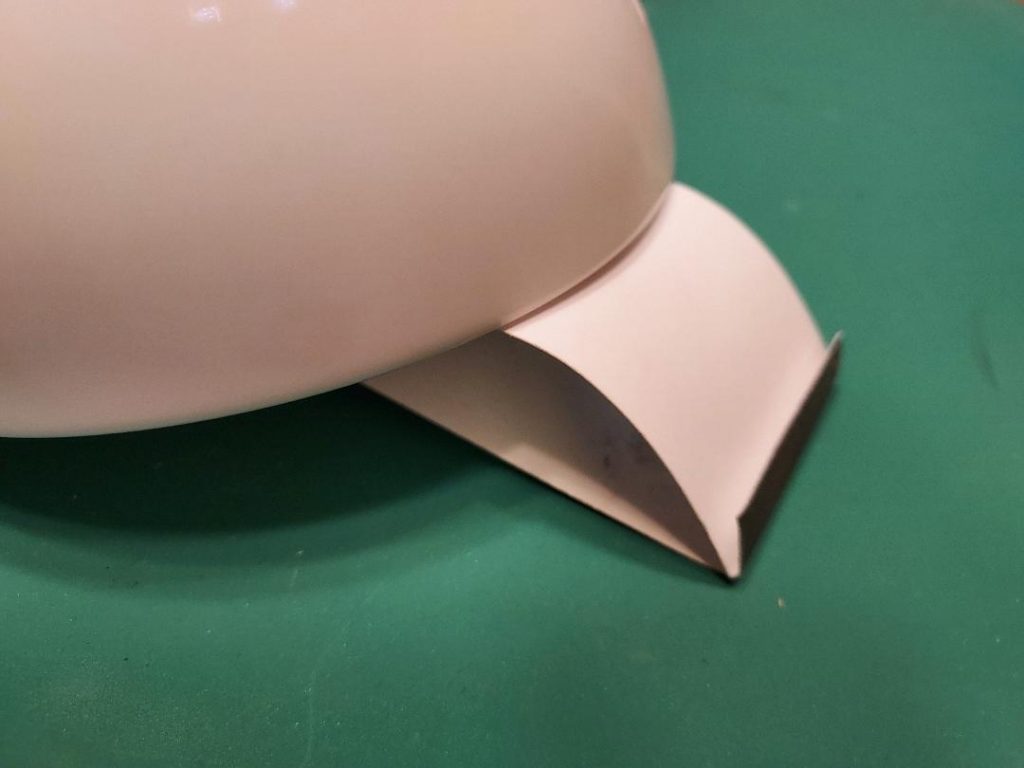
A business card held in an arched shape with a piece of bait makes a great container prop. When a mouse eats or takes the bait the business card flattens dropping the container over the mouse. You can use a piece of thin plywood, wire, sheet metal or a can lid to make this trap mechanism design.
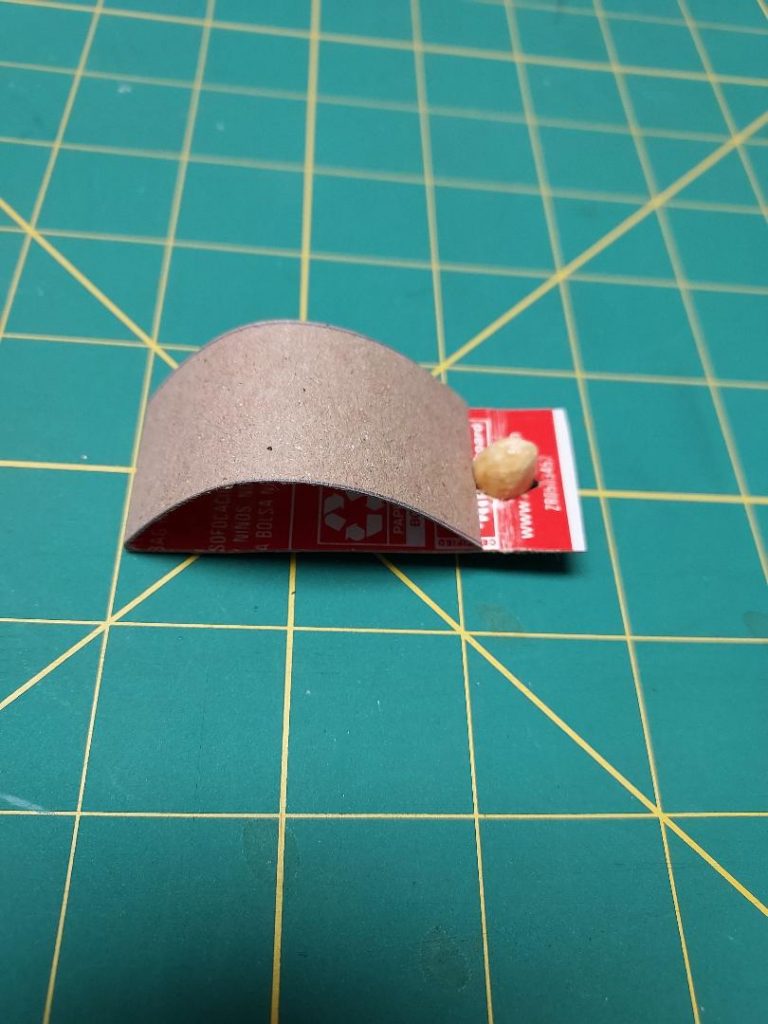
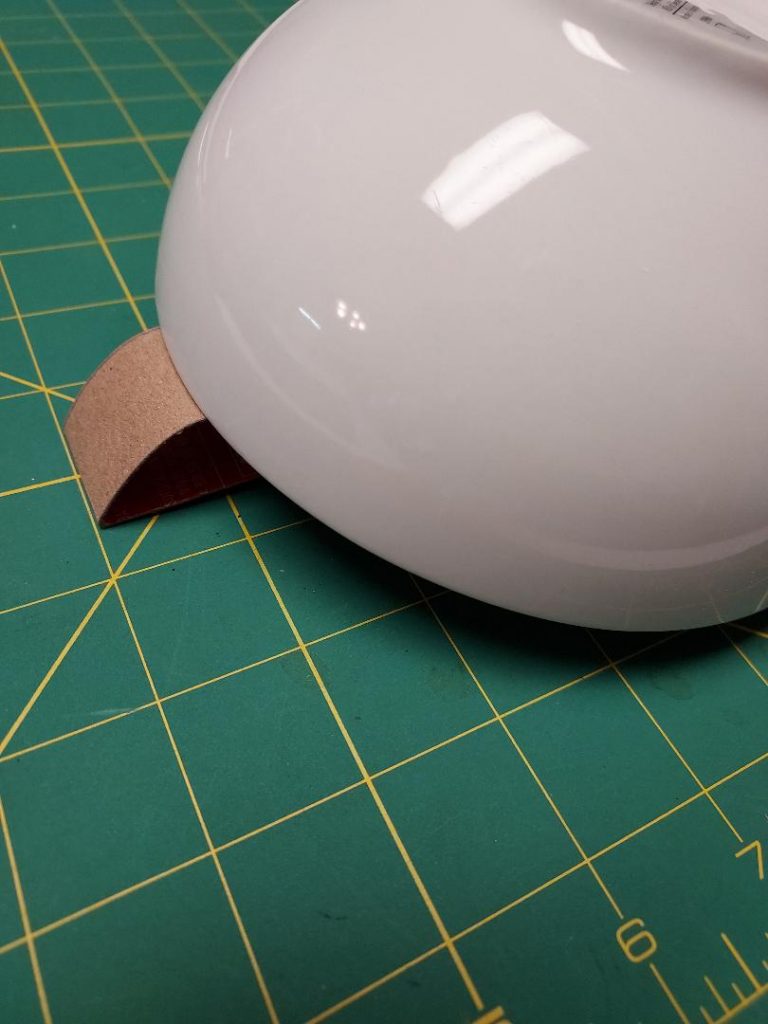
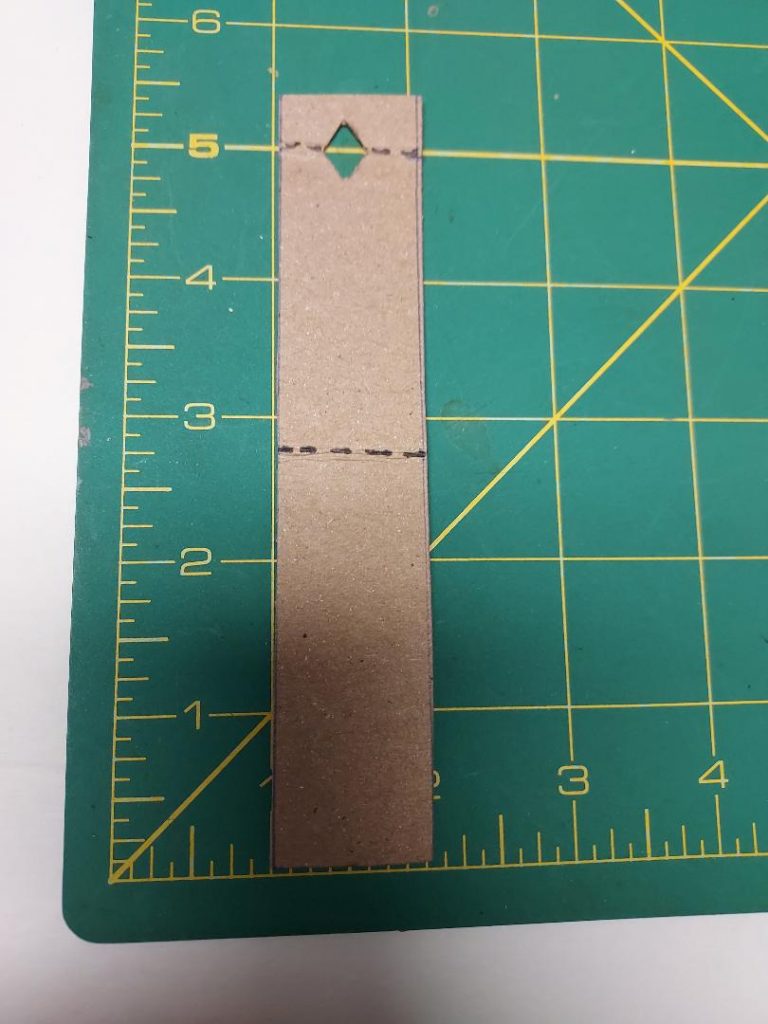
Gracie’s ‘Wave’
A simple design made from a 1″ x 5″-1/2″ strip of cereal box or similar cardboard. To make it fold the strip evenly in half and then fold a 1/2″ tab at one end and cut a small triangle centered on the fold seam then unfold. The resulting diamond shaped opening that holds the bait needs to be appropriately sized so that the bait lodges firmly in it. An alternate bait holding opening can be made by cutting a small ‘V’ instead of the triangle. The ‘V’ becomes a ‘X’ opening when it is unfolded.
Insert the bait and carefully fold the top long tab so that it creates a round, apex shape when lodged against the bait. A peanut is being used as the bait in the picture below. Place a container over it so the lip of the container rests on the apex. The trap is set! This design can be scaled up or down in size to change the height of the opening for mice, rats and other critters.
Multiple Mouse Catching Mechanisms
Below are some of my designs that catch more than one mouse:
The ‘Floppy’ Front Door and Side Door Mouse Traps
1/2″ PVC pipe is used to make light, floppy doors that will only let a mouse pass through in one direction. The cylindrical PVC pipe moves easily and is difficult if not impossible for the mouse to grasp. Because the door is so light there is very little effort needed by the mouse to move it out of the way to get in. Unfortunately for the mouse, there is not enough room for it to negotiate opening the doors to get out.

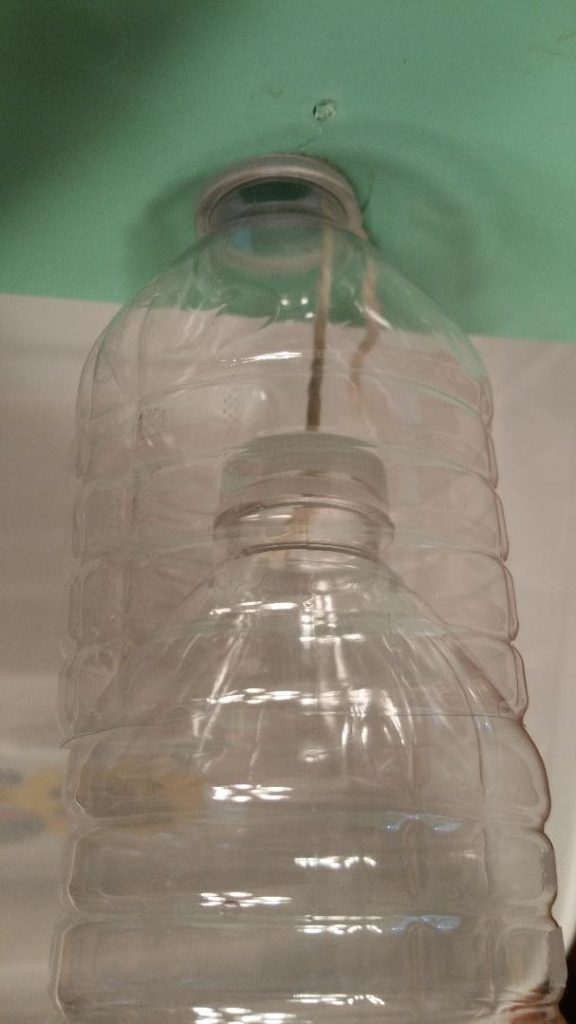
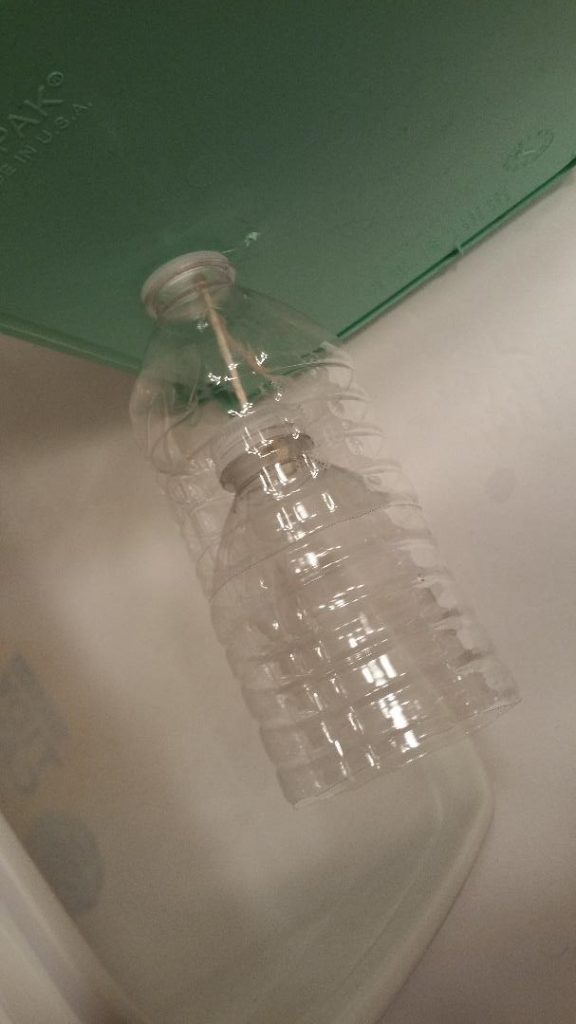
The ‘Nook and Cranny’ Bottle Mouse Trap
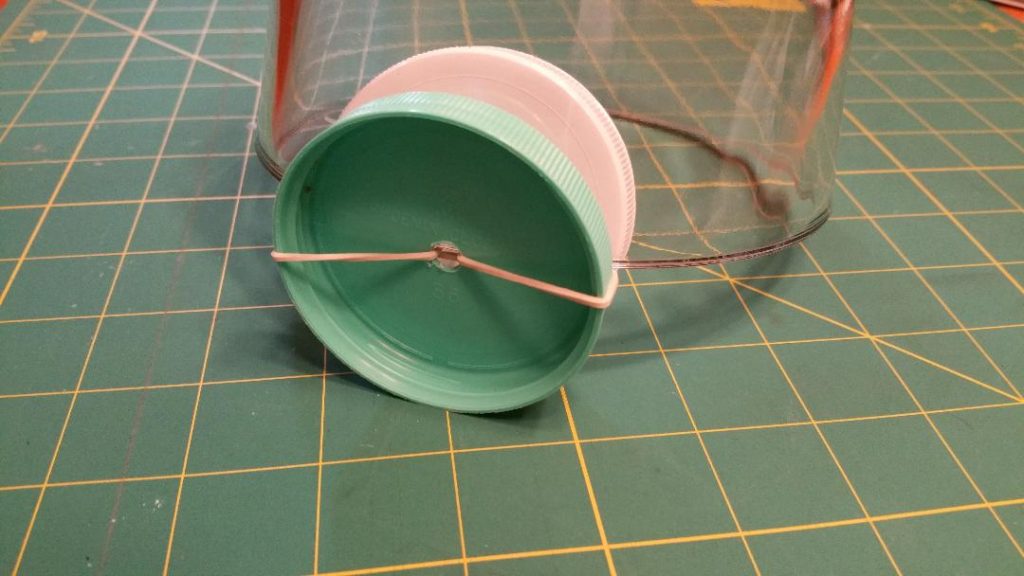
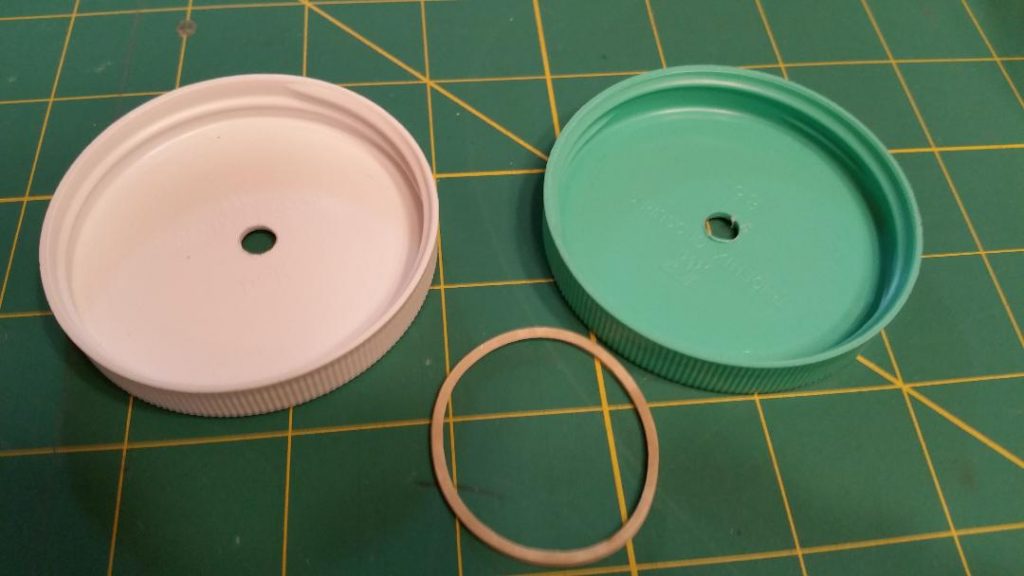
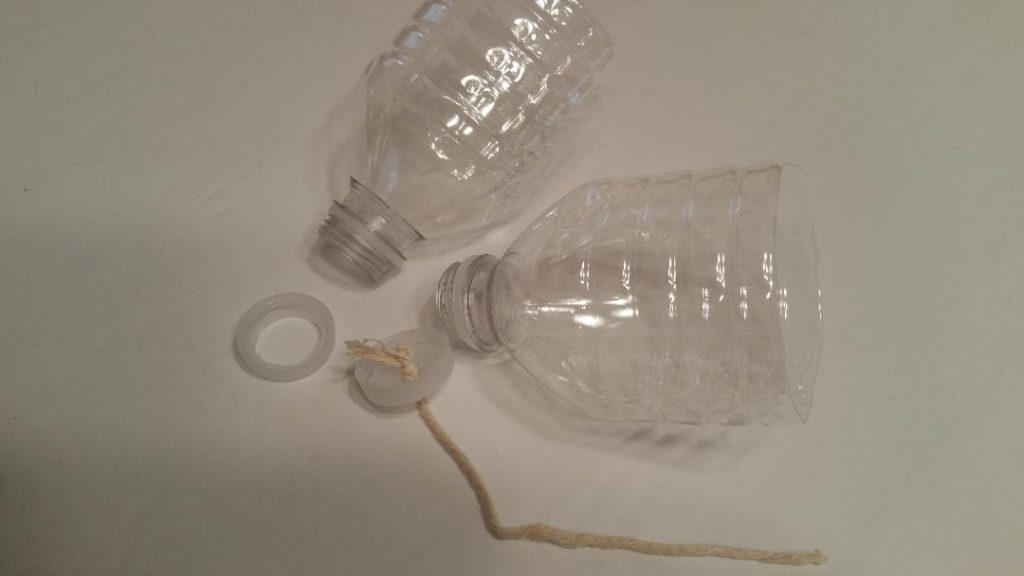
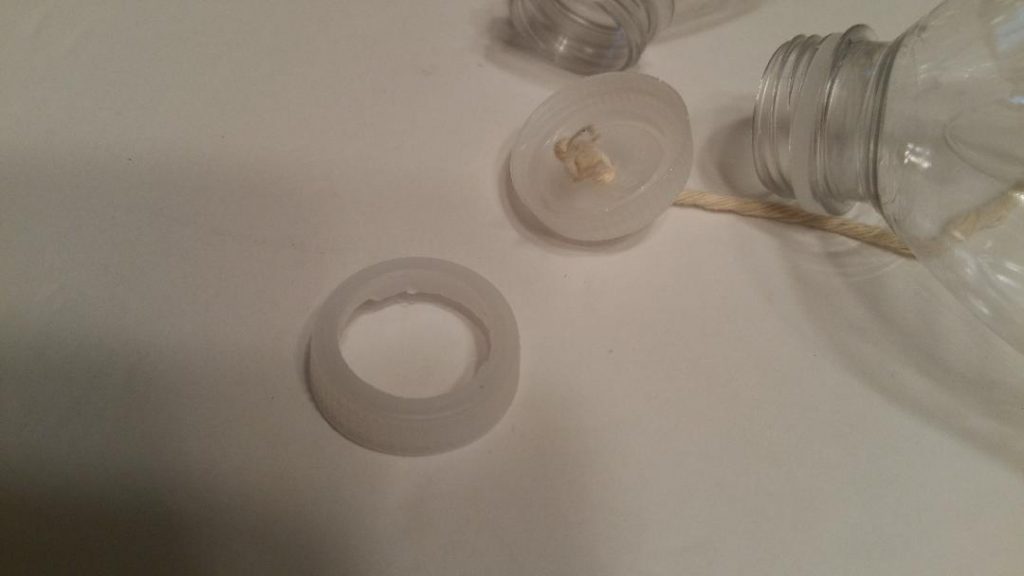
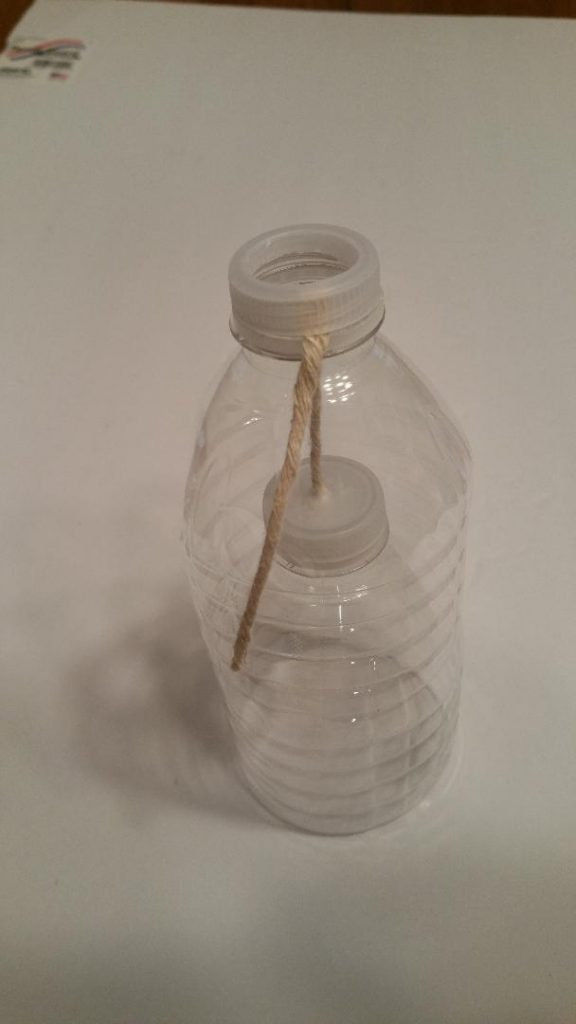
This is a top down design that utilizes larger containers. Drill a 1″ hole in the top lid or cover of the container and attach the mechanism below. It is made using two plastic water bottles halves and a piece of string or wire. Cut a hole in one of the screw-on bottle caps. The easiest way to do this is to screw the cap on the bottle and use a sharp knife to cut the opening cutting in the clockwise direction. Puncture a small hole in the other bottle cap for the string or wire to attach to. Tie a large knot on one end of the string and thread it through the bottle cap. Screw the cap on the lower bottle half and run the string through the upper open bottle. Insert the upper bottle through the lid hole and lay the string over the edge of the bottles threaded opening. Now screw the open bottle cap over the string on the threaded opening to hold it to the lid. The string just needs to be taut enough to hold the two bottle halves together and no tighter. This mechanism can also be mounted on a thin sheet of sturdy material and then placed over an open bucket or trash can.
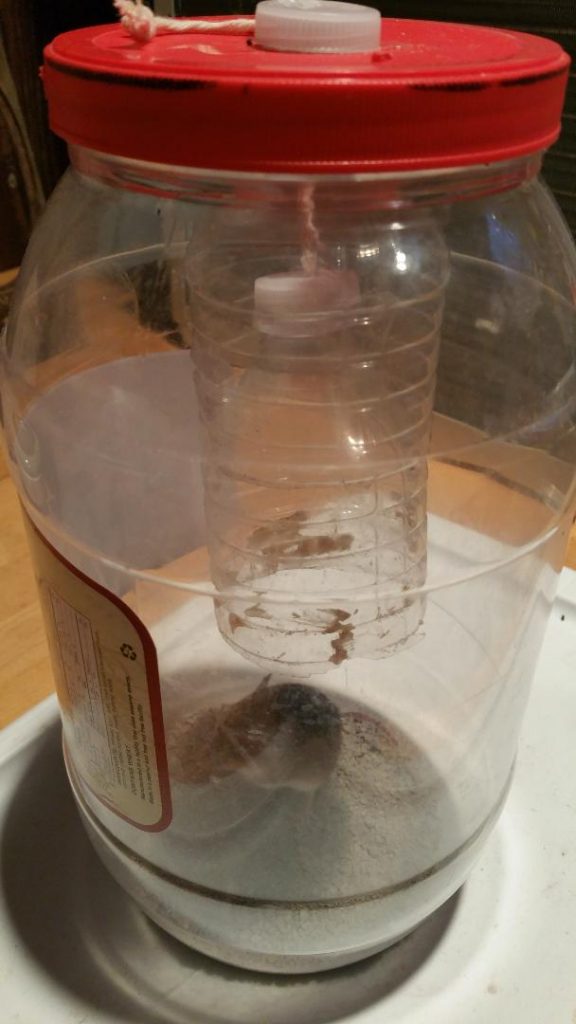
The mice enter the hole to get into the nook and then proceed to squeeze through the cranny between the two bottles to get to the bait on the underside of the lower bottle. Once they get through the cranny there is no turning back and they drop to the bottom of the container. When they try to escape by jumping up they can’t cling to bottles and there is no opening to escape through.
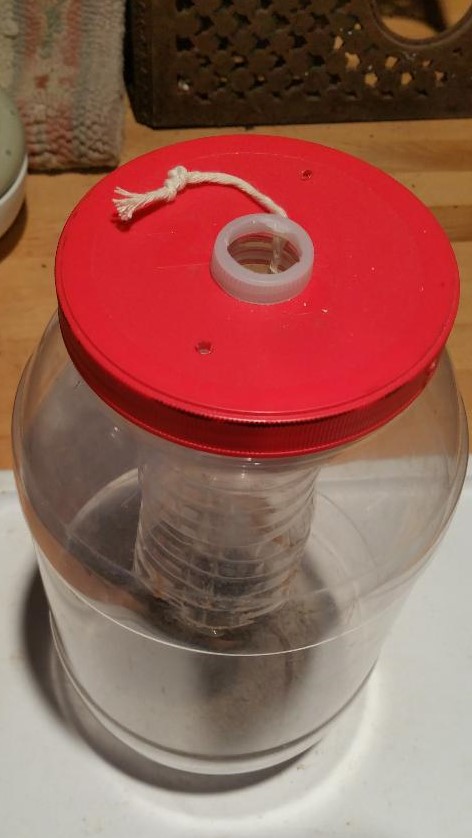
Using the Nook and Cranny trap mechanism in a large plastic pretzel container shown below. I placed a small amount of unscented cat litter at the bottom to soften the fall and to make cleaning easier.
Lands softly on cat litter. 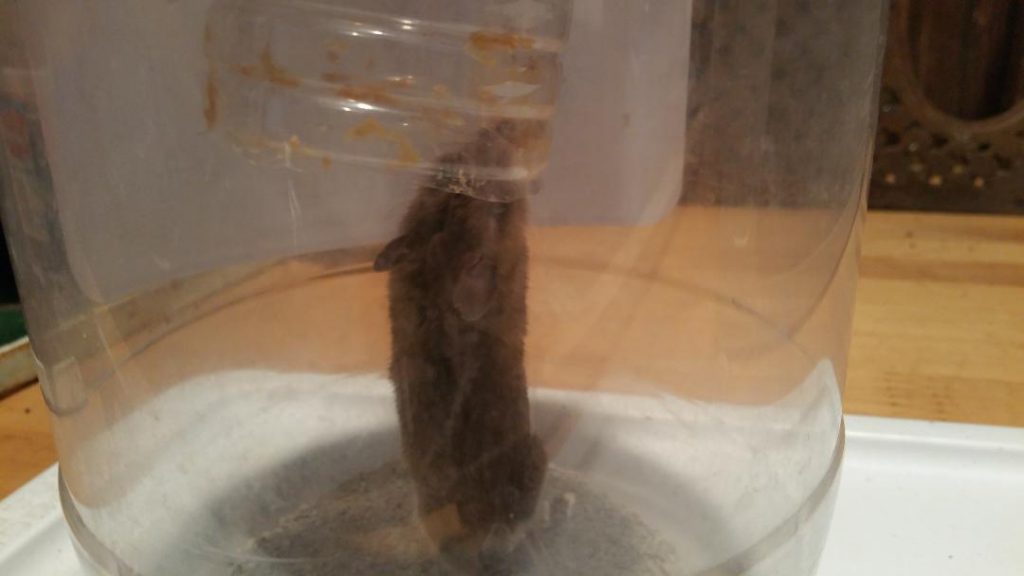
Pondering an exit strategy. 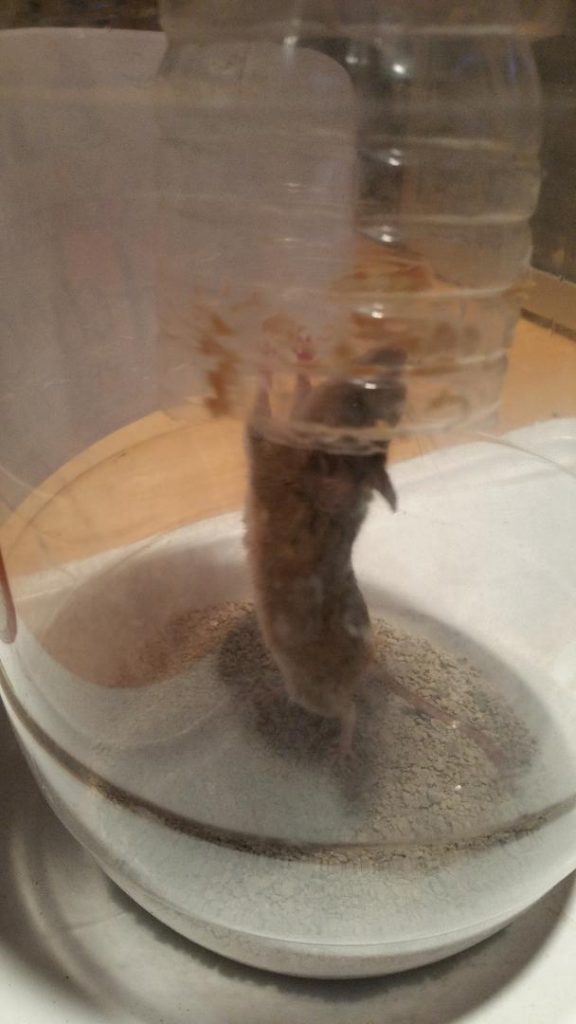
“Yikes! There is no way back out!”
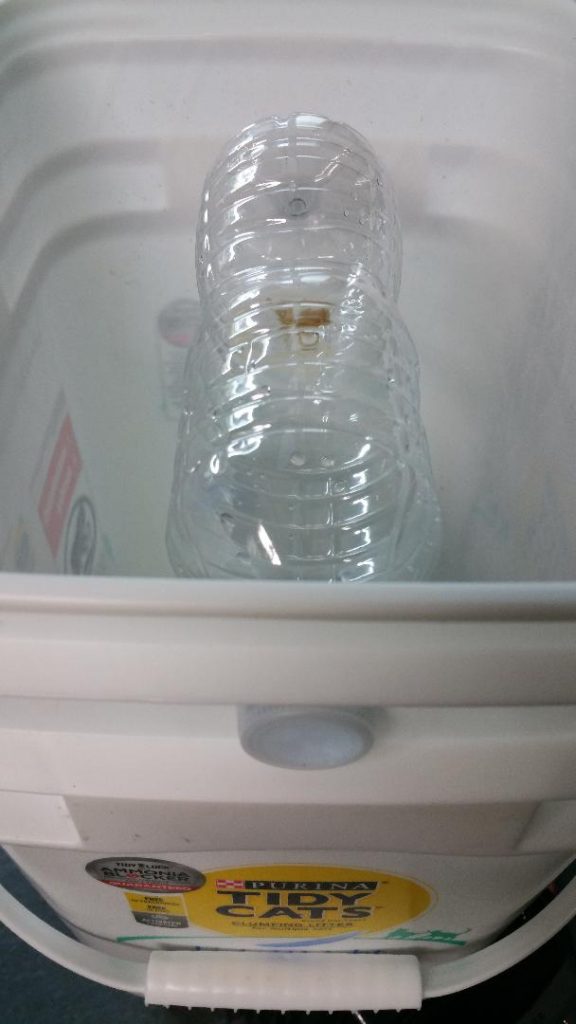
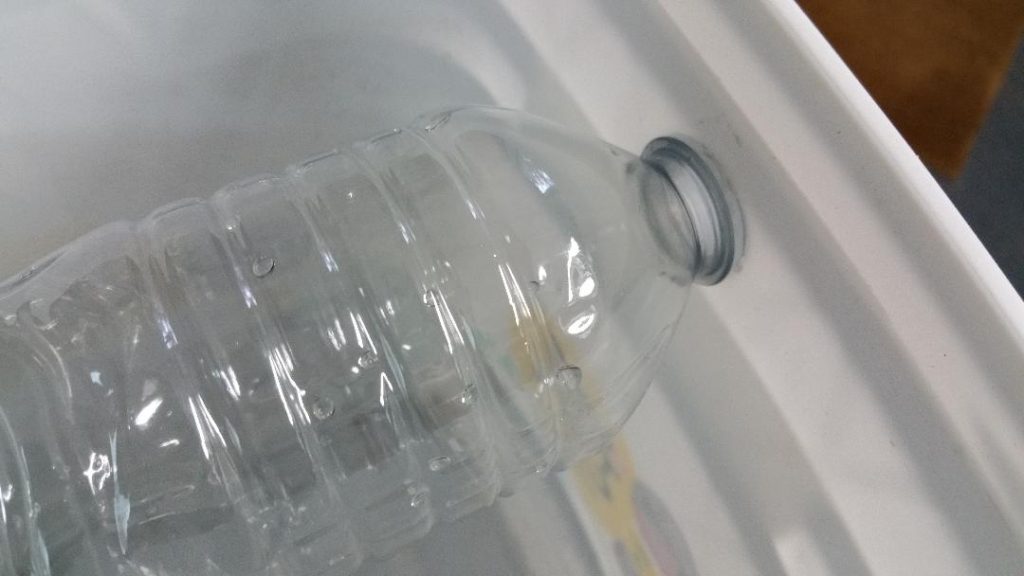
The ‘DUMB’ Mouse Trap
The DUMB (Drop Unto My Bucket) mouse trap has no moving parts and relies on the mouse to make a risk versus reward decision. The mouse has to attempt to cling to the sides or end of the bottle to reach the peanut butter bait on the underside of the bottle. The bottle seems to provide a better sense of security as opposed to an empty bucket with bait spread on the inside surfaces. After losing its grip the mouse drops in the bucket. You will need to use a very deep container so the mice can’t jump out. Place crumpled newspaper or sawdust in the bottom to cushion the fall.
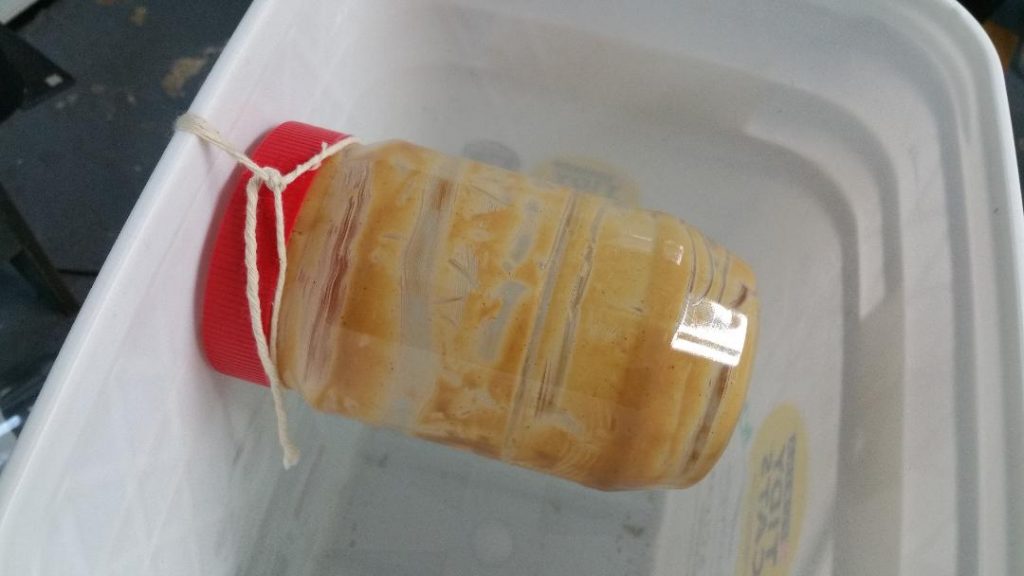
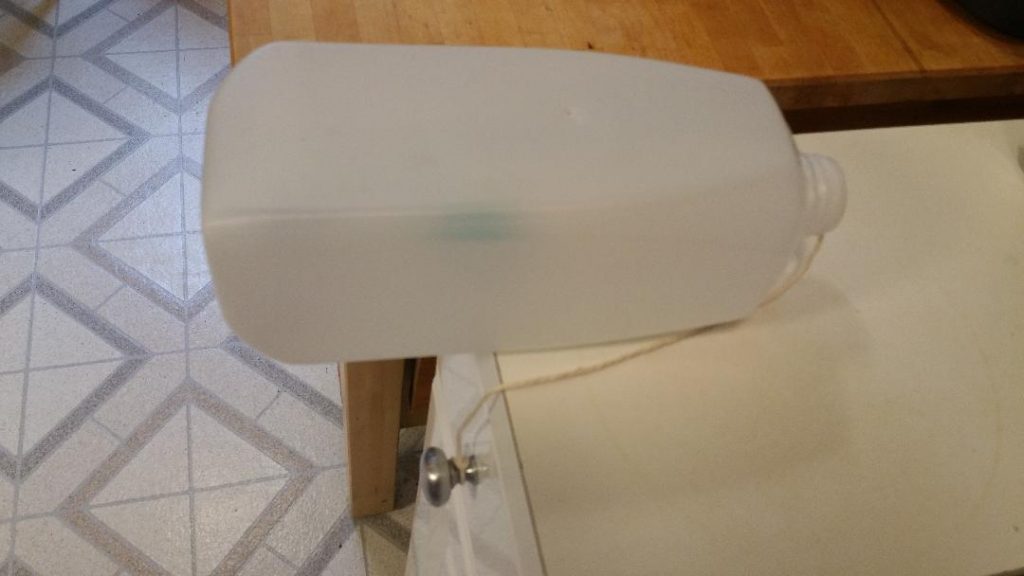
The bottle can be mounted a few ways. Drill a 1″ hole in the side of the bucket and use the bottle cap to hold the bottle in place or screw the bottle cap to the side of the bucket. Or, mount the bottle to a hanger made from wood. Larger containers like a peanut butter or mayonnaise jar can be hung with a string or wire, or screw the cap to the inside of the bucket. Remove the labels and if there is any residual label adhesive on the container make sure it is positioned downward.